3d-printable terrain for all your samurai wargaming needs


It's been a while in development, from design, to test prints, and finally to painting.... but we have a new release to announce today! The new Samurai Shrine Set set is now available for download, and it's a BIG set!
Let's take a look at all the contents of this massive set.....
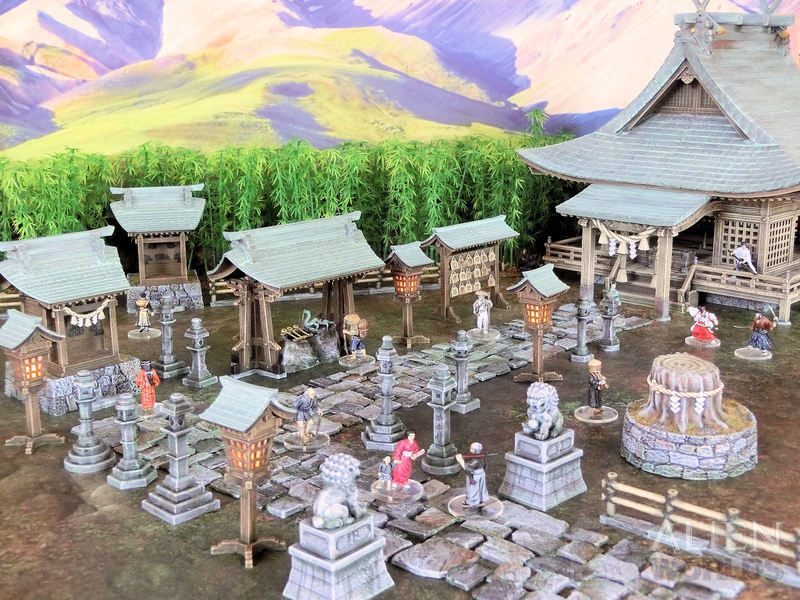
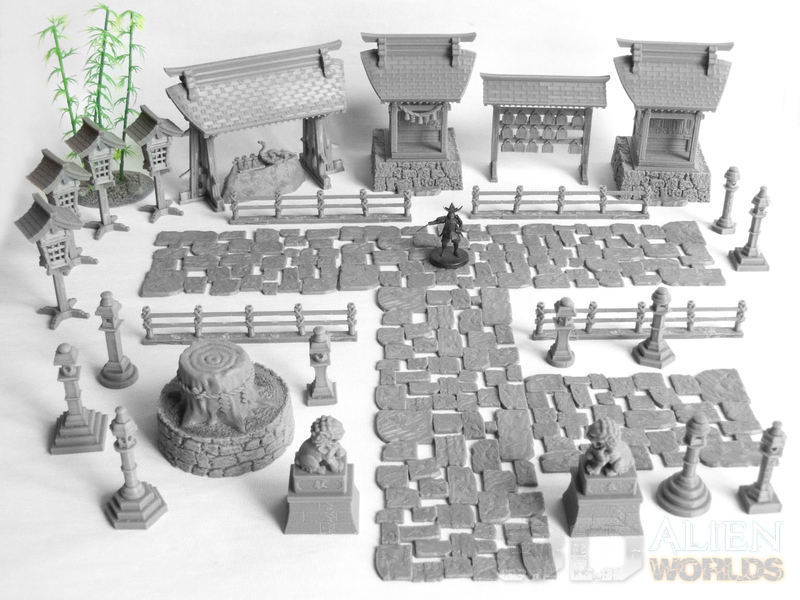
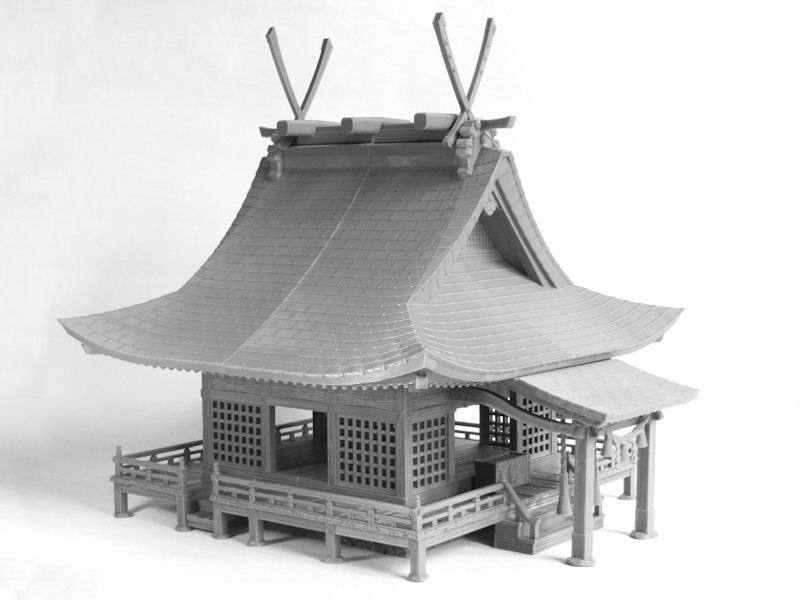
▲ These are all the models from this new set, and it really was quite a squeeze trying to fit them all into one photo!
It's time to take a closer look....
▲ It's a busy day at the local shrine, with housewives, beggars and priests all making their way along the rough stone path to wish for good fortune.
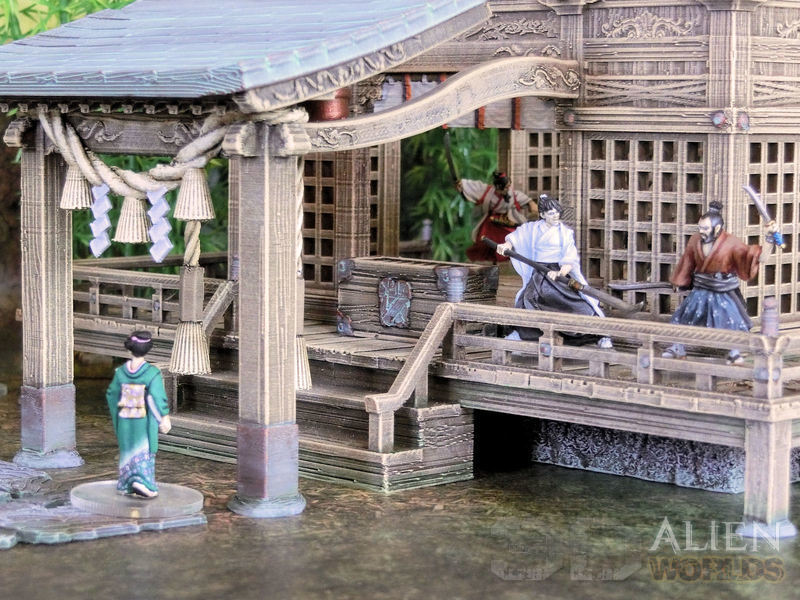
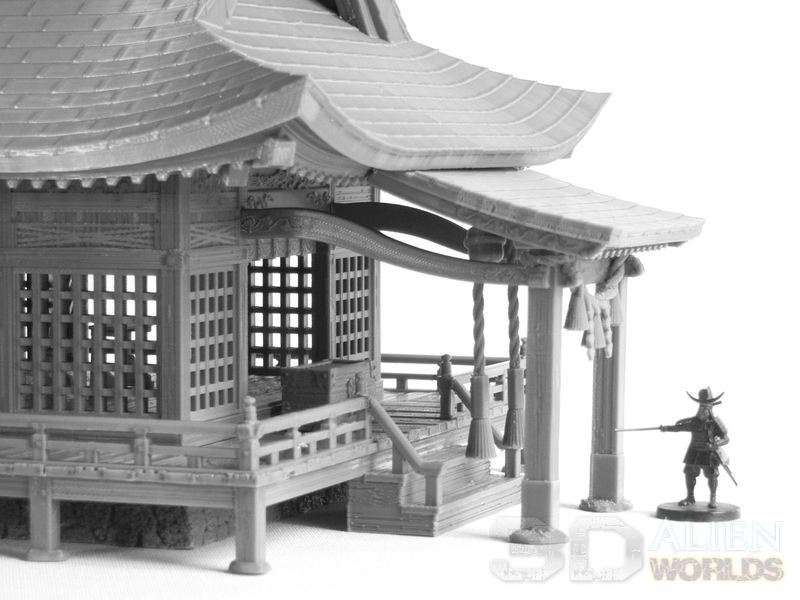
▲ Some disrespectful samurai have even dared to start a fight right on the balcony of the main shrine building! The shrine staff look like they have it well under control, so perhaps Tomoko the geisha won't need her dagger after all?
Check out those lovely carved wooden details on the walls of the shrine, and the thick bell ropes!
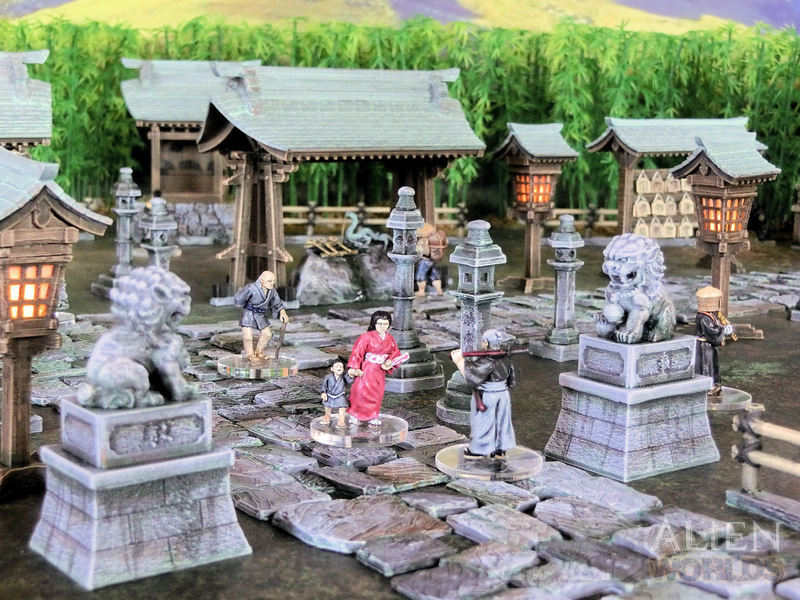
▲ The local dojo master stops for a chat with one of the shrine's visitors, under the watchful eyes of the komainu liondog statues near the entrance.
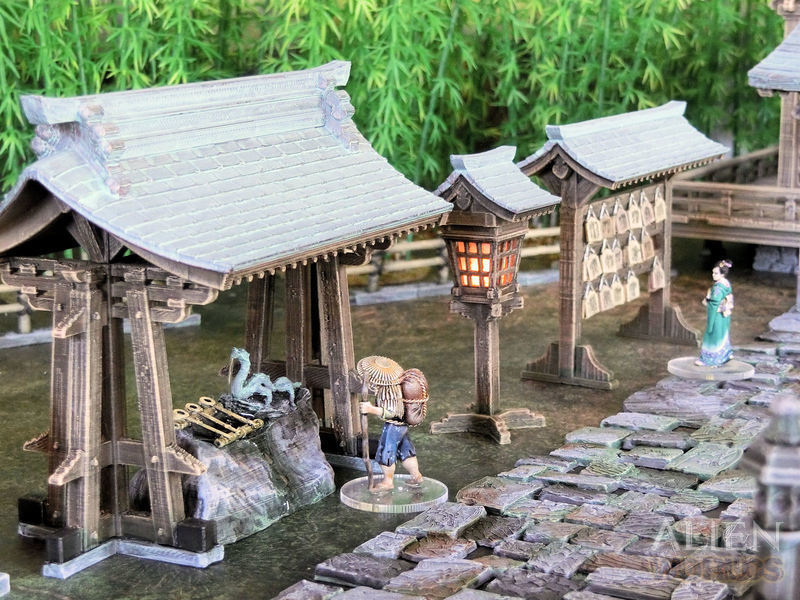
▲ A wandering peasant stops at the dragon fountain, to ritually wash his hands before entering the shrine proper.
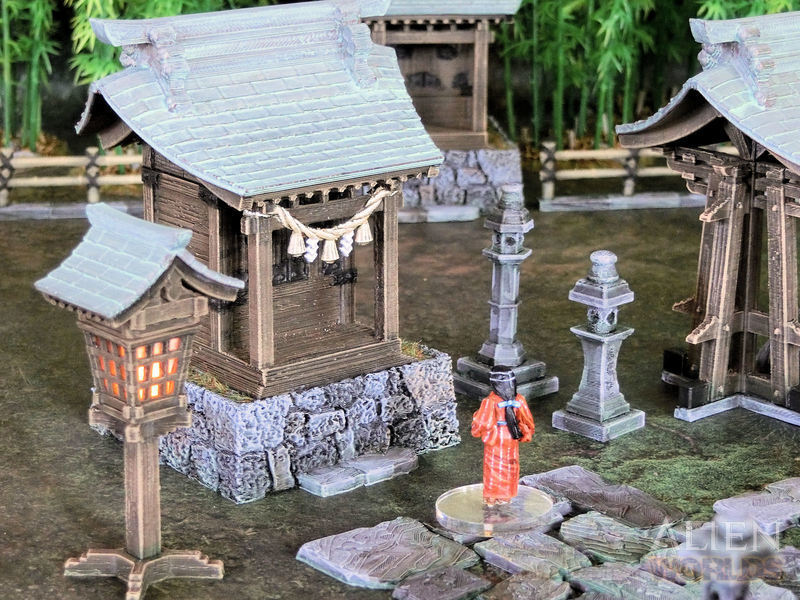
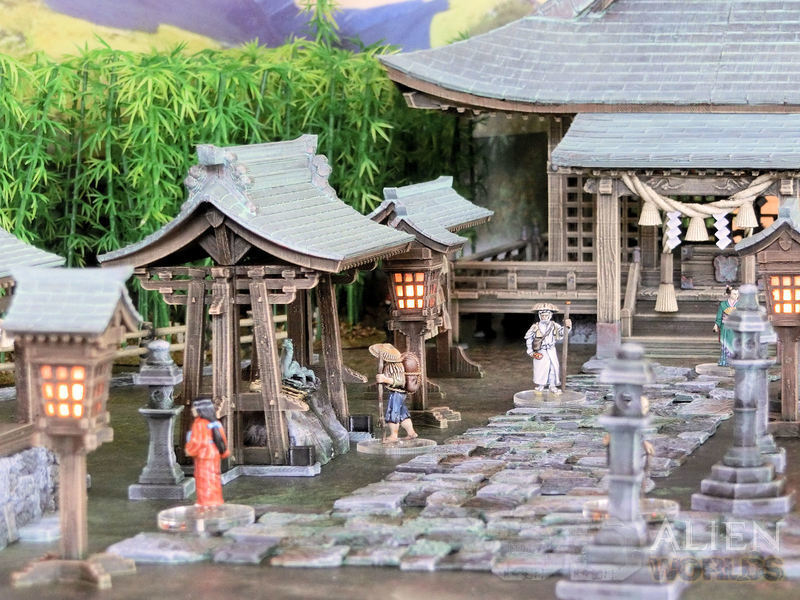
▲ The sessha auxiliary shrines even get their share of visitors today.
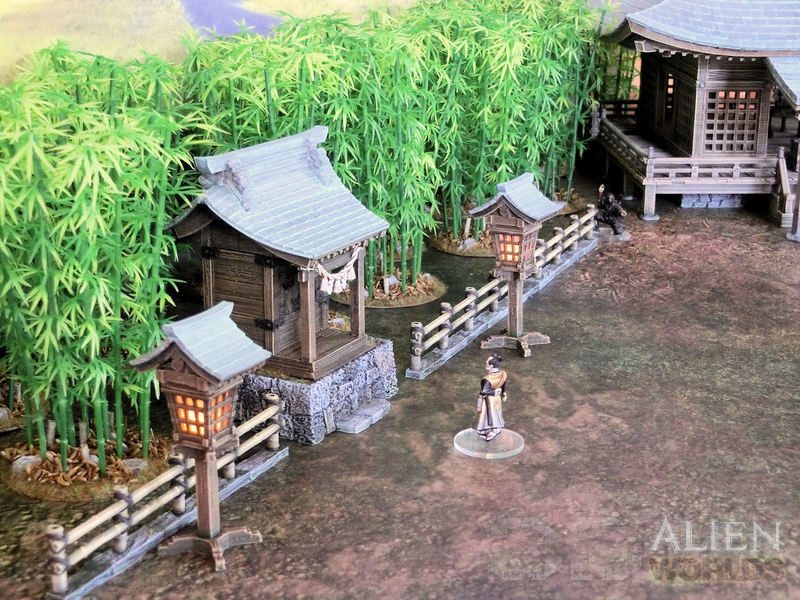
▲ Lord Nobu stops by a small shrine on the edge of the bamboo forest. Will the light from the shrine lanterns be enough to alert him to the danger nearby?
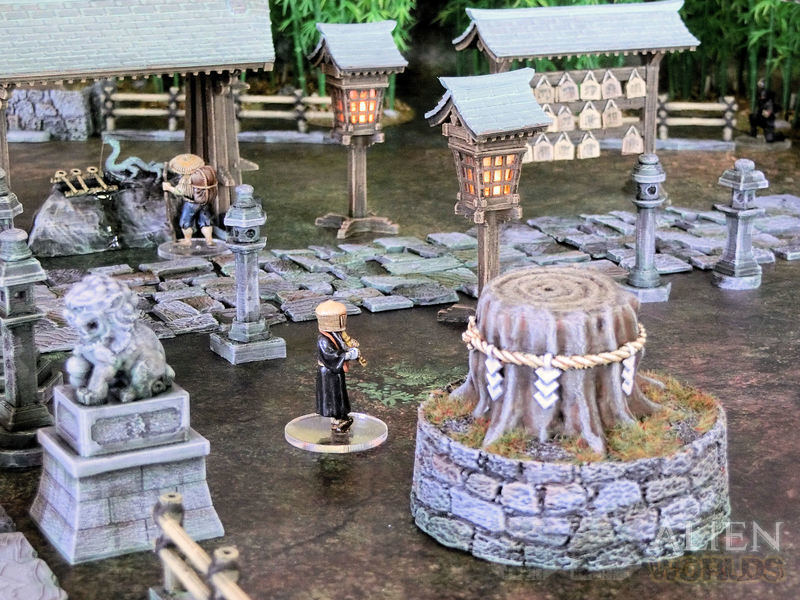
▲ This sacred treestump is all that remains of the giant cedar-pine tree that once towered here, but it provides a strong link to the natural forces of the shrine.
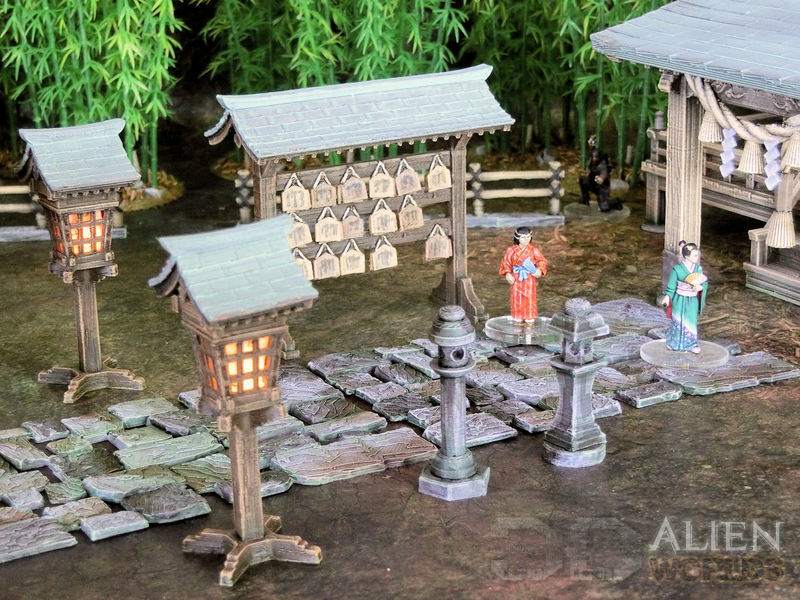
▲ Visitors to the shrine often write their wishes and hopes for the future on these wooden ema boards. Let's hope one of them wished for invulnerability from ninja throwing stars!
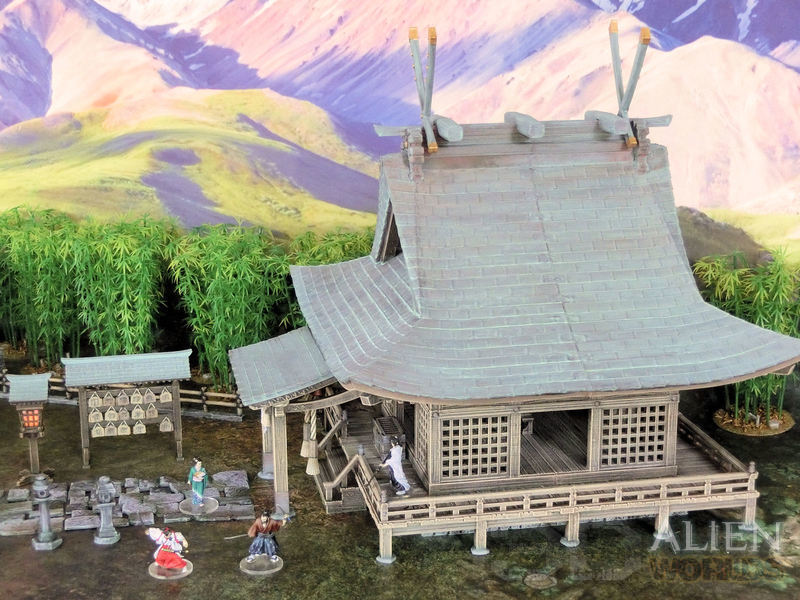
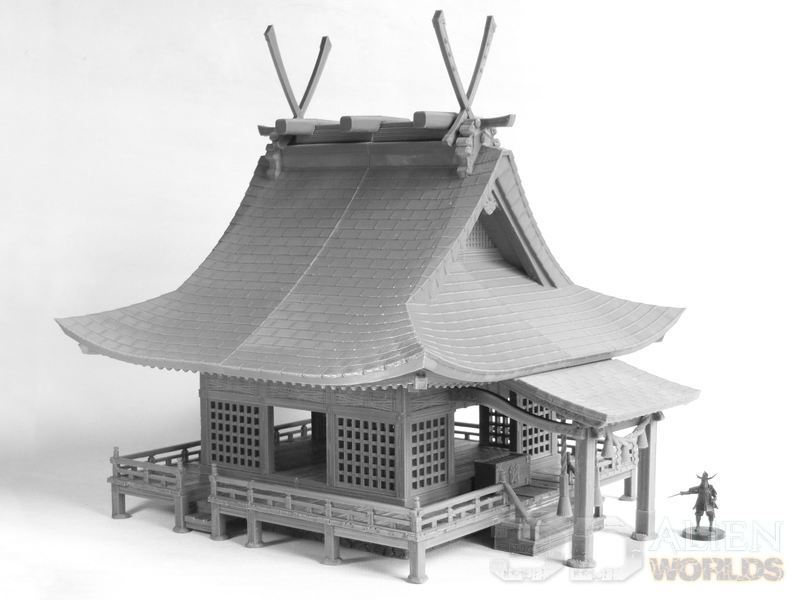
▲ The main shrine building has an ancient copper roof, topped by these gorgeous ornamental decorations, and features a wide balcony on all sides.
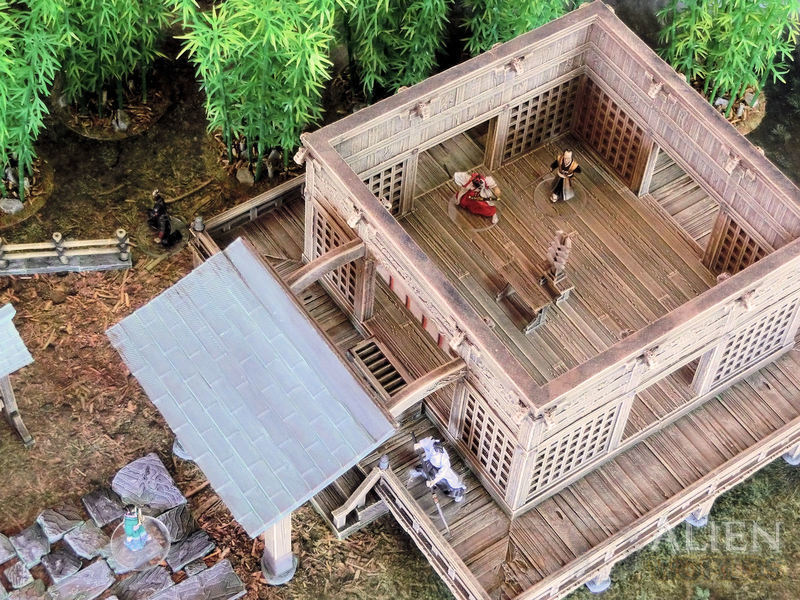
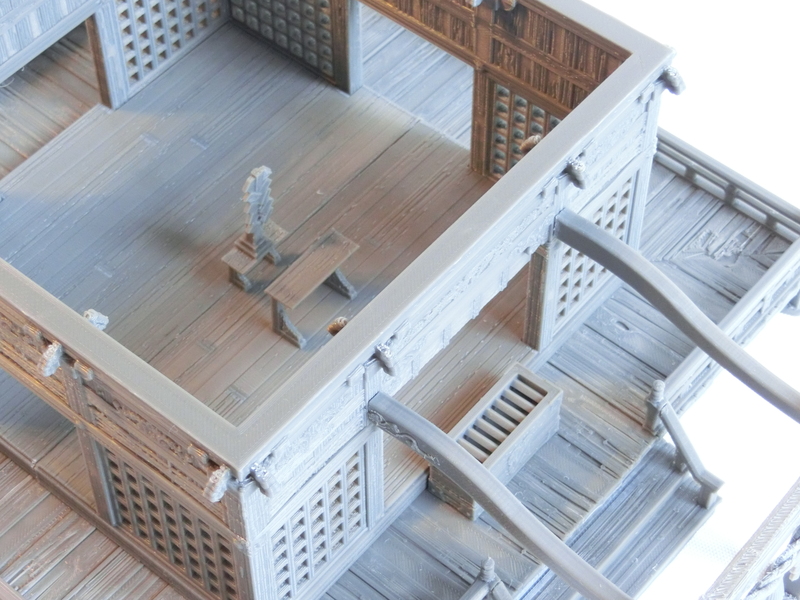
▲ The shrine interior has doorways on each side, and a simple prayer table right in the centre. Plenty of space for fencing!
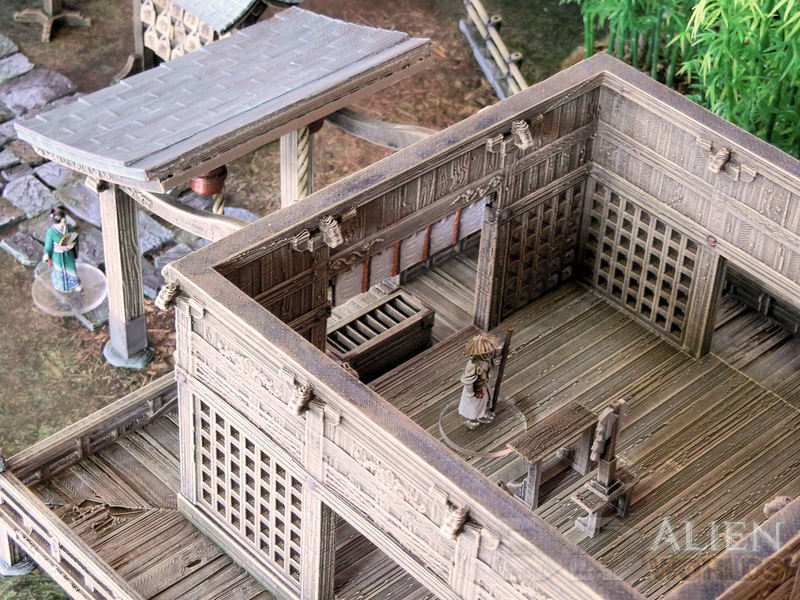
▲ A quieter day at the shrine... without anybody starting a fight! The large offering box stands in front of the main entrance, and visitors stop at the foot of the front steps to ring those big copper bells before making a prayer and dropping in a coin.
The new Samurai Shrine Set set is available for download from today!
It's time for a painting blog, and today we're looking at the contents of the new Shrine Set!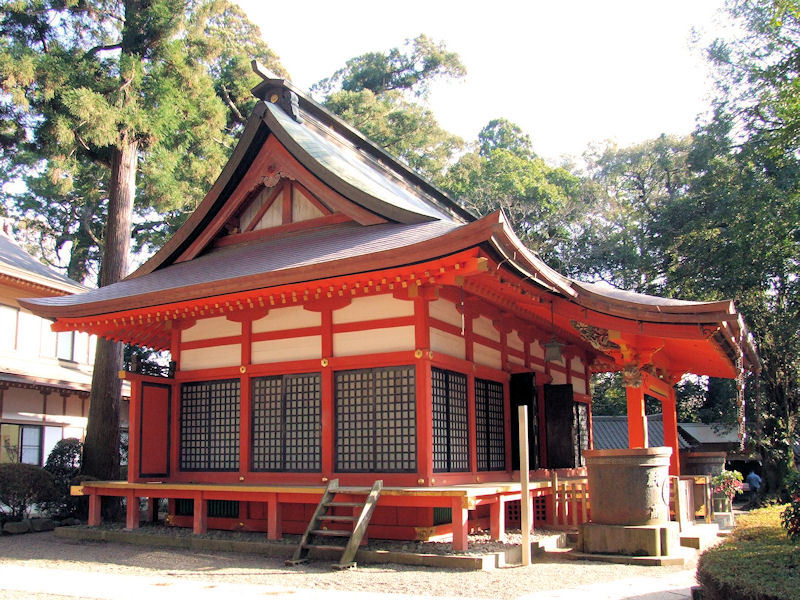
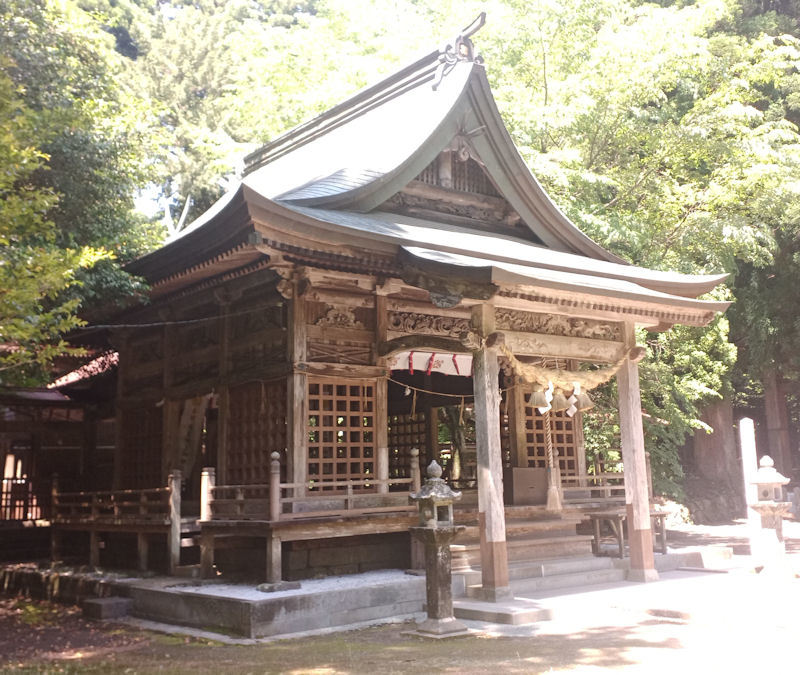
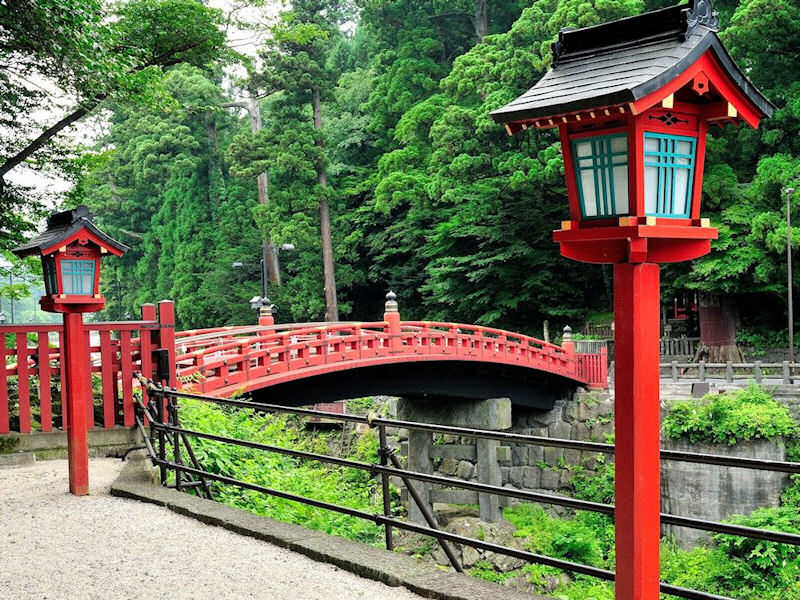
▲ With Japanese shrine buildings, you've got two main choices - you can either paint it in bright reds, like the picture above, or you can choose to paint it in natural wood colours.
So before you start painting your model, do a little research on Google Images, and see what kind of shrine you'd like to build!
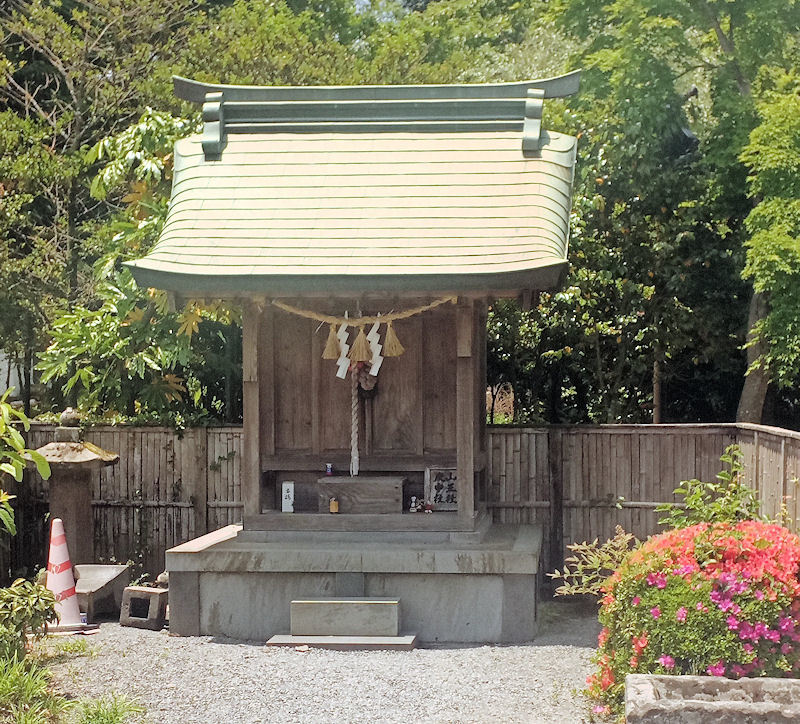
▲ I chose to paint my shrine in natural wood colours, like this photo of the actual shrine the model is based on - Kokuzo Shrine in Kumamoto Prefecture. Whichever colour scheme you choose, you'll love all the little sculpted details on this model, so let's get started....
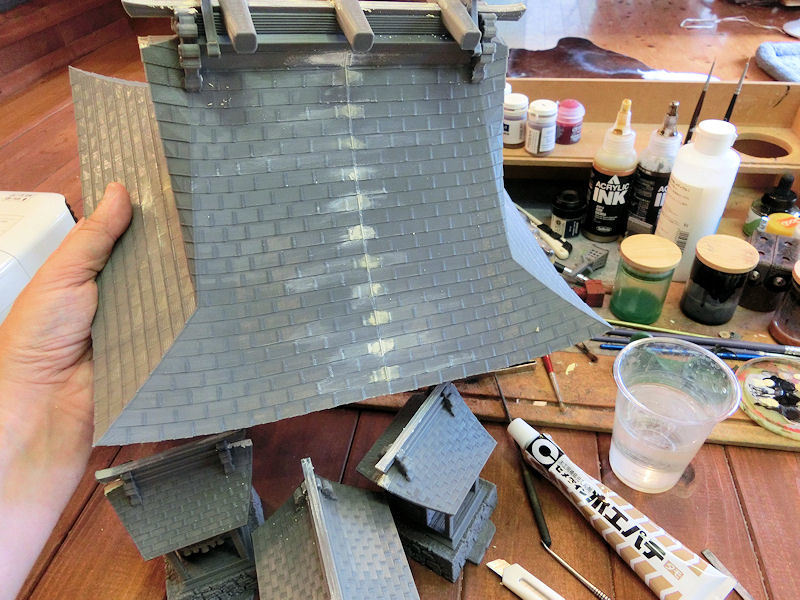
▲ Before I started painting, there were a few gaps in the model that needed covering, particularly in the roof sections. I use the simple method of smearing a dab of wood putty onto each of the gaps, and smoothing it over with a wet finger. Easy!
Then it was off to the spray booth, to get basecoating!
▲ Let's start with the stone path sections. I undercoated these in a light grey spray, then gave everything a heavy black wash to shade in the crevices.
▲ Next I drybrushed up the details with a wide 5cm brush in a light grey colour.
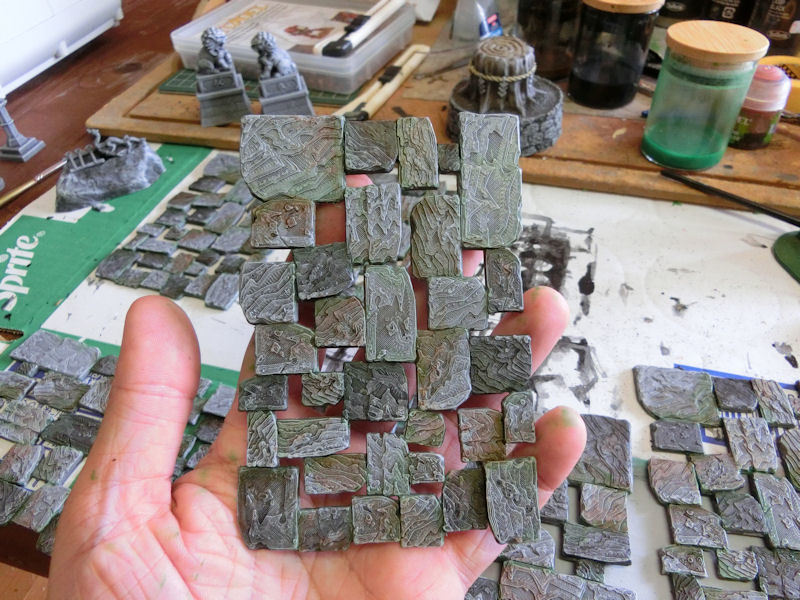
▲ What makes a more realistic paint job for these path sections is adding some variation in the stone colours, and I tried to achieve this by dabbing more colour washes at random on various stones.... black (again!), brown, red brown, and sepia.
Once I was happy with the effect, I switched to green wash and messily drew a line between each stone where they connected, and then dabbed green at random in the lower spots, where moss growth would naturally occur.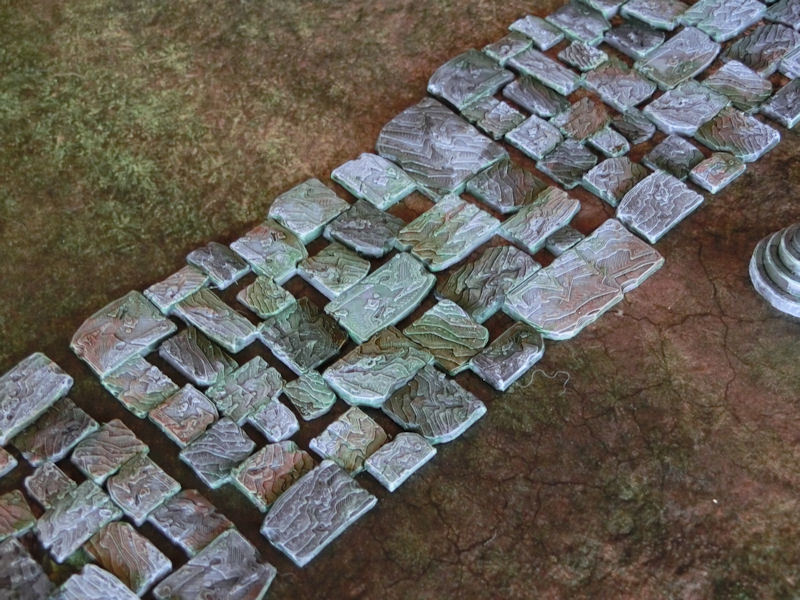
▲ As you can see from this photo, the green helps to blend the path sections to a green battlemat, in addition to simulating age and weathering.
You could also take this a stage further by gluing on small patches of green sponge or flock, to simulate moss growth.
▲ The sacred tree is a great little accessory in this set, and I used the same techniques for basecoating and washing the stone section as I did for the paths. A thick wash of green around the bottom few millimetres of the stone help to blend it to a green mat and make it look older.
The thick rope was basecoated in a cream colour, and then washed in brown and sepia to shade the texture of the rope. Then I carefully added a cream highlight to the top of each rope strand, before painting the paper tassles in light grey and then white.
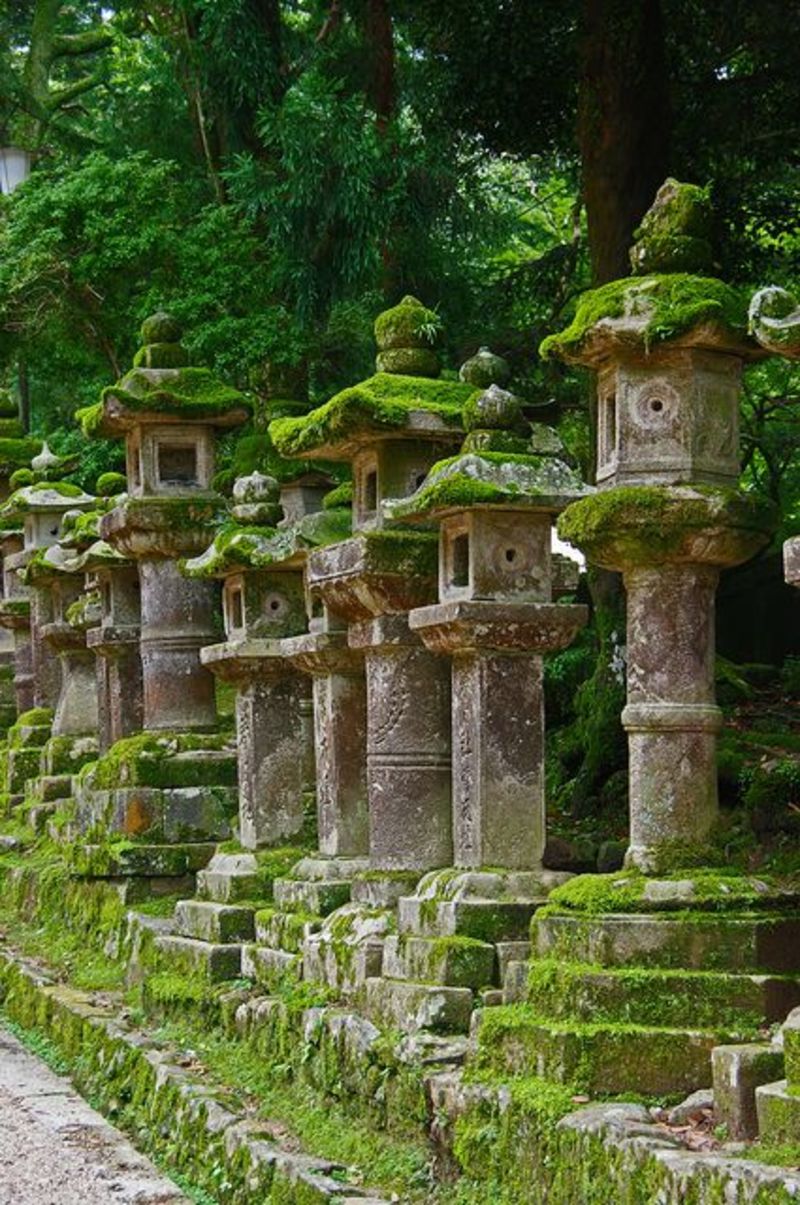
▲ The stone lanterns in this set look great with lots of weathering techniques and stains, like in the photo above. I added green washes at random to my lanterns, but they would also look super-realistic with sponge or flock 'moss' glued on, too!

▲ The ema board rack is another characterful model in this set, and I painted the votive offering boards in a variety of woody colours. The strings are usually white, black or red, by the way. For the text, I dabbed on blobs of black ink in random lines - remember that Japanese text on these boards is traditionally written vertically.
▲ The LED shrine lanterns were the next item on my paint desk, and you can choose to paint these in bright reds, or natural wood tones. They don't necessarily need to match the colour scheme of the main shrine building, by the way.
I decided to paint mine as old wood, so they looked nice and ancient!
▲ If you print the LED version of the shrine lanterns, you could also cut some paper inserts to diffuse the light from the LED bulbs. You could use normal white paper, but I've found that baking sheet (kitchen paper/sheet) lets more of the light through, so the lanterns are a little brighter.

▲ This is the shape you'll need to print and cut, so you might need to do a few test prints to make sure that the line on the left prints at the 14mm size required to fit the lanterns.
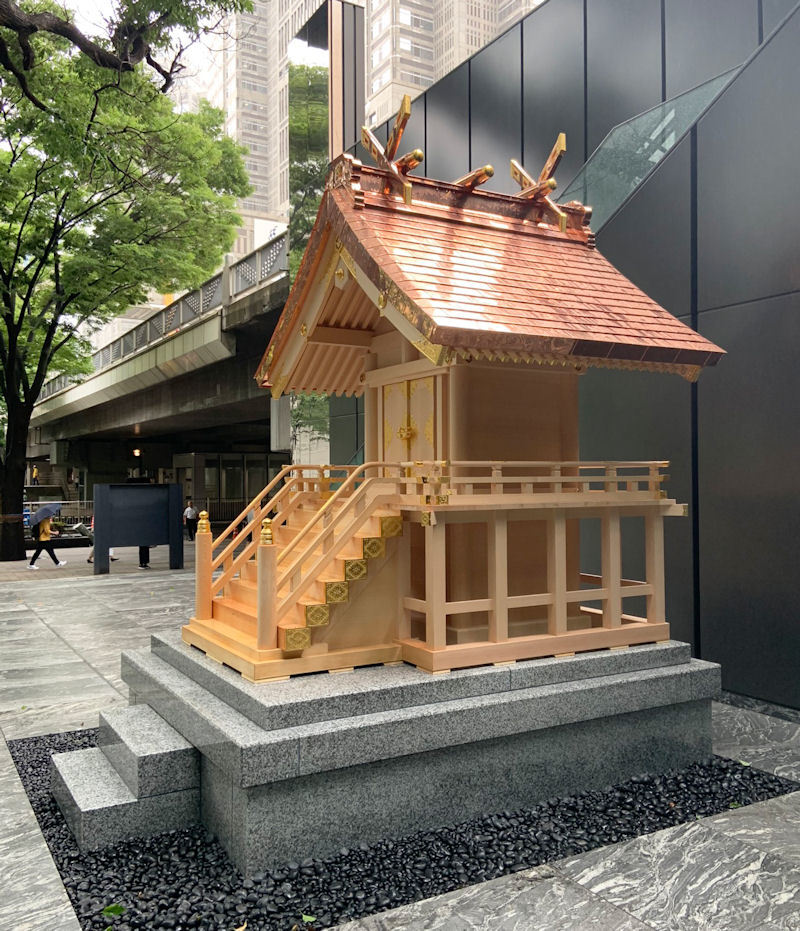
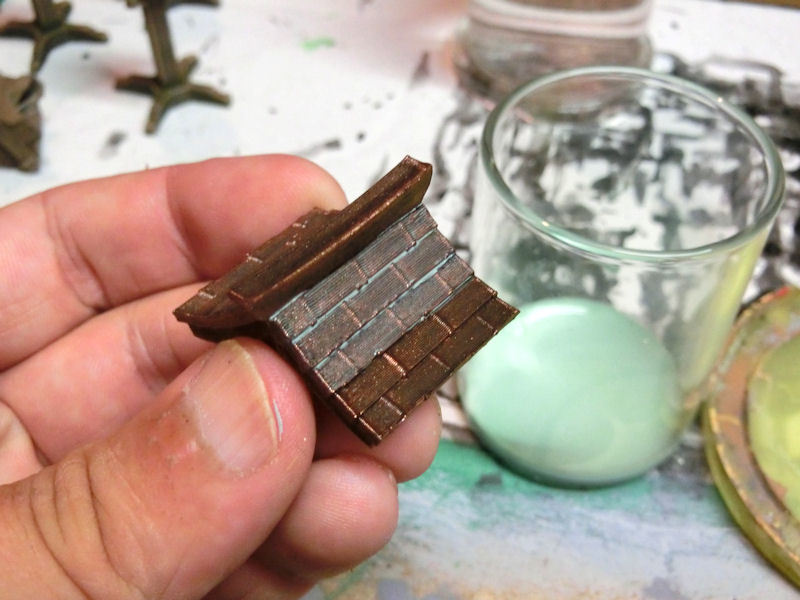
▲ Okay, it's time to deal with the shrine roofs! These are a major part of the shrine set, and they have been modelled with copper sheeting panels. When a shrine is new, the copper sheets look stunning, as in the photo above, but after a while the gleaming copper changes to darker tones, and then to a brilliant verdigris green!
Having said that, you can also find real shrines with painted roofs, usually in dark colours such as dark brown, grey or black. So, again, take a look at some Google image searches, before you decide how you want your shrine to look!
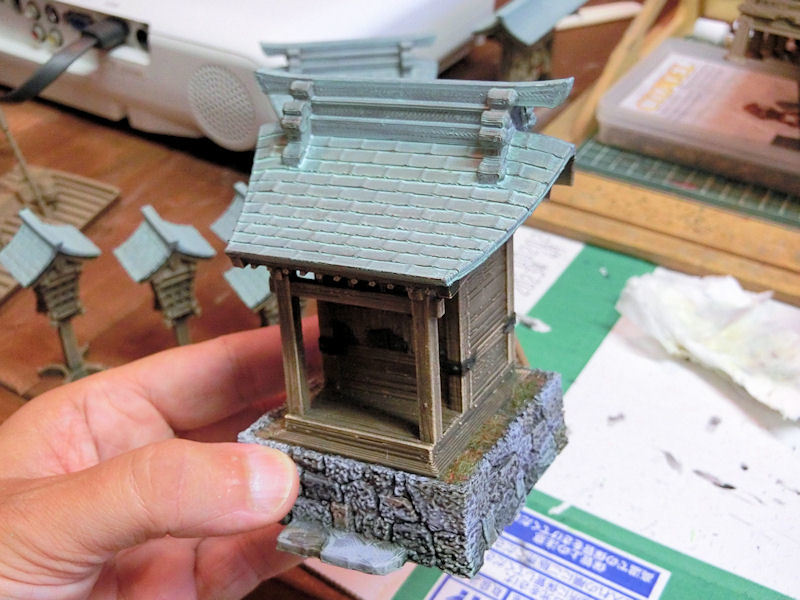
▲ I decided to paint my shrine buildings with a verdigris roof, like in the photo above. The aged wood and green roof sections will look right at home in the bamboo forest board I'm planning, as an ancient and forgotten forest shrine.
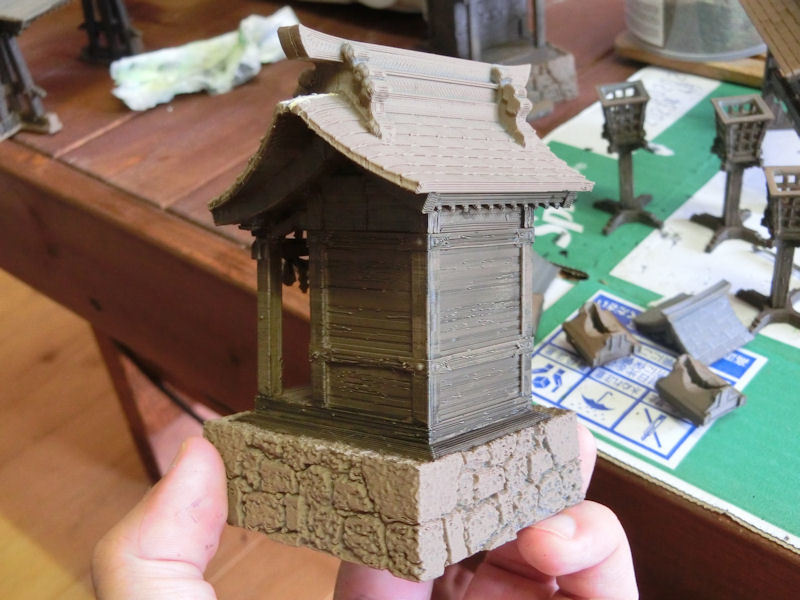
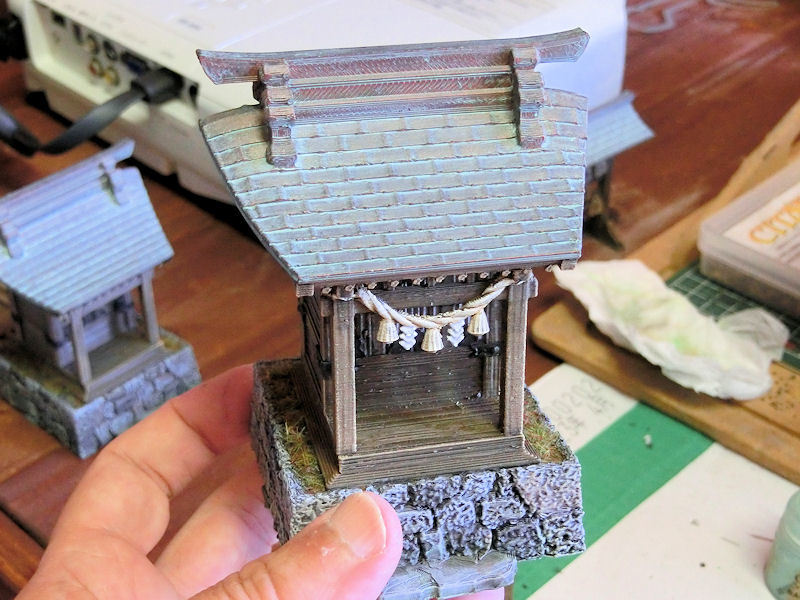
▲ I undercoated all my wood models in light brown, and then gave them a heavy black wash to shade the woodgrain patterns. This technique was also used on the main shrine building model, but for this painting blog I've taken pics of the mini-shrine instead.
▲ Next I drybrushed the wood sections in light brown again, and then a very light drybrush with a sandy brown to just pick out the edges of posts and panels.
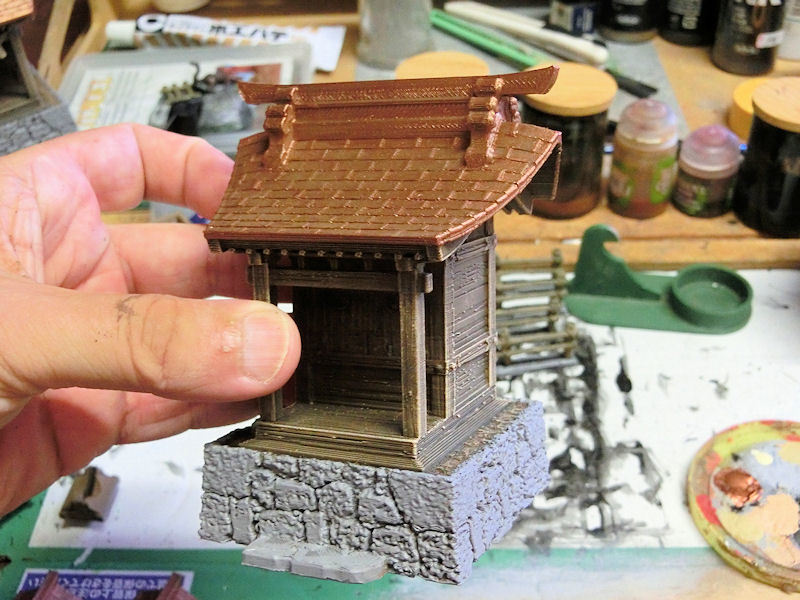
▲ A medium grey was painted over the stone base section, and then a gleaming copper on the entire roof section. This is probably what the shrine would look like when new (of course it would need brighter wood, too!).
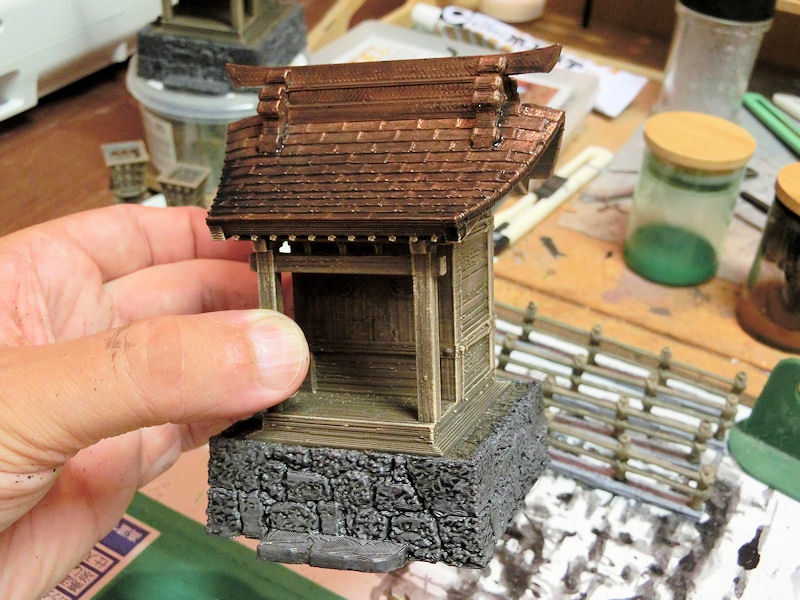
▲ Next, I dulled down the copper on the roof with a heavy wash of black. The stone was also given a black wash at this stage.
▲ Whe the black wash was completely dry, I drybrushed the stone base section with light grey...
▲ ... and then randomly dabbed colour washes on some stones to create a little variety. Again, I used a green wash on the bottom of each stone face to suggest moss growth.
▲ Finally, it was time to start weathering that lovely copper. I mixed a mint green acrylic paint with water, to the consistency of milk, and then brushed it on all the copper surfaces. Don't go too heavy with this verdigris wash, or it will pool in funny places. It's better to do multiple thin washes, so you can better control the finished look.
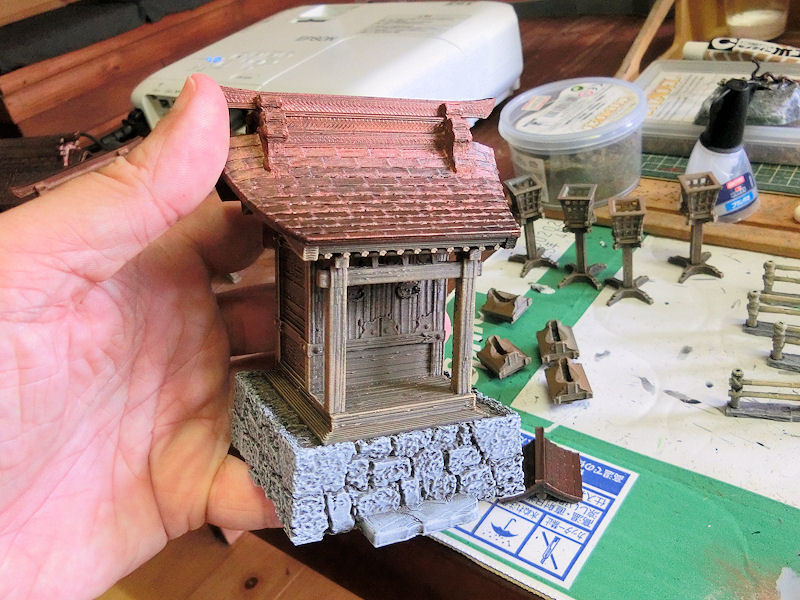
▲ This was how my roof looked after one verdigris wash had dried, so I decided to do it one more time.
▲ And here is the second verdigris wash after it dried. I was happy with this, as it had fallen into the crevices nicely, while still leaving a little hint of the copper underneath.
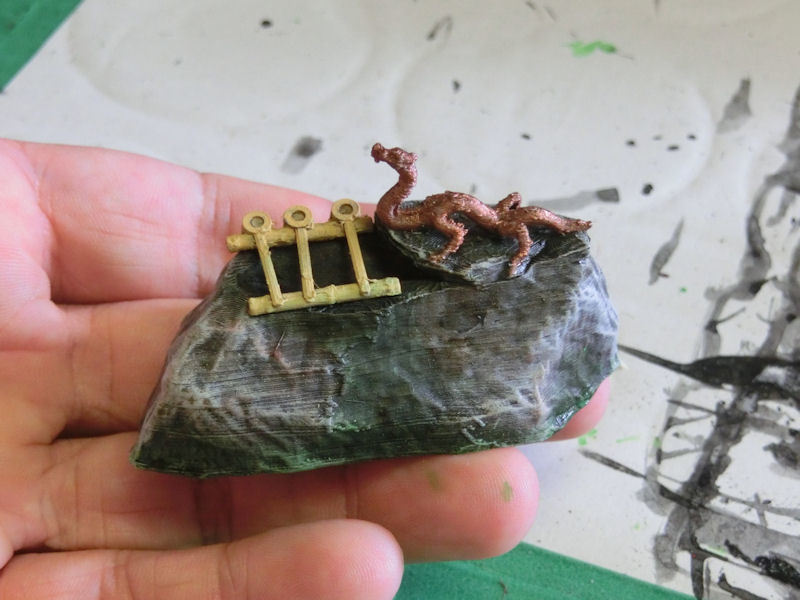
▲ The handwashing basin, known as a temizuya, has quite a few interesting textures. I painted the stone with various washes and drybrushes, and decided to paint the dragon fountain in verdigris copper, to match the roof.
▲ After I had added the verdigris wash to the dragon, I cut a thin strip of clear plastic from a plastic bag, and superglued the top end to the dragon's mouth. Be warned - this IS a bit fiddly!
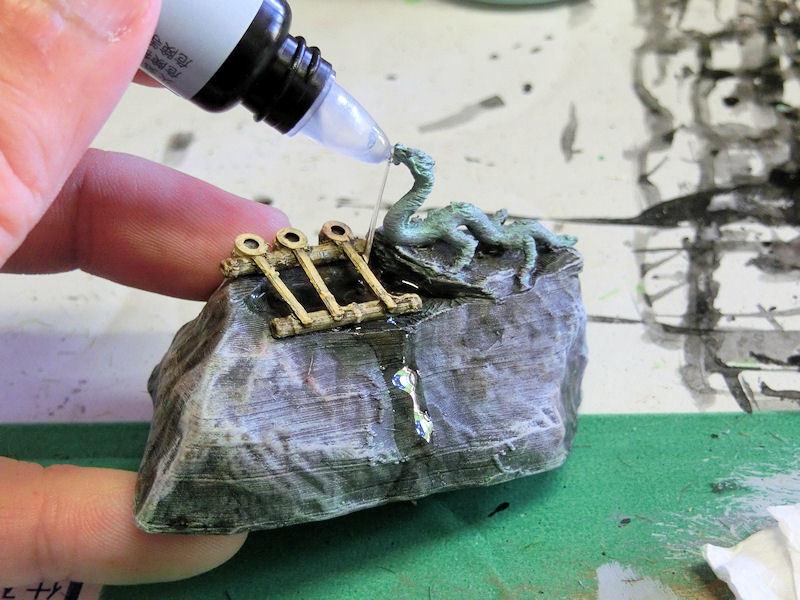
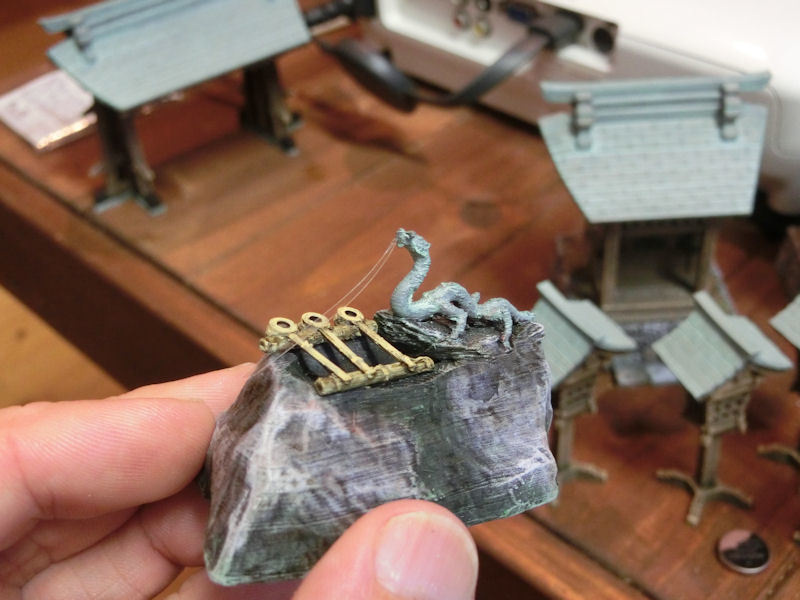
▲ After the superglue had dried, I gently pushed the clear plastic strip down into the basin, to show the water spouting from its mouth. I then used a tiny bottle of clear UV resin (bought for $1 in the jewellery/craft section of my local 100yen shop) to drip resin down the plastic strip and into the basin. I also carefully poured a drop down the front of the rock, where the overflow water would run.
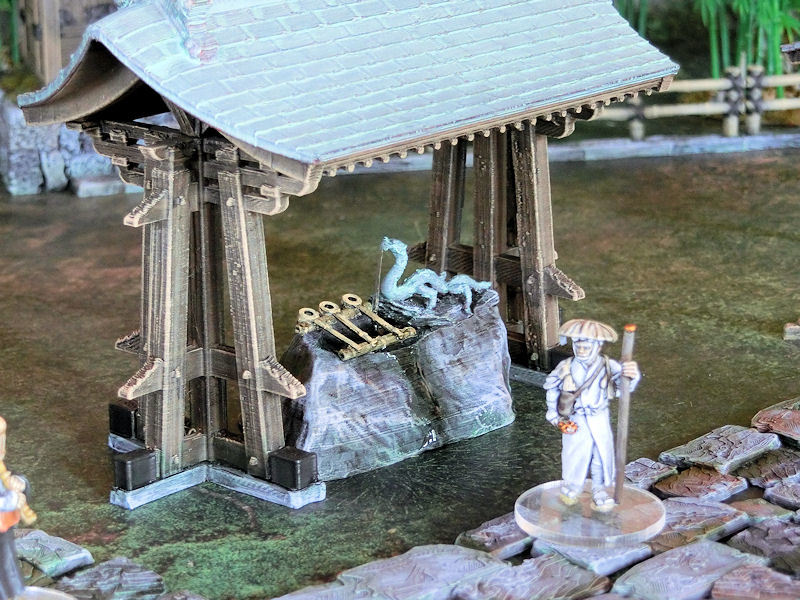
▲ And there you are... a finished washbasin and dragon fountain!
The main shrine building is just having the last few coats of paint added to it now, so this set will be ready for release in just a few days! Watch this space....
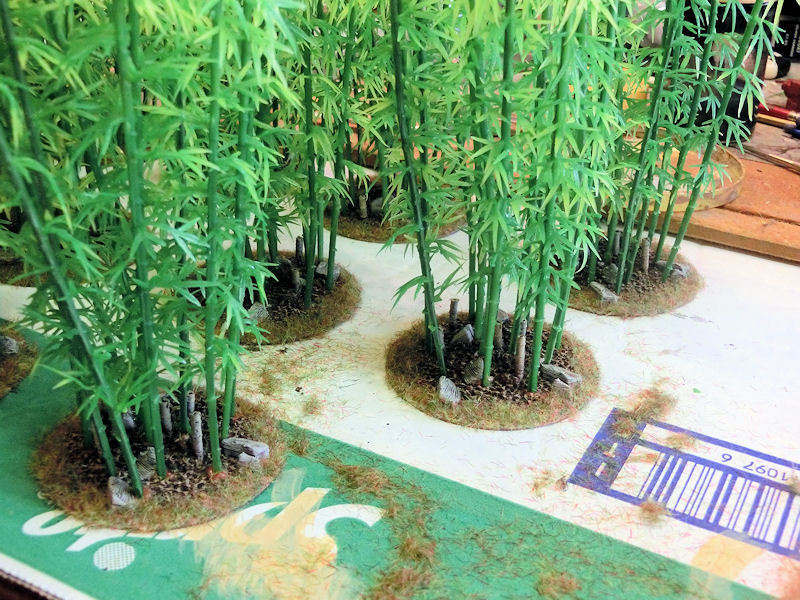
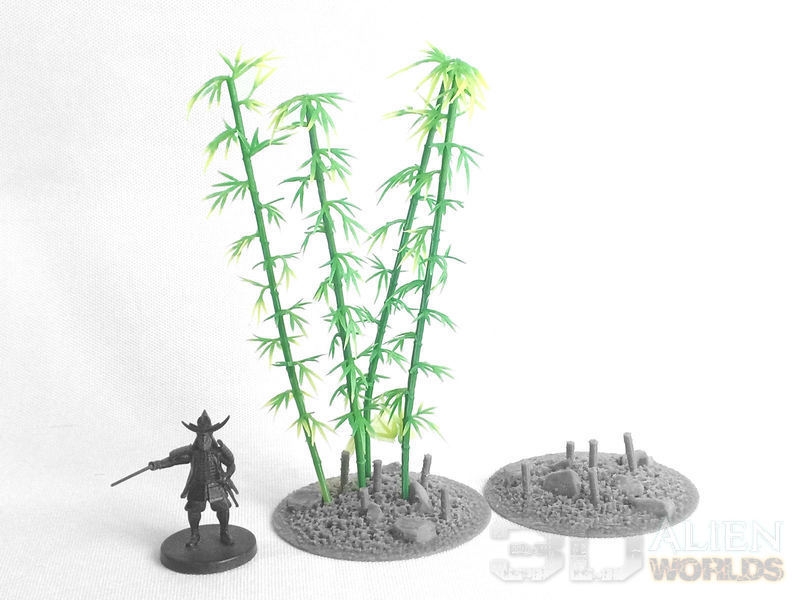
Today we're taking a closer look at the bamboo bases from the new Shrine Set, with a how-to guide on an easy way to create a thick bamboo forest for 28mm scale wargaming.
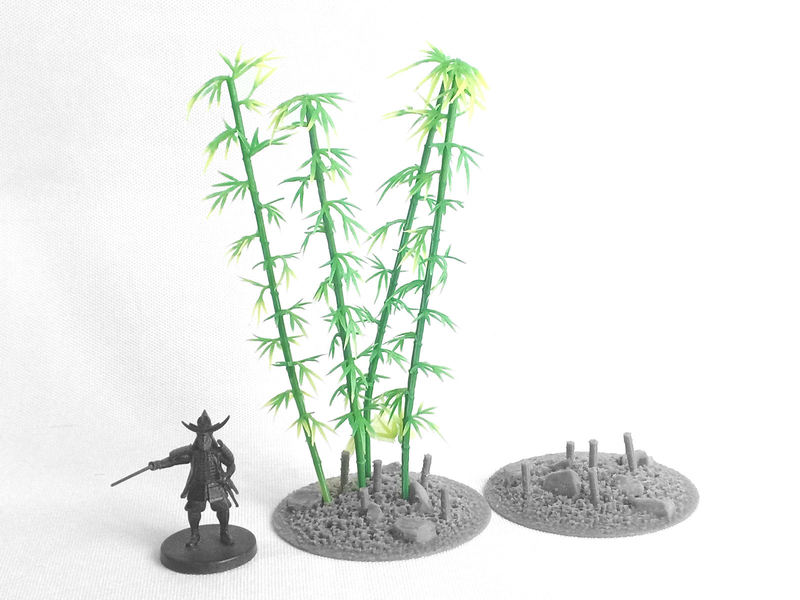
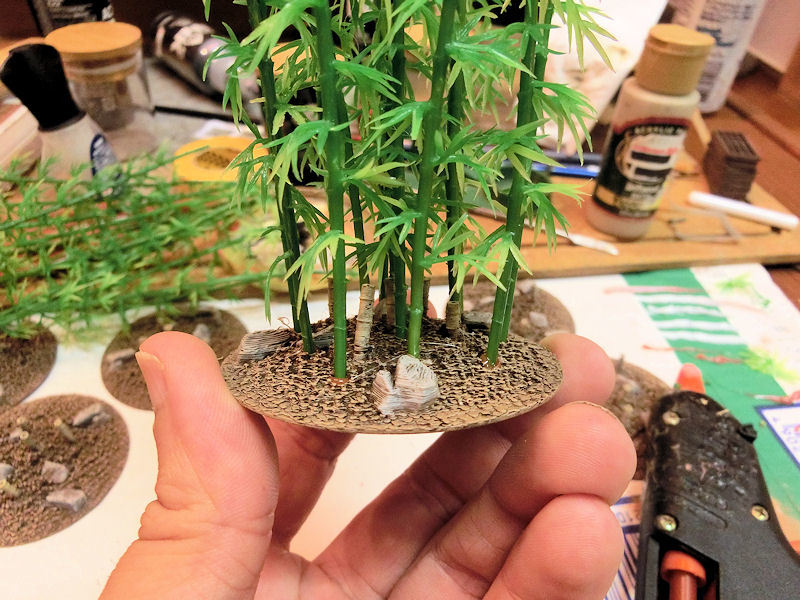
▲ This is a photo of the 60mm bamboo base included in the shrine set. As you can see, it's a simple textured circle, with a scattering of small rocks and broken shoots of bamboo. There's also a small hole in the underside for a magnet, in case you want to use that. These were printed at 0.2mm layers on an FDM printer, by the way.
The green bamboo trees are, of course, those bendy plastic ones you can buy in bulk online, and are not included in the print files.
▲ To make attaching those green plastic bamboo trees to the printed base easier, there are fourteen small 2mm holes scattered around the base, as you can just about see in this photo. They are the light-grey dots, with the sunshine behind the thin plastic of the holes. Those are the perfect size for the bamboo tree stalks, with just a small blob of glue.

▲ I bought these cheap plastic bamboo trees from Amazon, for about $10 for 100 trees. I think they're actually advertised as 1:75 scale trees, about 12cm tall, but they'll work fine for 28mm (1:56) scale or even tall 15mm scale bamboo forests. I bought two packs of these, and printed 14 of the bases.
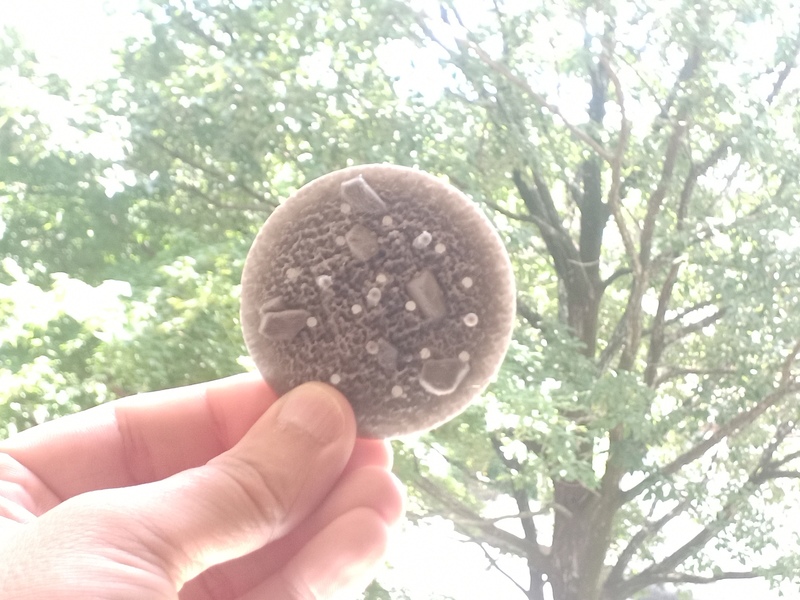
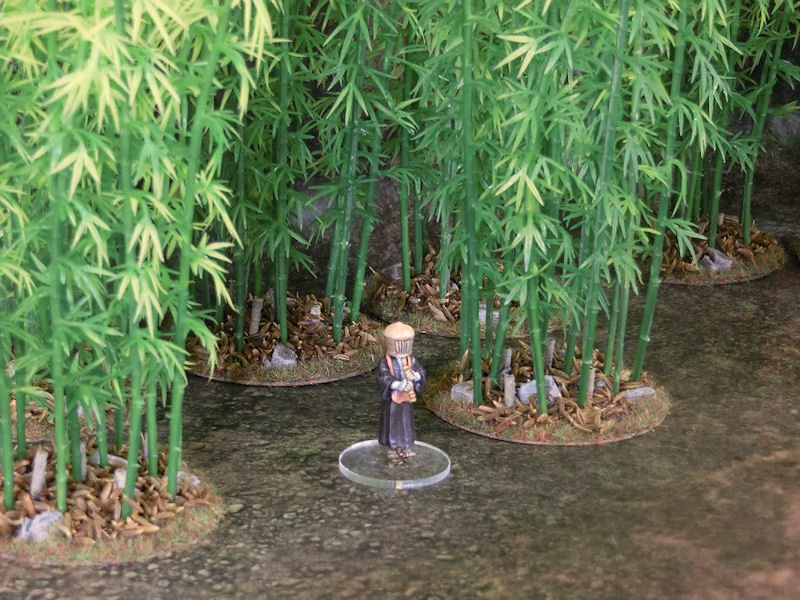
▲ Okay, now it's time to look at some reference photos. This is a bamboo grove in Kyoto, I think. You'll notice that the leaves on bamboo trees are actually only really found near the top half of each tree. As the tree grows taller, the bottom part (without leaves) stretches higher and higher.
If you take a look at the plastic trees I bought above, you'll see that the leaves start near the bottom of each tree, so it's probably going to look better to trim some of the lower leaves off.
The other thing you'll notice is the mass of brown leaf litter on the forest floor. I'm going to try to create that effect, too!
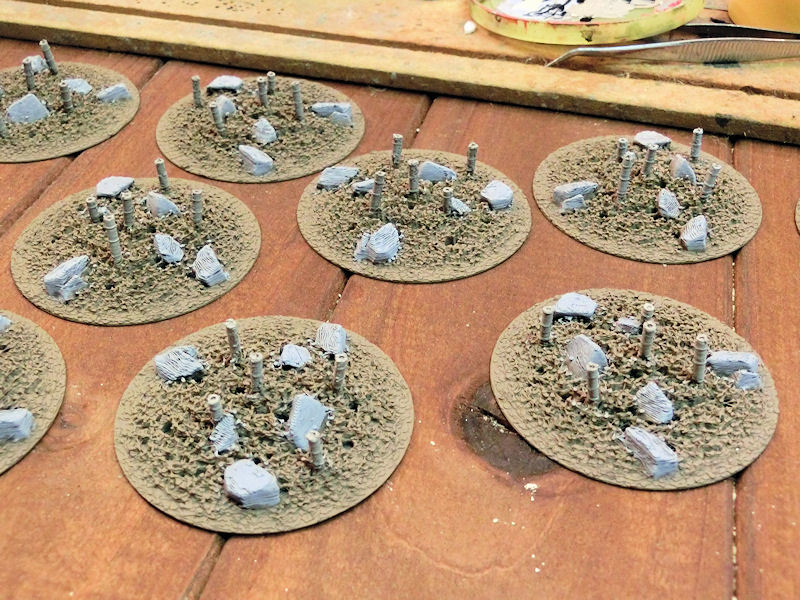
▲ I started the painting process with a light brown spray undercoat, and then light grey painted messily onto each rock. You don't need to be neat here, because later steps will hide mistakes!

▲ Next I covered each base in a heavy black wash, to fall into the crevices of the base.
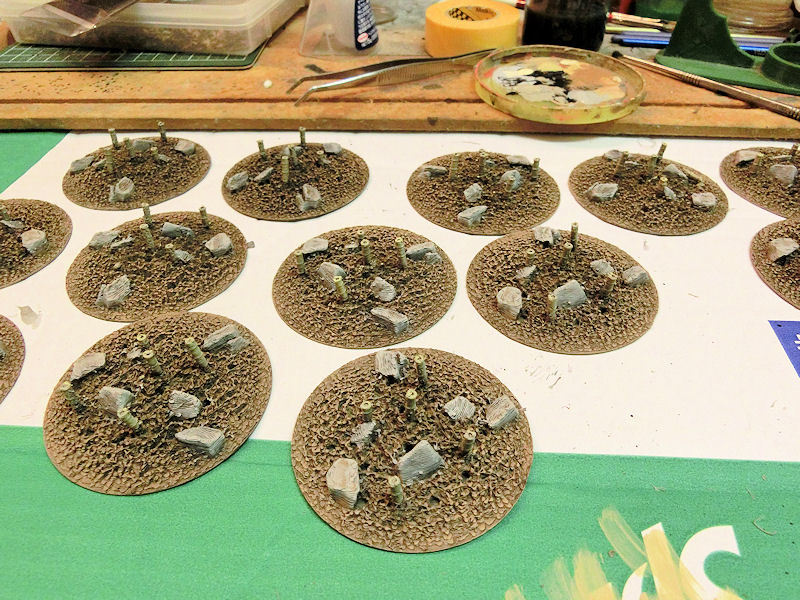
▲ Drybrushing was the final painting step, with a lighter brown for the earth, a light grey for the rocks, and a slightly different brown for the bamboo stalks. Be careful not to hit those stalks too hard, as they are fairly brittle at that size.
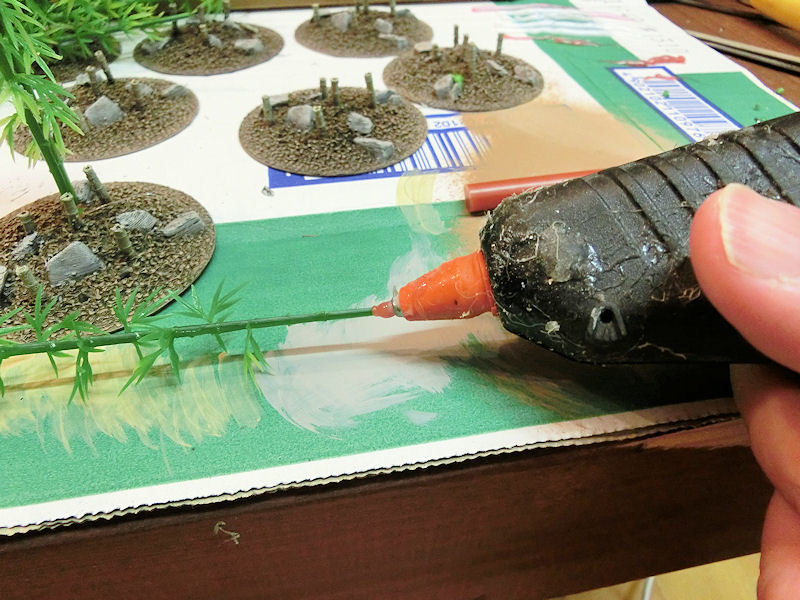
▲ Next I took my clippers, and snipped the bottom of each tree flat, so that it will fit the holes better. Then I grabbed my very old glue gun and dabbed a small blob of glue onto the end of each tree, before pushing it down into a hole. Start with the holes in the middle of the base, and stop adding trees whenever you're happy.
* Tip: I managed to find brown glue sticks for my hot glue gun (from the local 100yen store), which will look much better than blobs of white glue over each base.
▲ Here's a base with several stalks of bamboo trees inserted. See how the brown glue is almost completely hidden? It's well worth getting a few sticks of brown glue if you can find them!
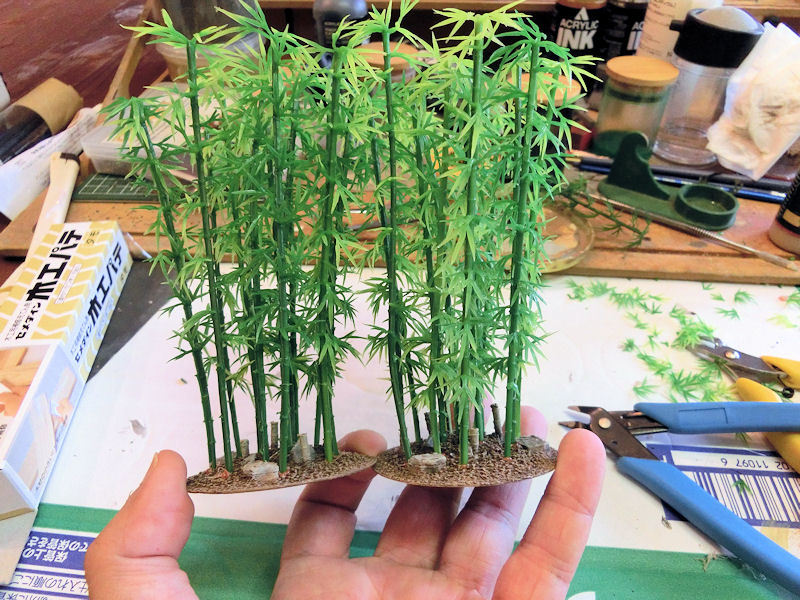
▲ Next I decided to trim the bottom couple of inches (about 5cm) of leaves from each base. This is probably not totally realistic (half of the tree height might look more real), but I wanted to keep some foliage lower down, to help block line of sight and make it look thicker. As long as the leaves start above head-height on a 28mm model, I'm happy enough.
The base on the left has been trimmed to remove lower leaves, as compared to the trees on the right, which are the uncut version. Only a small difference, but it looks better to me.
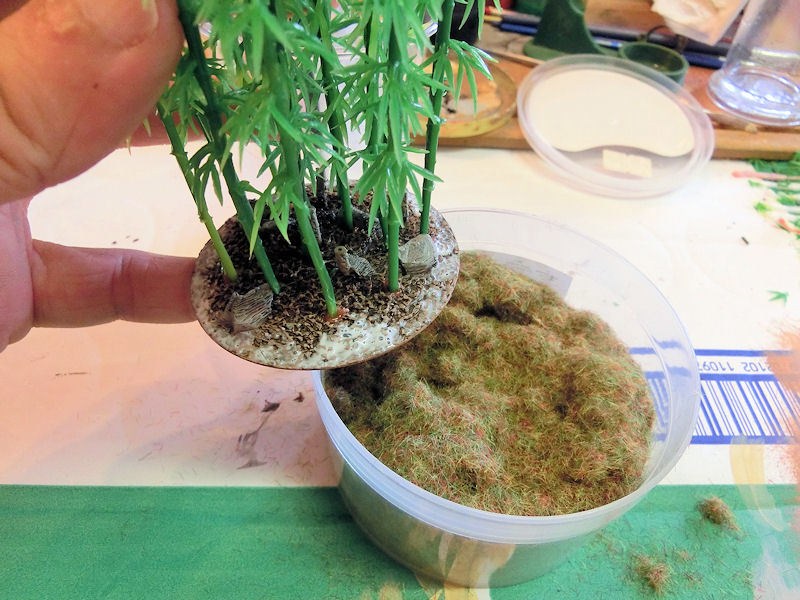
▲ The battlemat I'll probably use with this bamboo forest most of the time is a mid/dark green, so I wanted to blend the edges of each base to the mat. I used this darker green static grass around the edges, stuck down with very watery PVA glue.
▲ When the glue had dried clear, each base looked pretty great. I'd happily use these on my battlefield.
HOWEVER, by this point I had already gone out and bought something to duplicate leaf litter on each base, so I might as well continue!
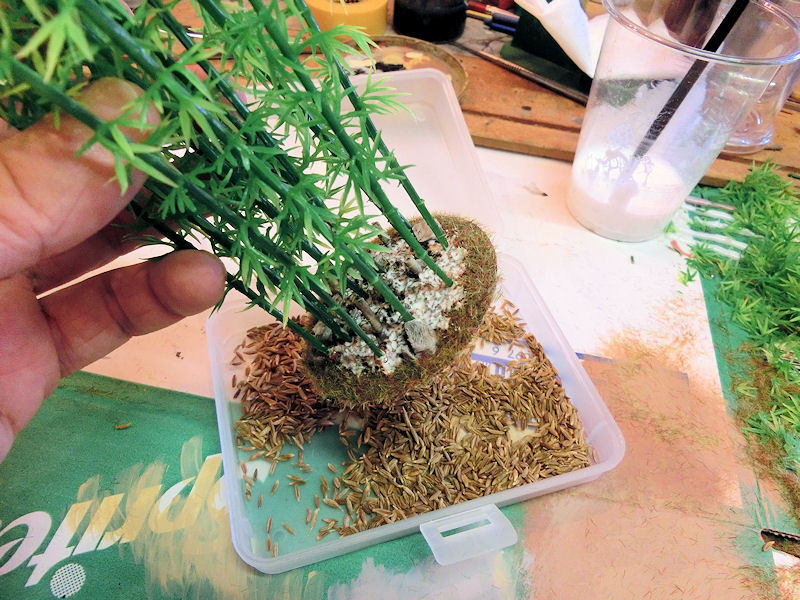
▲ I asked the wonderful group of people on the Facebook group Feudal Japanese Miniature Wargaming for suggestions on what might work at 28mm scale for bamboo leaf litter. First I tried a local tea shop for a bag of tea leaves in a suitable brown colour, but didn't find any good matches there. Rosemary leaves didn't have the right colour for me, but I was lucky enough to find cumin seeds in my local supermarket, which were a pretty good match in colour, size and shape. Thanks, Jim Jackaman, for the suggestion! Plus my bases had a lovely spicy smell for a couple of days!!
So I brushed some more watery PVA glue onto the centre of each base, amongst the trees, and sprinkled on the cumin seeds.
▲ This was the final result! With the bamboo leaves starting above head-height, each base is thick enough to visually look like a forest, and the floor has lots of interesting obstacles and detritus.
As a group they look great, but you'll have to wait a few more days until I can share proper photos of the completed shrine-in-a-bamboo-forest setting....
Today we have a new print partner to announce - SCALE 3D, from Wales. They are now selling print versions of our samurai terrain ranges at both 28mm scale AND 15mm scale.

We have lots of great photos of the printed Shrine Set models to show you today, but first we're going to show you how to assemble the main shrine building.
Ready? Here we go....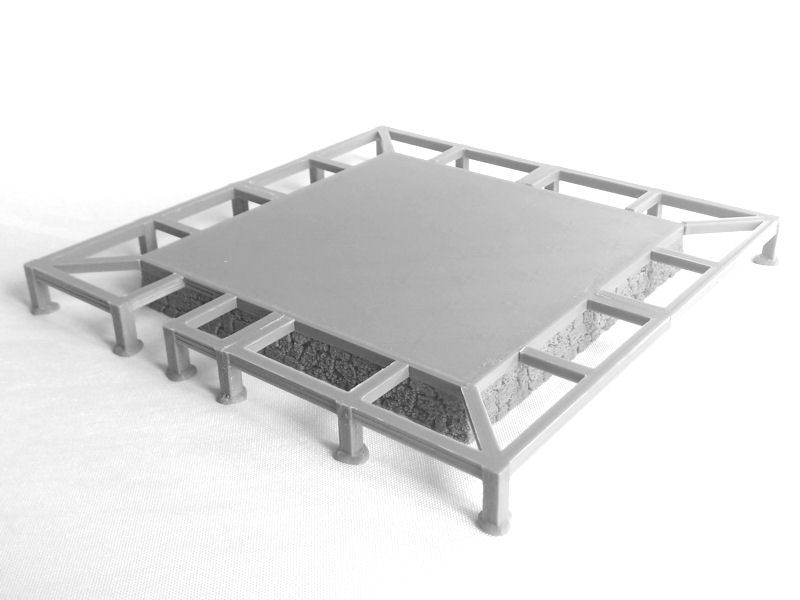
▲ The base of the shrine building consists of this large stone base (included as a one-piece print, and also in 4 sections for smaller printers) surrounded by a wooden frame for the balcony. The balcony frame pieces print upside down, and don't require supports.
Note the gap in the frame, on the left side.
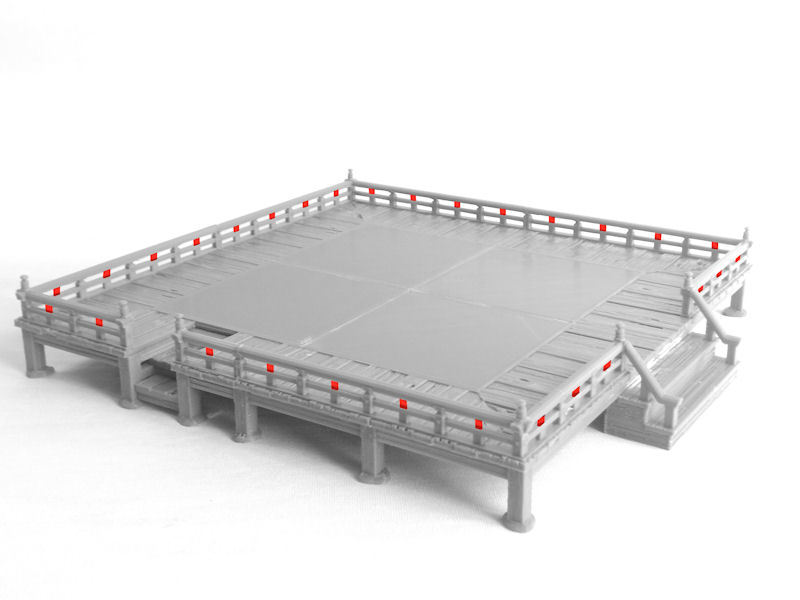
▲ Next you'll need to print the 4 sections of the balcony. In the photo above you can see that there are some built-in print supports marked in red. You can cut those out after printing, if you prefer, to make a more authentic shape of handrail.
After you've glued down the balcony sections, you should fit the wide steps at the front, and then the small steps at the side. Those are the 'backdoor' steps for the priests. You can finish the balcony off with 8 knobs at the corners, but those are optional.
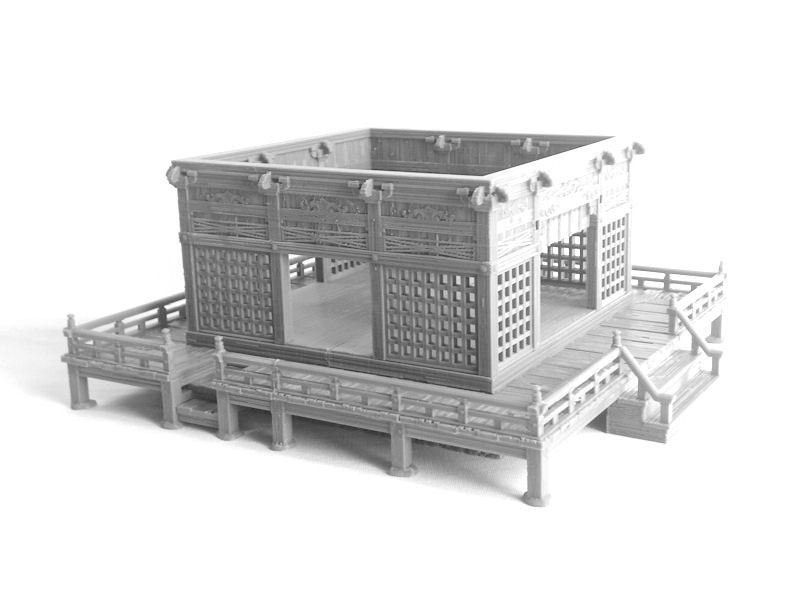
▲ Next comes the large floor for the building, which is printed in 2 halves. Then on top of that you can place the walls of the shrine building. If you have a larger print bed, I recommend printing the walls in one piece (upside down, so no print supports are required), but of course 4 separate wall pieces are also included for smaller printers.
▲ Next we start building the front of the shrine, with two curved beams and the arch structure with rope tassles. You'll need to turn on print supports for those 3 pieces, to get the best results.
Then it's time for the big roof! That prints in 4 quarters. Please note that the roof quarters are quite large, and will require a print bed size of 141mm to fit each piece. Sorry about that! Everything else on the model can be fitted on a normal 125mm print bed.
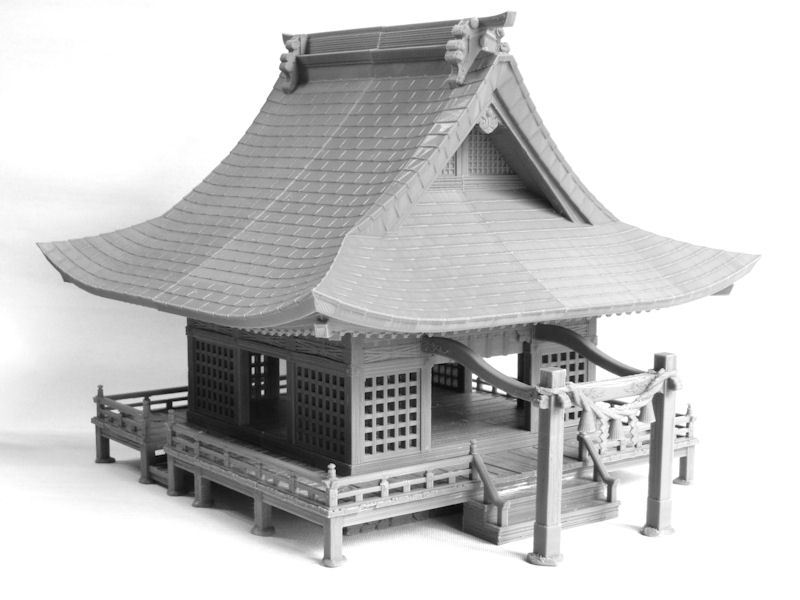
▲ We're almost done now! There are just a few finishing touches. First is the offering box in front of the curtained entrance, into which coins are dropped by visitors. Inside the shrine we find the simple wooden tables, onto which the paper tassled structure is glued.
▲ To finish that front section, we need to print one last roof piece, which slots into place on top of those front posts. Two thick ropes with bells are hung from the underside of the front roof, and print supports are required for those pieces.
* Note: You can print the building without the front posts and front roof section, if you don't want to use it as a shrine. It could just be an awesome, fancy building!
The last parts needed to complete the shrine building are those extra roof decorations, which are simply glued into place on top. They are optional parts, so you don't need to add them if you prefer a simpler shape of building.
▲ That's it! The shrine building is complete! Isn't it HUGE?! Didn't those wooden carving details come out great?
But a shrine wouldn't be a shrine without lots of extra accessories, so let's take a look at those....
▲ Here's the full set of accessories included in the shrine set! There's probably enough here to cover a small gaming table. 
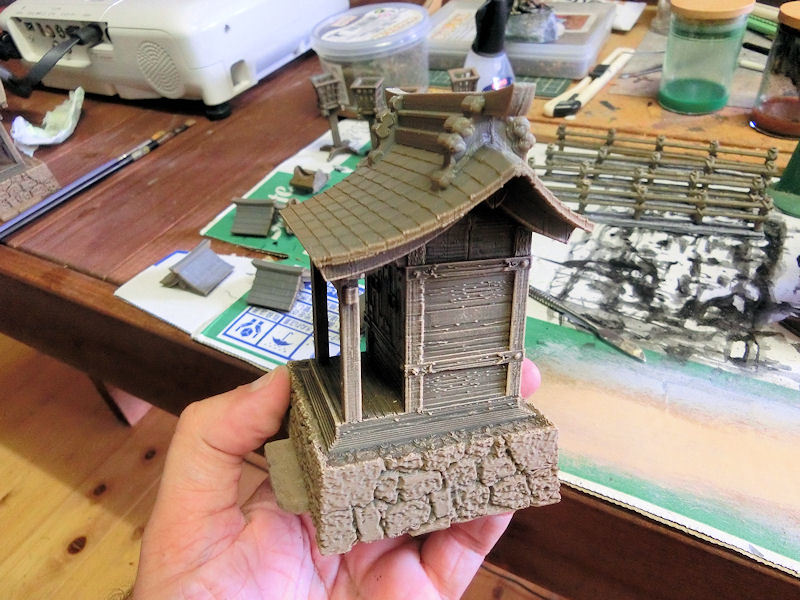
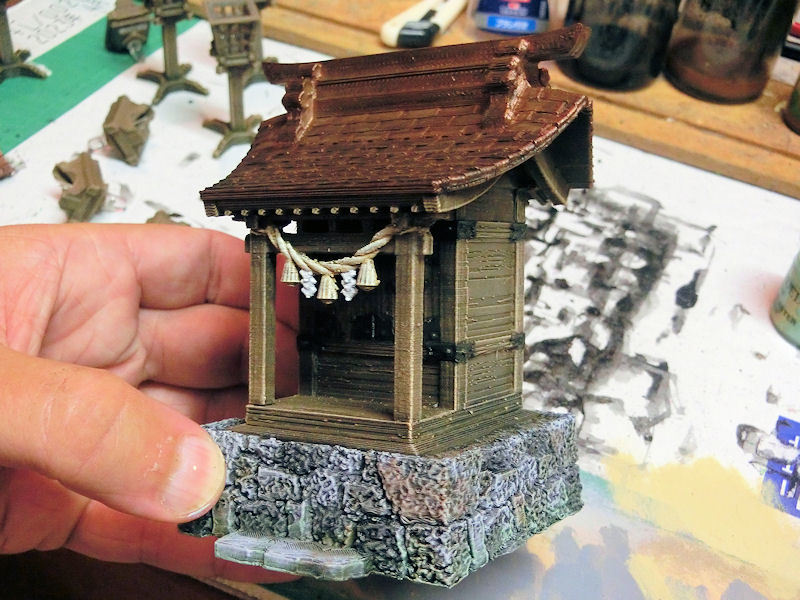
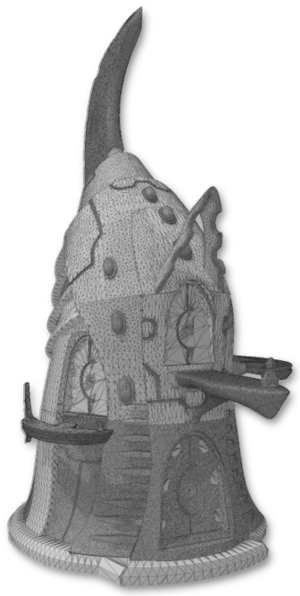
▲ We'll start with a look at the mini-shrine. This is a small auxiliary shrine, and is a very easy and quick print.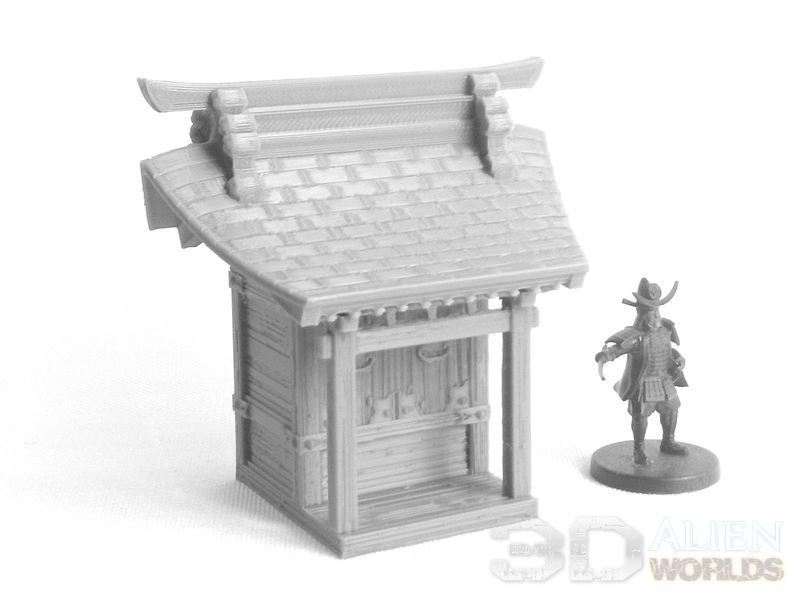
▲ You can also remove the mini-shrine from its stone base, if you prefer to make it smaller. This photo shows the version without the rope tassles at the front, and would make a great game objective (approximately 50mm at the base).
▲ This is the fancy handwash basin, which is found near the entrance to a shrine complex. This model also doesn't need supports, because the wooden frame prints upside down. I'm quite pleased with how well the bamboo water cups came out on my FDM printer, and also the lovely waterspout dragon on the rock. Sadly, I dropped it almost immediately, and snapped off a whisker!
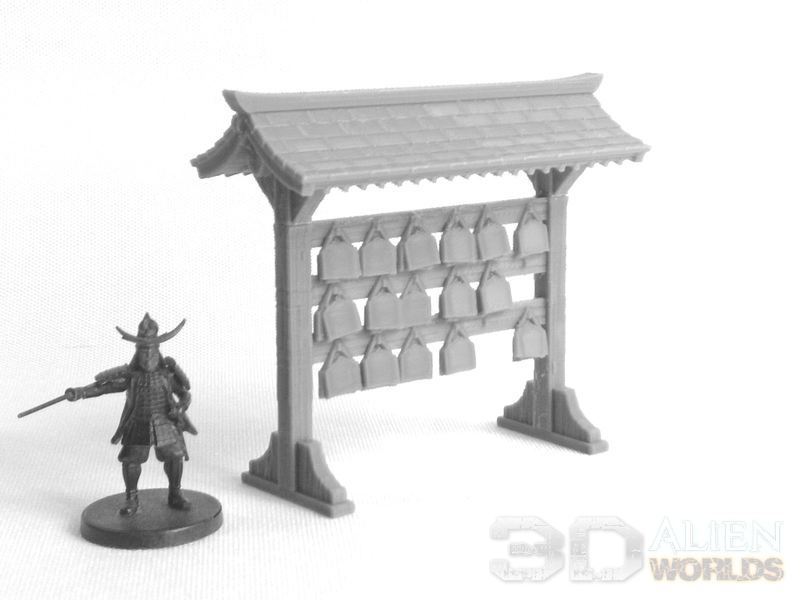
▲ Another essential piece of any Japanese shrine is this board of ema votive offerings. These are wooden boards onto which visitors will write their wishes (for good health etc), and then hung on the pegs.
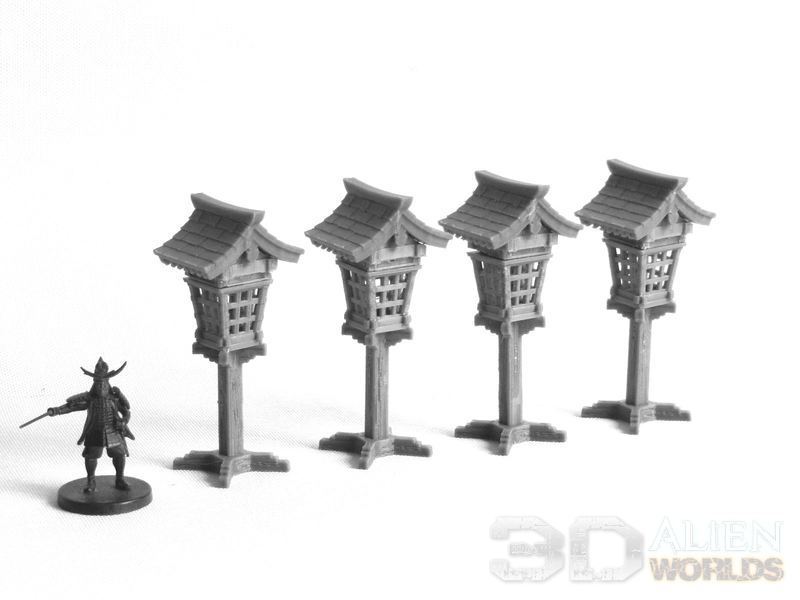
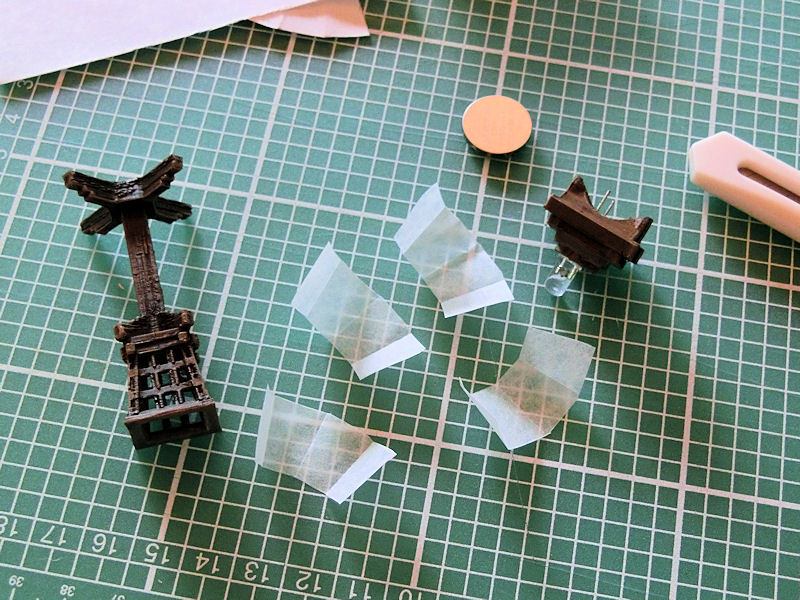
▲ In yesterday's blog we showed off this new shrine lantern design, and I printed 4 of them with the wooden base option.
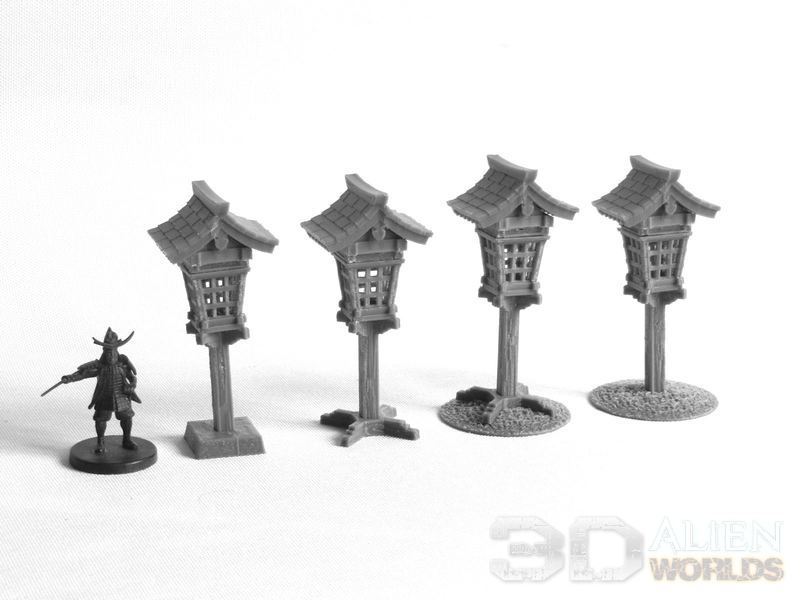
▲ There are actually 4 base options included in the set, as shown in the photo above.
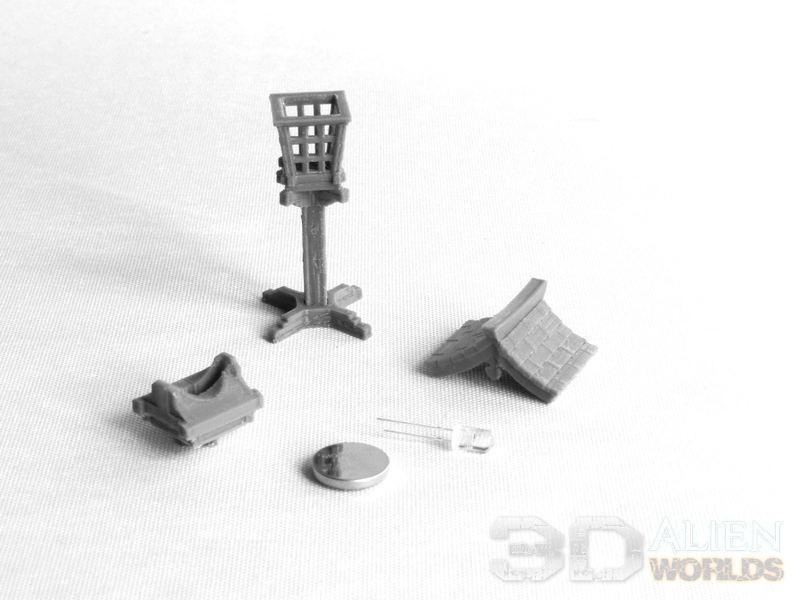
▲ The shrine lanterns can be fitted with a CR1632 coin battery and a small LED, to give a realistic glow to your gaming board.
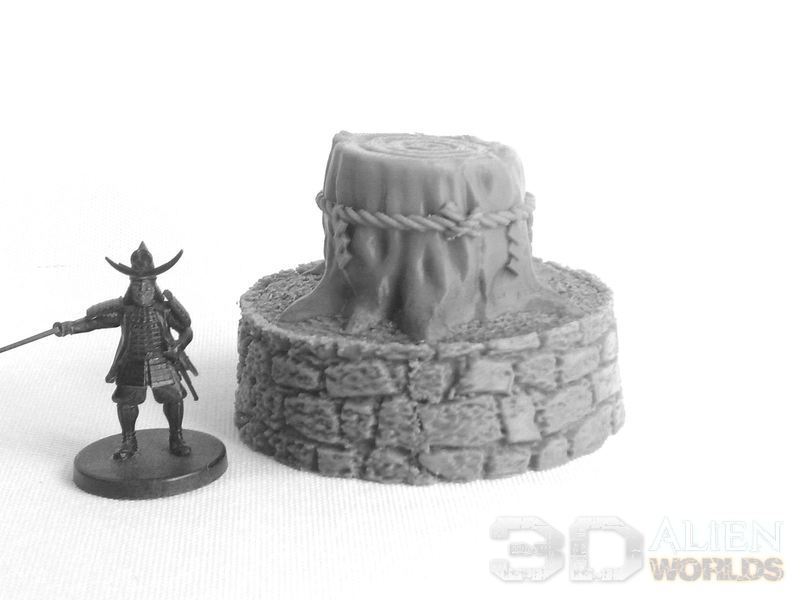
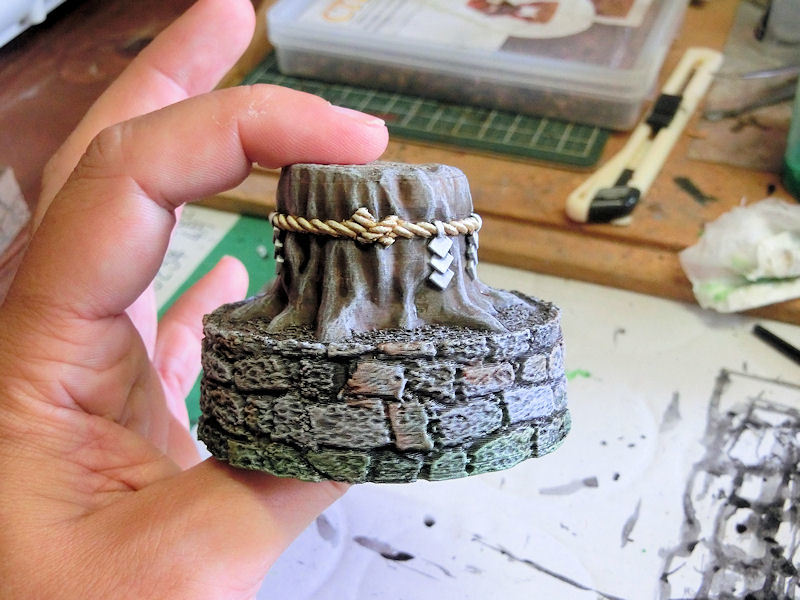
▲ This is the sacred tree stump, wrapped in a thick rope and paper tassles. These can often be found at Shinto shrines.

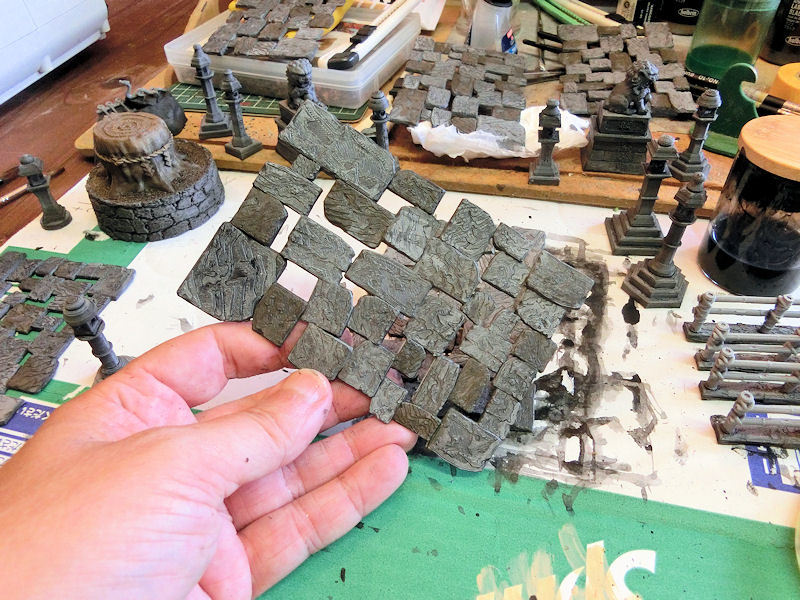
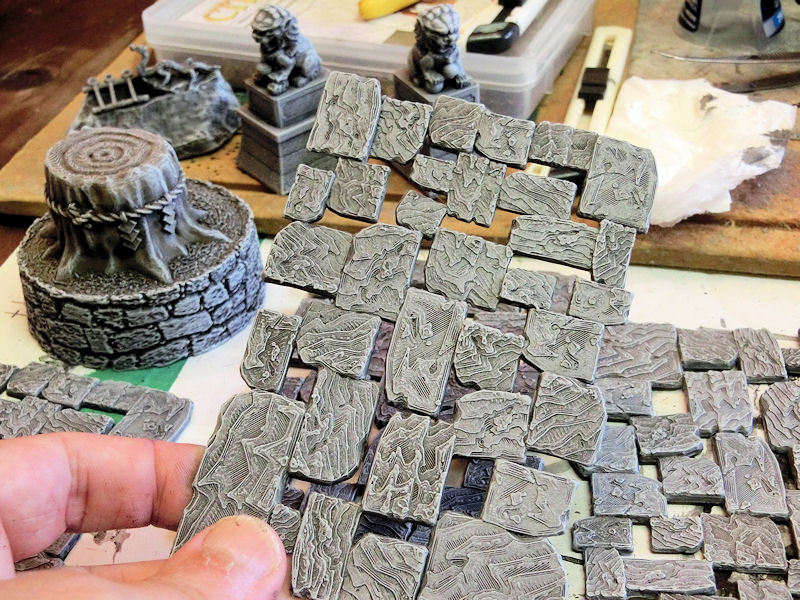
▲ The approach path to a shrine is usually made up of assorted stone slabs, worn smooth by the passage of feet over the years. These are easy prints, and can be used as straight paths and junctions in many samurai settings.
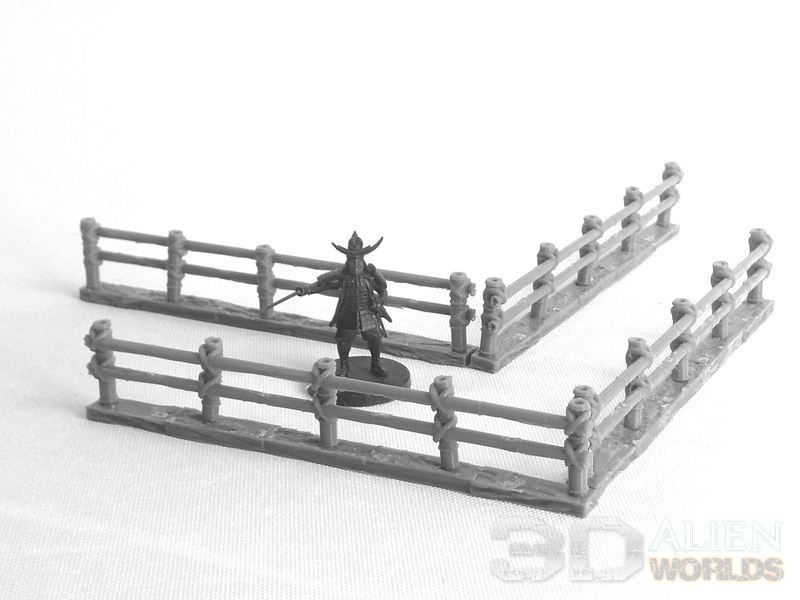
▲ Alongside the stone paths you'll often find simple bamboo fences, tied together by rough twine.
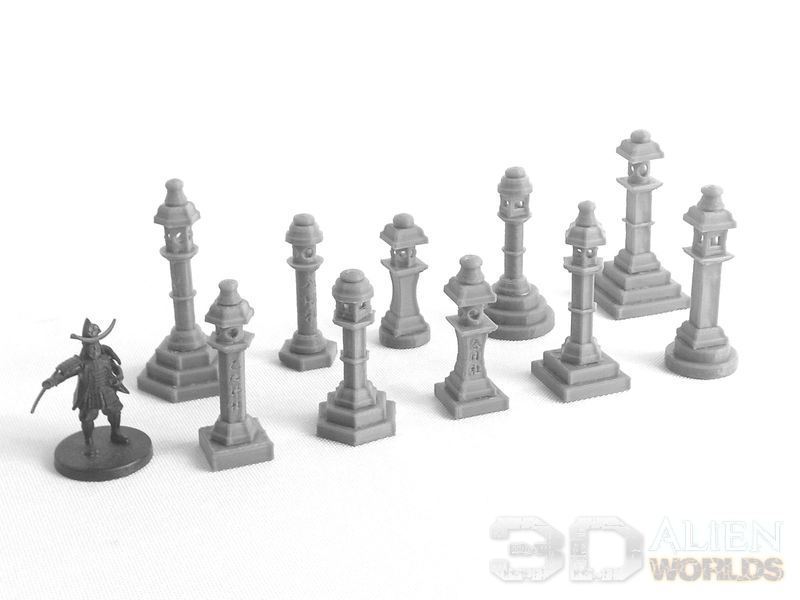
▲ At the sides of the path in a shrine you'll find many stone lanterns, in various shapes and sizes. These 10 lanterns were mixed and assembled from the contents of the ready-prepared set STL file.
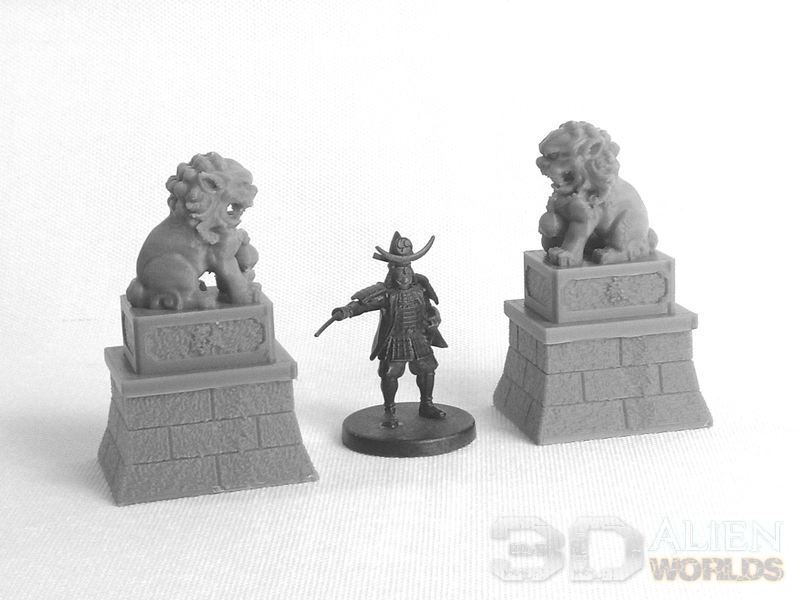
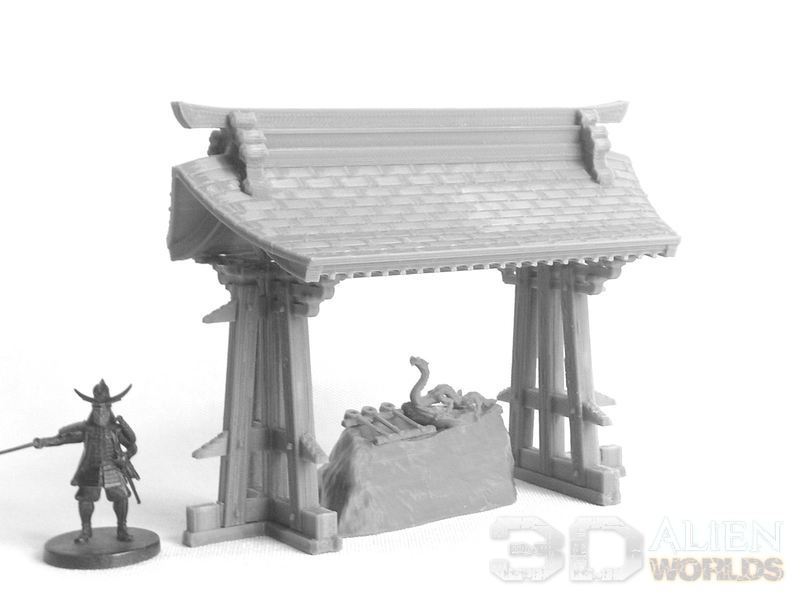
▲ This pair of komainu lion-dogs guard the entrance path to a shrine, and these are mounted on heavy stone plinths.
▲ Finally, we have this 60mm base for creating a bamboo forest to surround your shrine, into which you can insert these thin plastic bamboo trees. Please note that only the base is included in the set (shown in grey in the photo above). The green plastic bamboo trees are NOT included in the set, so you should grab some of those online!
Wow! It's a pretty big set, yes?
Please let us know what you think of everything, by sending us your comments below!


1 Comment :
Shrine Foxes
2023-09-04 (Mon) 6:04AM
This set is absolutely awesome. The main shrine roof is massive and the detailing is incredible. If I had one wish for a set that already contains a ton of accessories, I would love to see an iconic shrine fox! Otherwise, this set is impressive in every way.
Write a comment :