3d-printable terrain for all your samurai wargaming needs


Enjoy the new video for the full Samurai Lord's House model.....
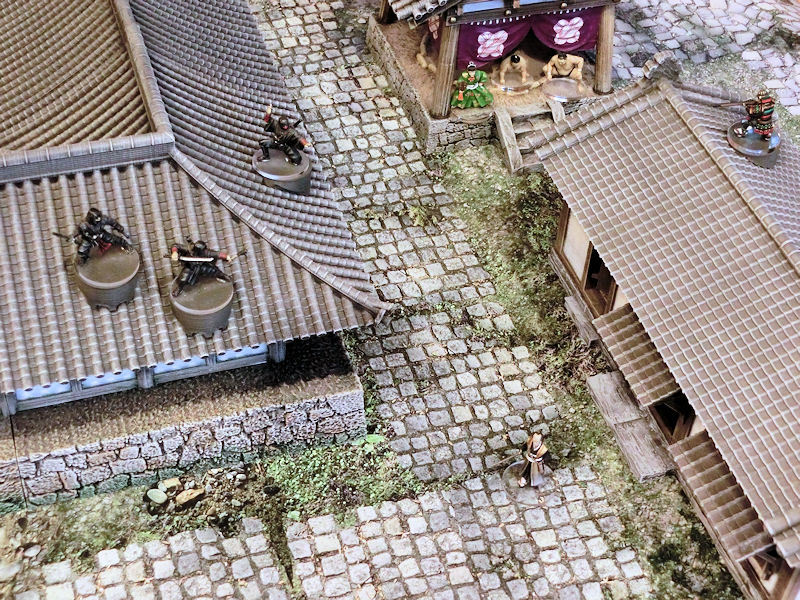
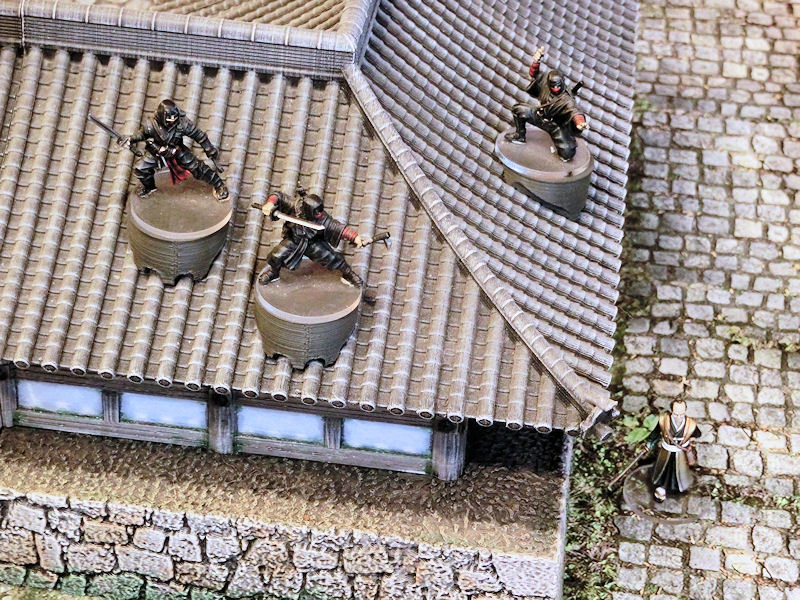
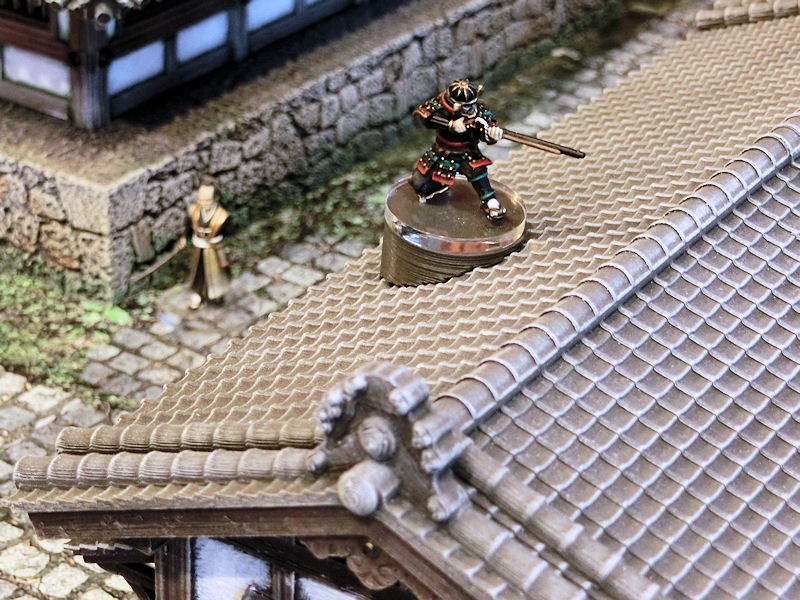
Have you ever played a game of Test of Honour where you REALLY want to see your ninja assassins creeping across rooftops, and raining down throwing knives on the heads of your enemies? But you can't, or risk the models toppling off the buildings and getting damaged?
Well, today we have a quick solution for you - roof stands!! These are simply negative versions of the roof shapes we use on our samurai buildings, and are designed to snugly fit the slopes and give your models somewhere to balance safely.
▲ Useful in skirmish wargames such as Test of Honour for doing sneak attacks like this, and they fit 25mm round bases perfectly.
▲ Type 1 is designed for fancy roof tiles, such as those found on temples, shrines and castles (like the photo above). It should fit curved and straight roof shapes.
▲ Type 2 is designed for simple roof tiles, such as those found on standard Japanese houses (like the photo above). You might need to mirror the stand, depending on whether your roof tiles go left-to-right, or right-to-left.
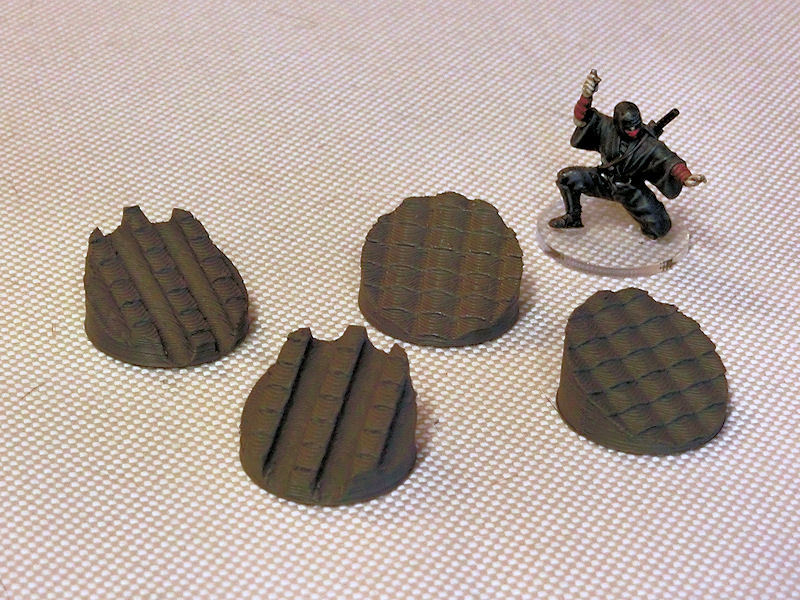
▲ The "fancy" roof stands are on the left, and the "simple" roof stands are on the right.
These files are available for FREE download, from our Thingiverse account:
https://www.thingiverse.com/thing:6597199

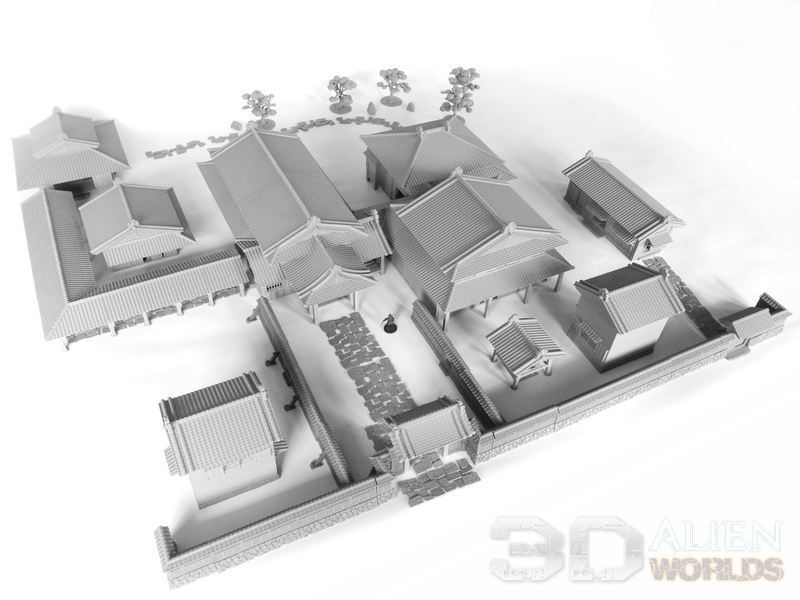
I'm very proud to be releasing the brand new set for the samurai collection today - the HUGE Samurai Lord's House!!
This really is the ULTIMATE gaming board for any samurai wargame or roleplay game, so let's take a look at the terrain inside....
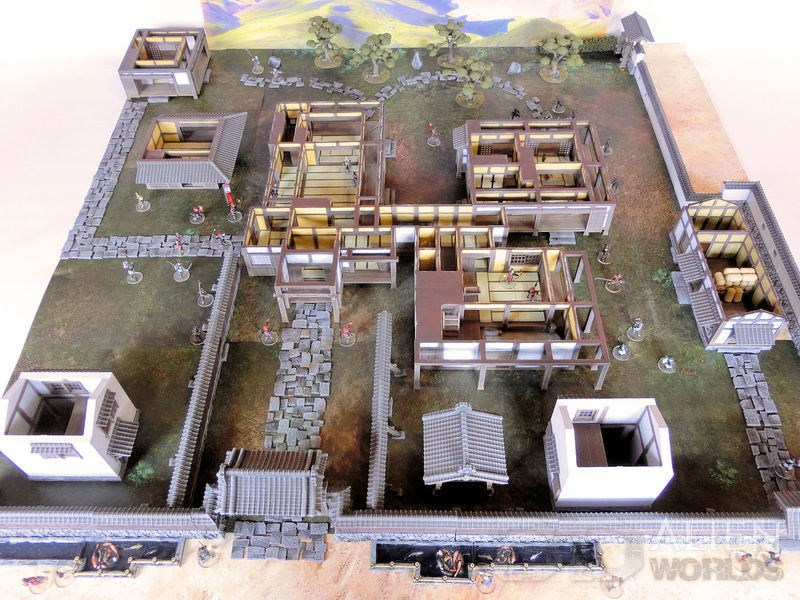
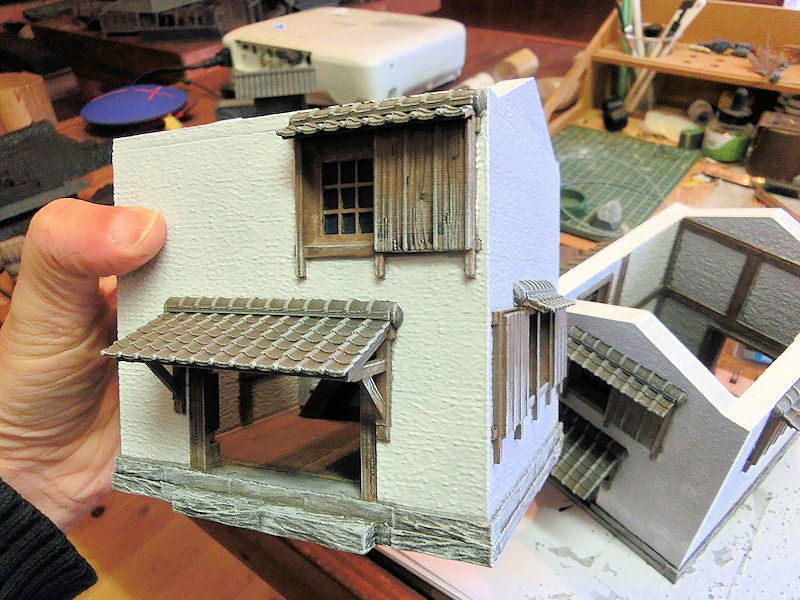
▲ Welcome to the Samurai Lord's House set!! This is a truly massive terrain set, which can be arranged in multiple layouts. The layout we're showing off today in these photos is the real-life layout of the historical Inaba Residence in Oita prefecture, which is what the whole model is based on.
Our version of the model will be displayed here at the studio for a year or so, enough to get some awesome wargames played on it, and then it will probably be heading for display at the historical residence's public museum!
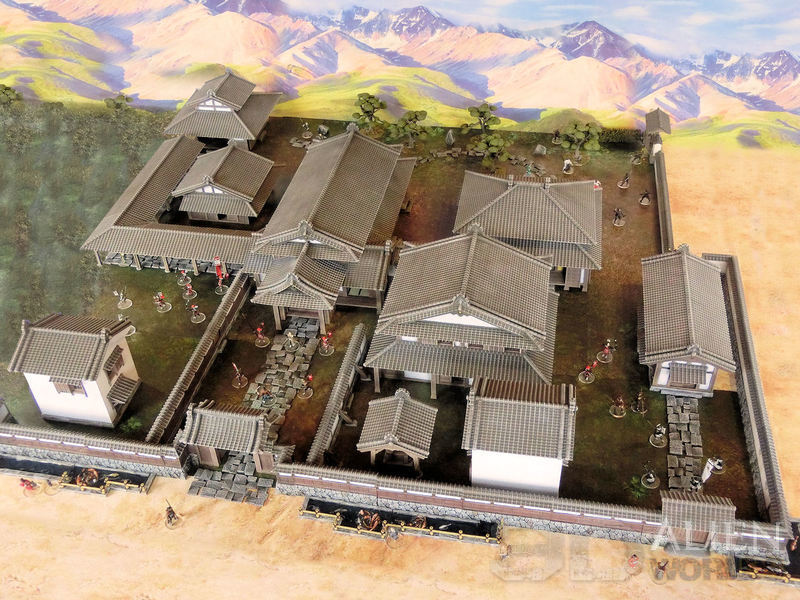
▲ This was a very hard model to photograph, because it's just so enormous! This layout covers 120x120cm (4'x4') with buildings, walkways, walls and gardens. Just look at all that lovely gameplay!
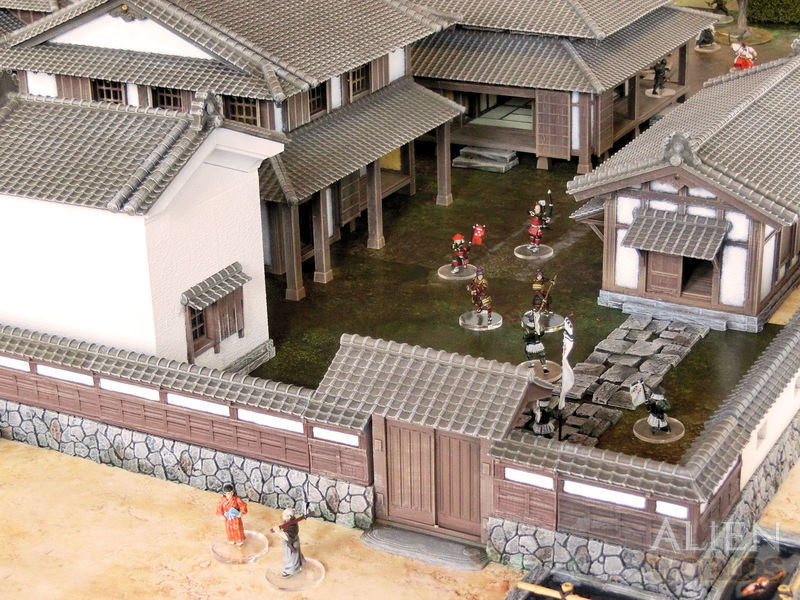
▲ The main gate is quite imposing, and leads to a front courtyard and the main house building (centre of the photo). The outer walls have tall stone bases and that classic wood panelling, while the inner walls have lower stone bases and wooden supports.
In these photos I've also included the street fish ponds, because the real-life historical house has those outside, but please note that these are not included in the set.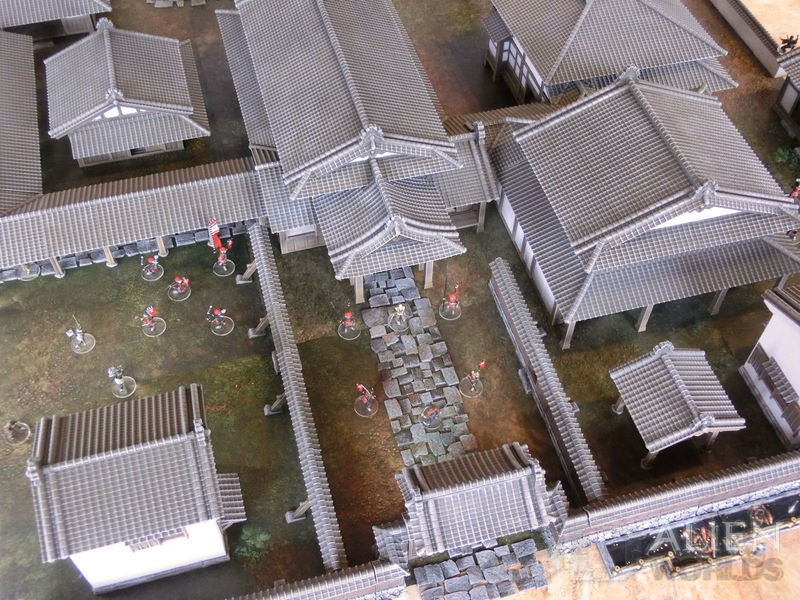
▲ This is an aerial view of the main gate and main house building (centre). The main house connects via a corridor piece to the large kitchen building (right) and bedroom residence (top right).
The front courtyard includes small gates in the inner walls, leading left and right. On the left you can see one of the kura storehouses included in the set, and on the right you can see the roof of the water well.
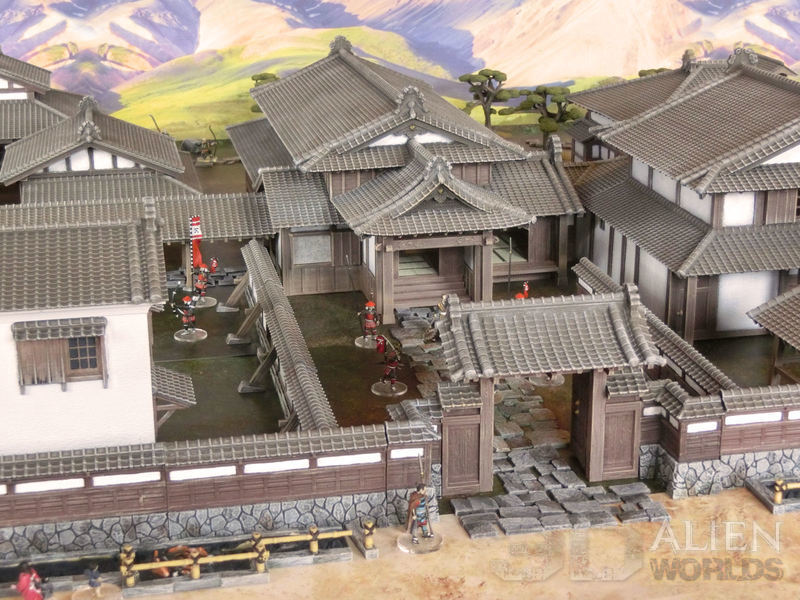
▲ This is the medium-sized gate on the right-hand corner of the front wall. It leads to the kitchen building and surrounding storehouses, and would most likely have been used by staff and lower-status visitors.
The white building on the left is the second of the kura storehouses, which would have contained food stores on the ground floor, and precious items upstairs. The thick clay-covered walls were designed to be fireproof.
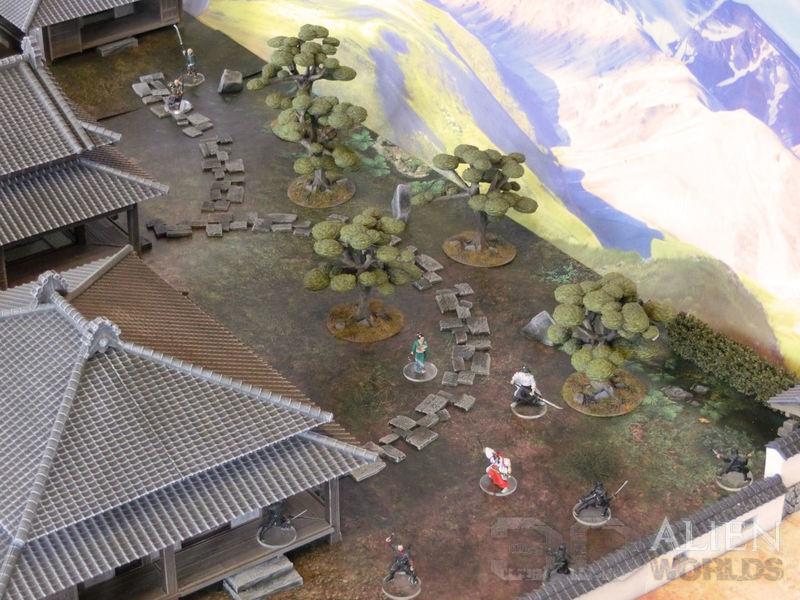
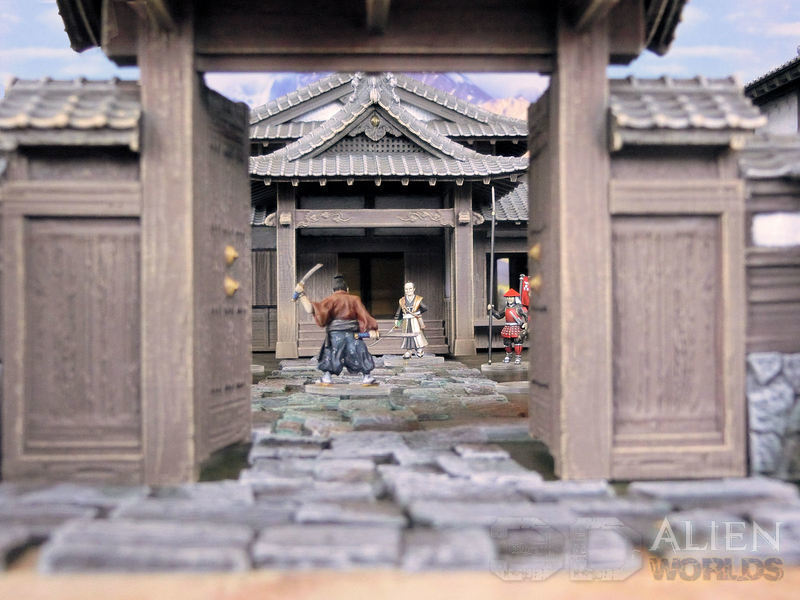
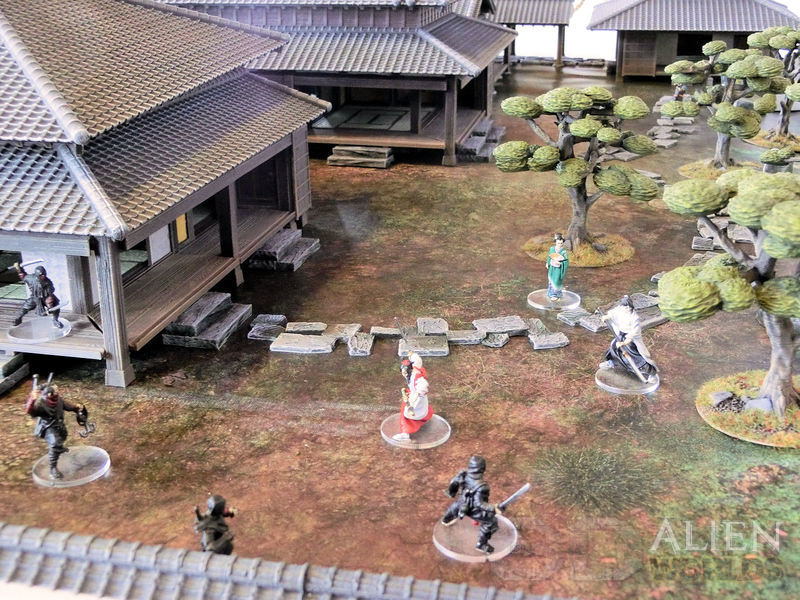
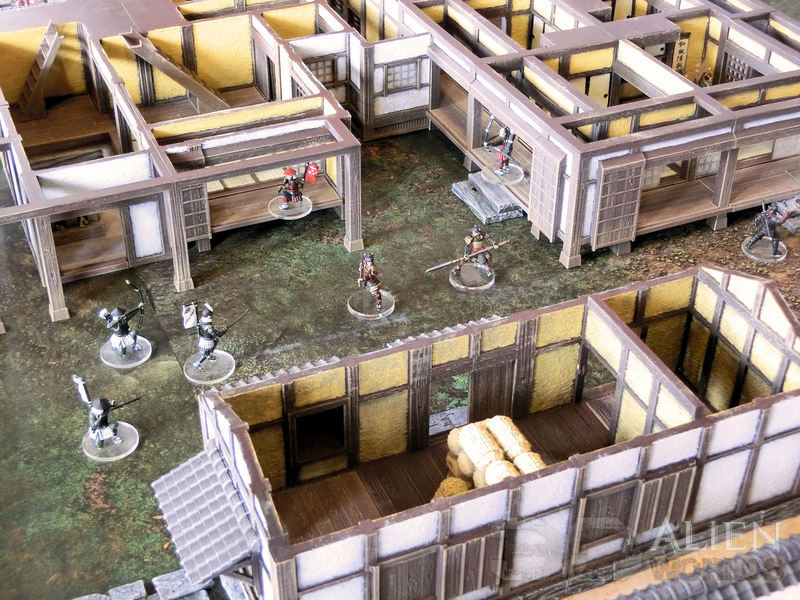
▲ The ornamental garden is a key part of the set, and the curving stone paths and sculptured topiary trees are included. In this scene you can see a life-and-death struggle between the Lady and her bodyguards and some sneaky ninja assassins.
▲ The garden is a natural extension of the residence building, where the Lord's family would have slept, with stone steps and carefully arranged views. This would probably also work really well with some ornamental ponds?
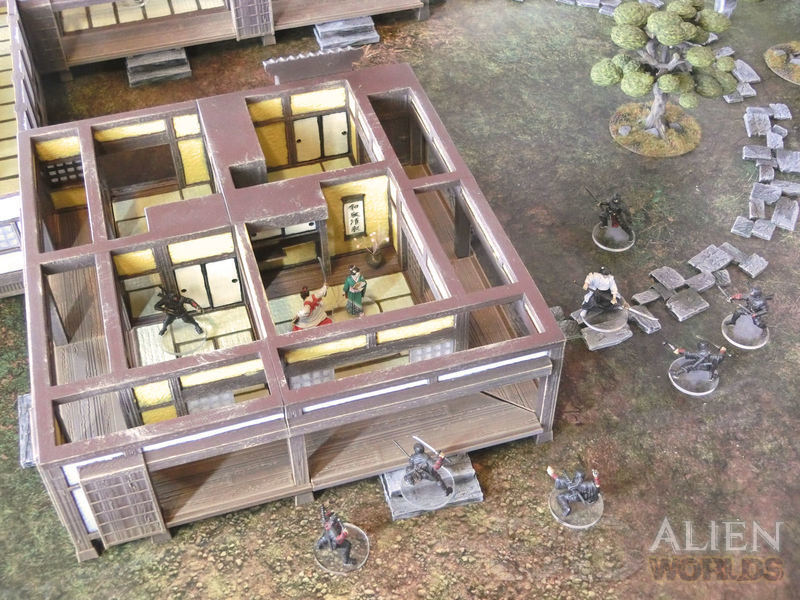
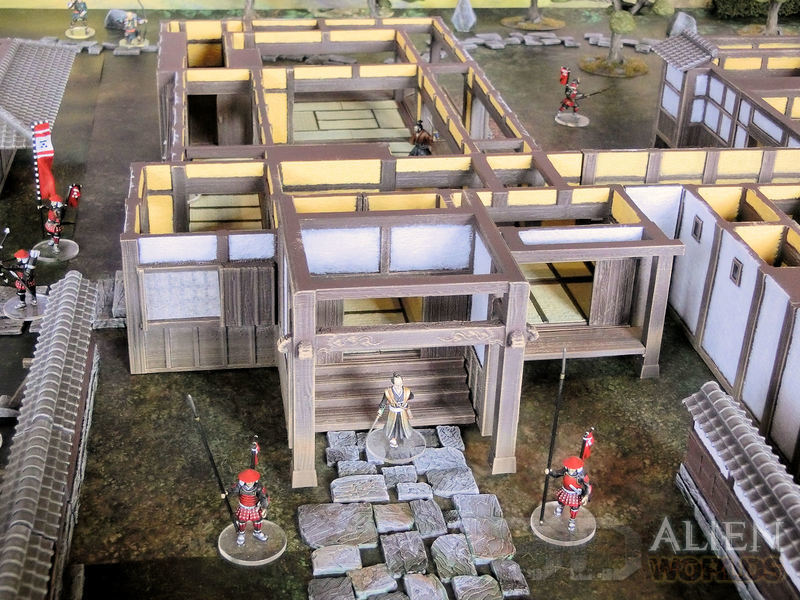
▲ Let's take the roof sections off, and see what the interiors look like....
All of the building interiors are fully playable, with detailed interiors and authentic decorations. Each room is connected by multiple sliding doors, allowing for exciting fights from room to room.
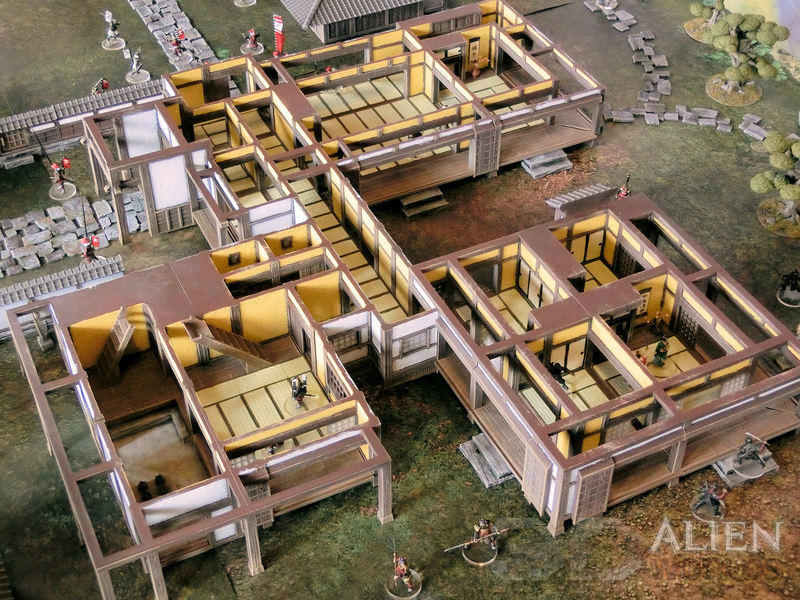
▲ Here we can see the 3 interconnected buildings - the bedroom residence (on the right) leads to a corridor section that joins the two-storey kitchen building (left) to the big main house (top centre).
Imagine the desperate fights as your Lord's warriors scramble to defend the house from attackers coming from every direction!
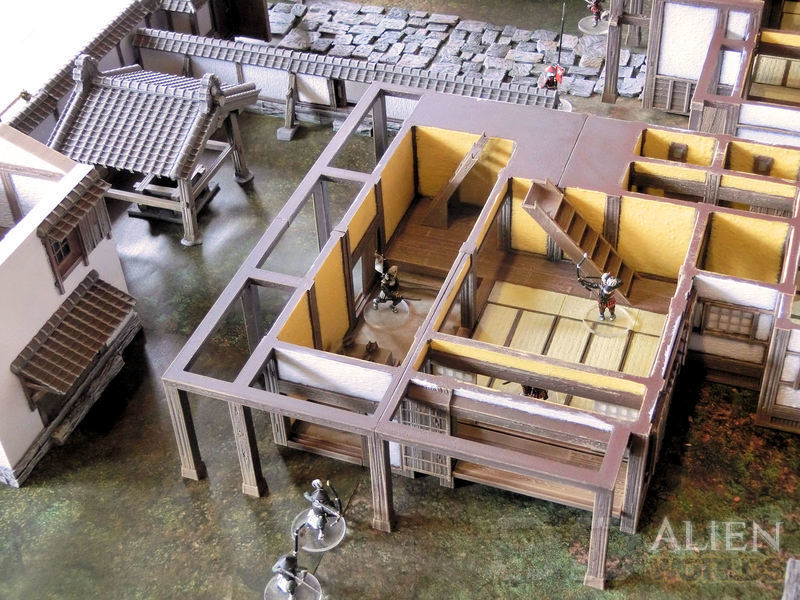
▲ The kitchen also features two narrow staircases leading to an upper storey, and the open floor above the oven area is ideal for sneak attacks!
Right across from the main door of the kitchen is the kura storehouse (left), and the water well supplying the house. Two hole-in-the-floor toilets are hidden away in the kitchen building too - with authentic sliding doors!
▲ Even this long storehouse has 3 entrances and exits, allowing for desperate last stands and objective grabbing!
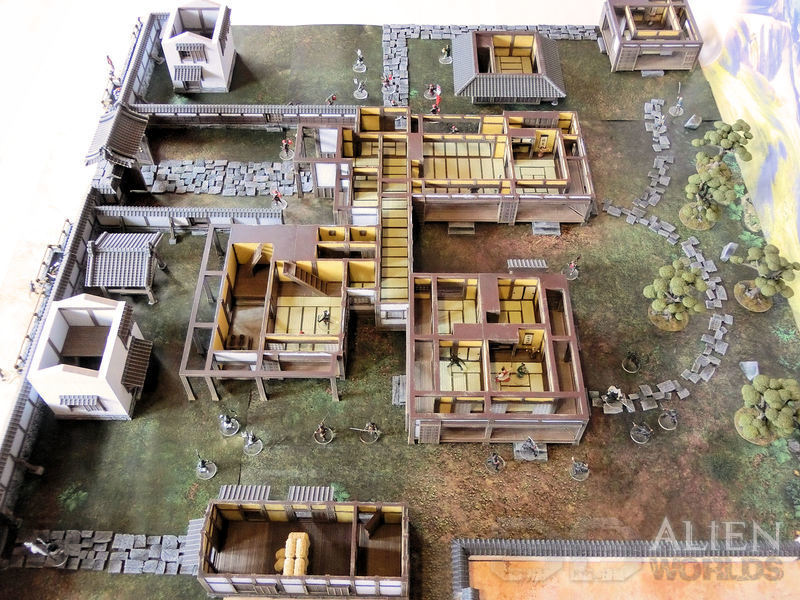
▲ A view of the whole layout from the side wall. At the very top you can see the stone path leading from the main house to the two guesthouses (top right), and the set also includes covered walkways to keep your guests warm and dry!
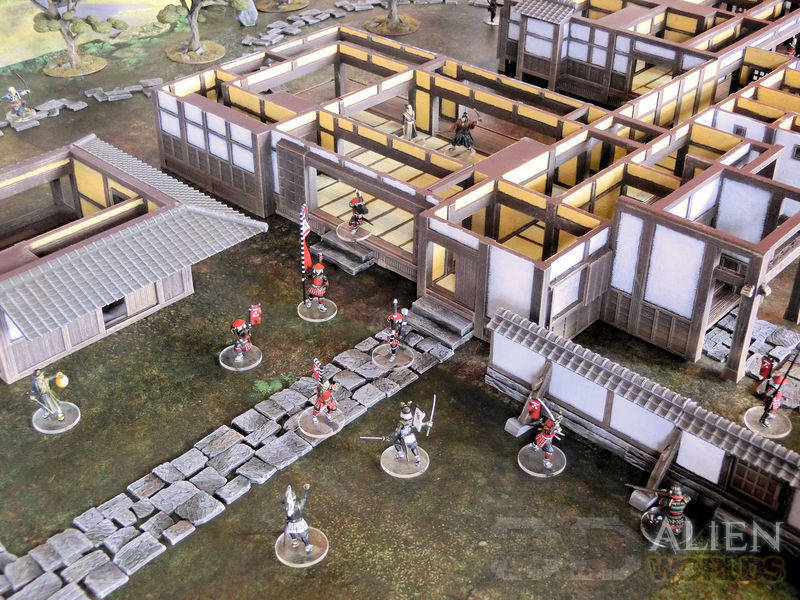
▲ With all of the roof sections removed, just look at all the possibilities for strategies and tactical gameplay - chokepoints, defended strongholds, and lines of retreat!
▲ Here's Lord Nobu and his household troops, ready to give a typically warm welcome to his unwanted guests....
▲ This truly is the ULTIMATE skirmish gameboard, and I'm really looking forward to playing my first game on it in a few weeks!
▲ The Samurai Lord's House set is available for download from today!
Here's a quick timelapse video of the new 3D-printable Samurai Lord's House set being laid out on a 120cmx120cm (4'x4') board. This massive model has been created for wargaming at 28mm scale, and is based on the real-life Inaba Residence historical house in Usuki City, Oita Prefecture.
Final photos and videos coming very soon!!
The huge Samurai Lord's House set is currently on the paint desk, and with only a few last pieces to complete, it seems a good moment to show you some tips and suggestions on how to paint everything quickly and efficiently!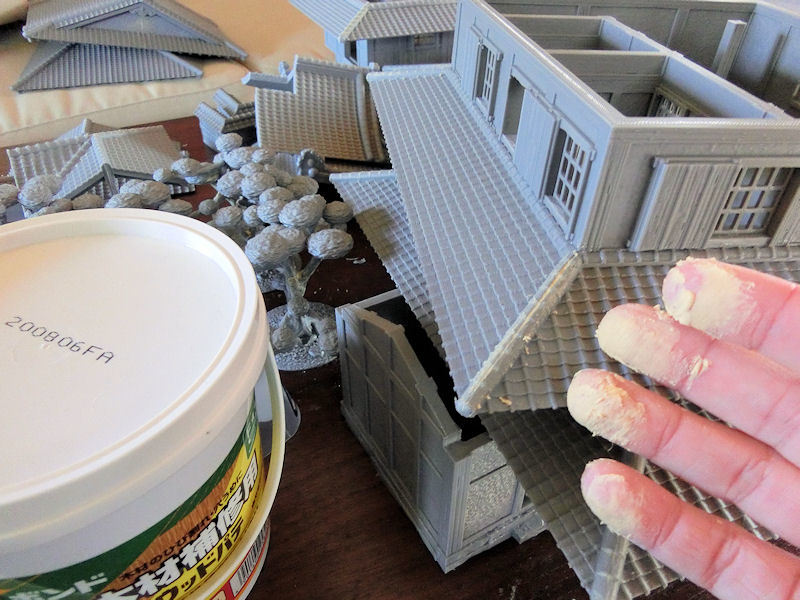
▲ The first thing to do is to cover some gaps. Many of the roof pieces are multipart, and it's a good idea to hide some gaps there - I find wood putty pretty helpful for this, although it's a rather messy job! Simply smear some putty in the gaps, and smooth it off with a wet finger.
The trees will probably also have some holes where you couldn't fit branches in, and those will probably also look better with putty covering the holes.

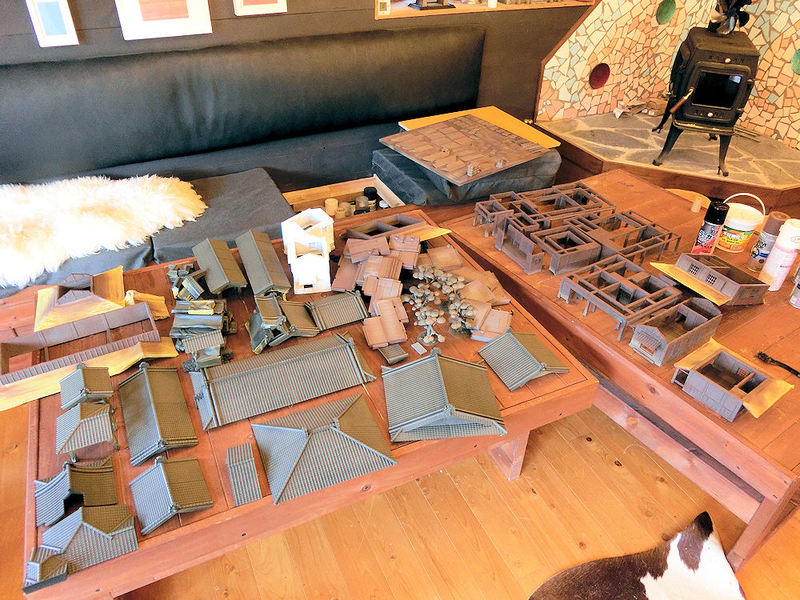
▲ Next job is to find a big, empty table and start breaking down all of the buildings into their component parts. If you look on the right of the photo above, you'll see that all of the base sections with tatami stuck to them are now separate from the walls, as this will make it much easier to get in all the nooks and crannies with a paintbrush. It also means that it will be much easier to get straight lines on those tatami mats.
▲ It's time to paint!! For such a big set, I think the best way to get things started fast is to spray basecoats - slate grey for the topside of the roof sections, and black for the stone paths and wall bases, and brown for everything else.
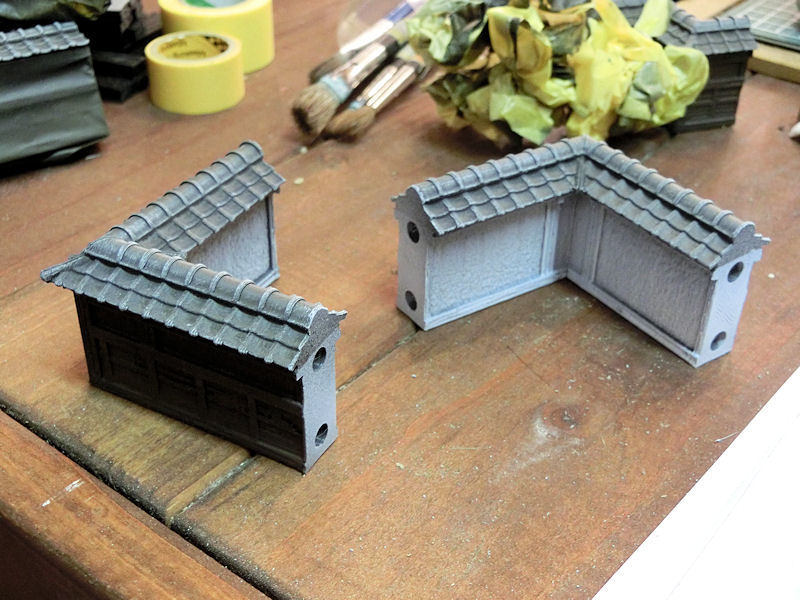
Take your time, and make use of plenty of masking tape where possible! My roof sections, for example, were sprayed slate grey on the tops, and then the edges were masked, and the undersides were sprayed brown for the wood. You can see this on certain buildings at the edges of this photo above.
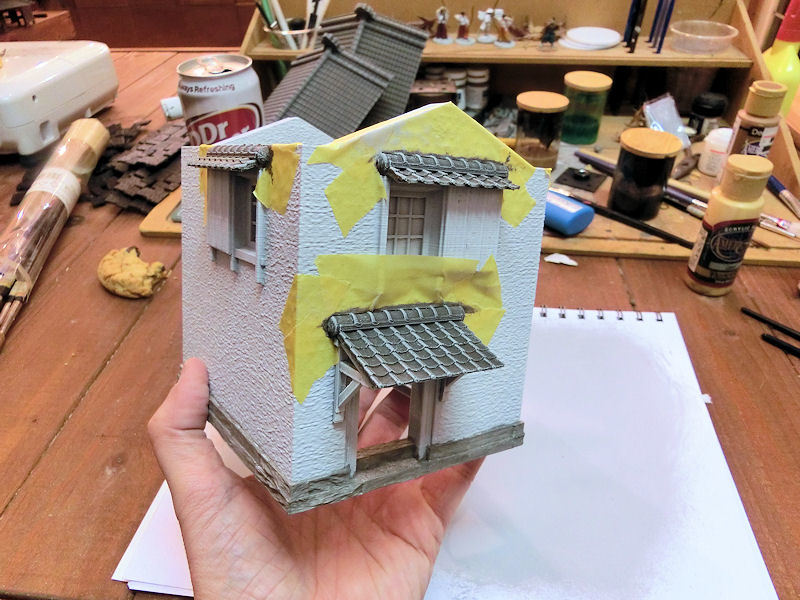
▲ The outer walls were in fact sprayed in three colours - brown for the wooden side, and white for the inner side, and then these were covered in masking tape before slate grey was sprayed over the roof tile parts. That's a pretty quick way to get these walls done fast.
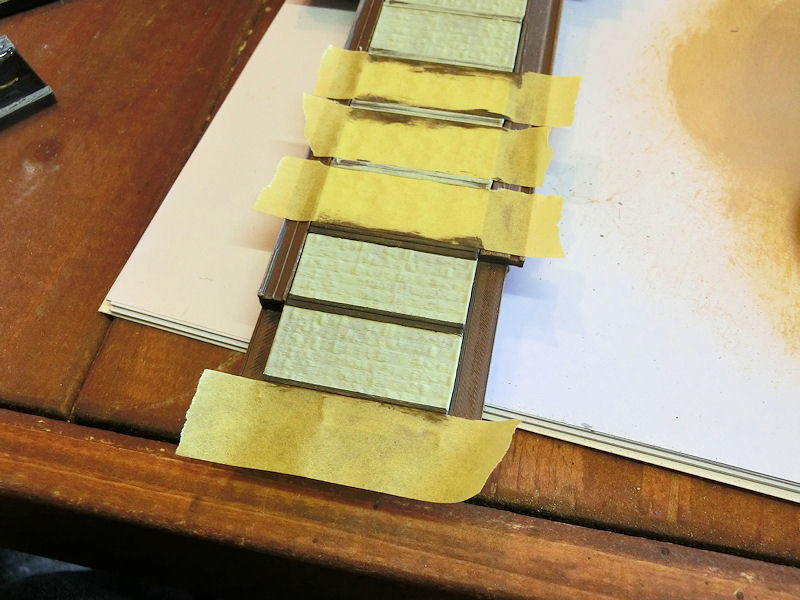
While the masking tape was still on, I spent an afternoon drybrushing every roof tile in the set in a light grey colour with a large 2" brush. This can be a slightly messy job, so it helps to keep the masking tape on where possible. Once the tape is removed, it should look like the photo above.

▲ Here's a great progress photo, showing big sections and buildings drybrushed and ready for detail. After the roof tiles were all drybrushed, the masking tape was all removed, and I drybrushed all of the wooden parts in a pinky-lightbrown colour called Fawn (by DecoArt). At this stage I also basecoated the tatami mats with two coats of Sage, the very light green colour you can see in the bottom left corner of the photo.
▲ Kura storehouses:
The two kura storehouses in the set are predominantly white, so I tried a different approach for those. Instead of basecoating with brown spray undercoat, I undercoated in a mat white, inside and out.
The roof sections were then basecoated with a 1cm wide, flat brush in slate grey, which helps to keep the edges neat, and then drybrushed in light grey. You might find using masking tape to cover certain parts of the walls helpful here, as it's a pain to repair smudges on white. I then basecoated the bottom stone sections in medium grey, and then gave them a black wash.
▲ The last parts to paint on the storehouses were the wooden door and window frames, and these were, I'll be honest, hard. My 1cm wide, flat brush helped to keep things neat, but adding a black wash over the wood was hard to keep neat. After the wood and stone was carefully drybrushed in light brown and grey, I did have to go back and repaint several bits in white again.
In hindsight, I'm not entirely sure the white undercoat saved me much time at all. It might have been just as fast to spray the building brown, drybrush the wood quickly, and then start to paint the walls in white. But never mind, you live and learn, eh?...
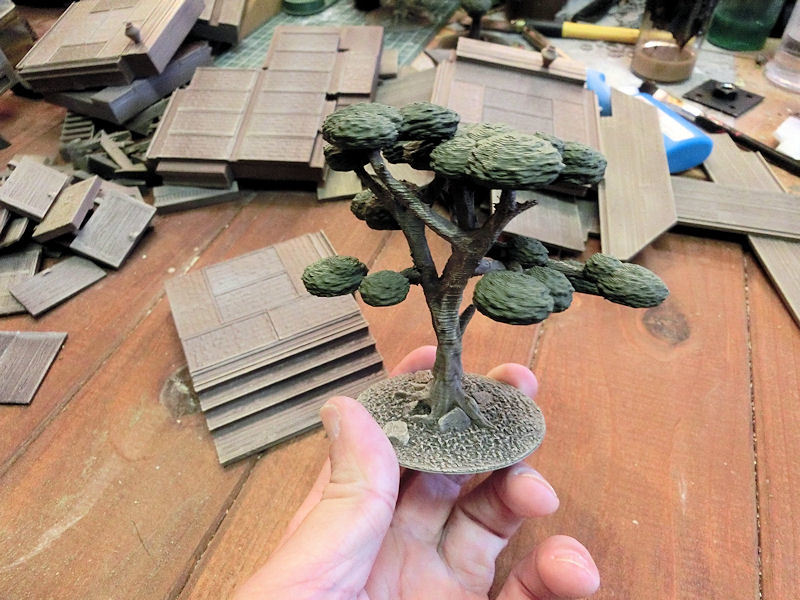
▲ Trees:
The whole model was spray undercoated in black to cover everything, and then lightly sprayed in a light brown colour. The base and lower roots were then drybrushed with a light grey/brown colour called Mississippi Mud (by DecoArts). 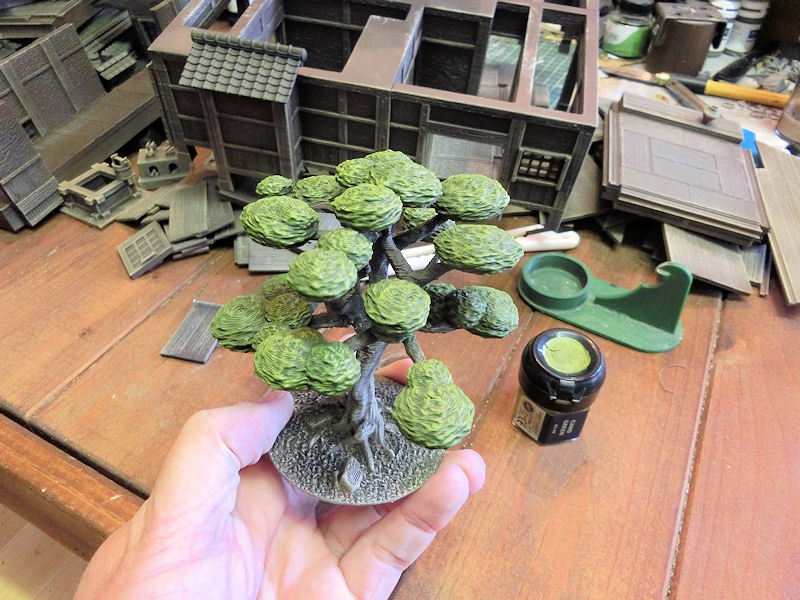
▲ These trees are juniper trees, shaped into very traditional topiary shapes. As such, they tend to be quite a uniform, mid-dark green. But that's not very interesting to look at on a scale model, so after basecoating the bush parts in a dark khaki green, I drybrushed with Camo Green (by GW), which gave them some extra pop.
▲ Tatami:
Tatami mats are usually light green or light yellow when new, fading to darker tones with age and time. However, I can imagine that the Samurai Lord owning this house would not want his visitors to see old, yellowed tatami mats, so I chose to paint them all in this very light green Sage colour (by DecoArts).
The edging on tatami mats is usually navy blue or a mid-dark green, but after looking at my reference photos of the real-life Inaba Residence (in Oita prefecture) I noticed the edges were all black. That's actually quite unusual, I think. But painting the edges in flat black would perhaps make them a little too strong, so I picked a more subdued dark grey/brown (Charadon Granite, by GW) to do mine.
Here's a tip for you: There are hundreds of tatami mats in this set, and edging each one by freehand is nerve-wracking! Strips of masking tape moved from mat to mat as you go, helps speed things up and keep your lines straight!
Stone paths:
This article on painting the Shrine Set shows how to paints the paths:
https://www.3dalienworlds.com/blog.php?BlogID=326
Building walls:
See the dojo article for painting the walls (white outside, yellow inside):
https://www.3dalienworlds.com/blog.php?BlogID=319
Stone outer walls:
Here's how to paint the stone sections of the outer walls:
https://www.3dalienworlds.com/blog.php?BlogID=59
I think that's about it! The last pieces of the set will be fully painted up this weekend, so watch this space for the big release and finished photos next week... if I can find a table big enough!


0 Comments :
Write a comment :