3d-printable terrain for all your samurai wargaming needs


We have a new European retail partner to introduce to you today - SCENERY 3D PRINTS (or Impresión 3D Escenografía), supporting the gaming scene in Spain.
They're printing our full samurai and sci-fi collections of terrain, so if you can't see the models you want there just drop them a line - they'd be happy to add those to the store, too! Take a look and see what they have for you!

It's time for another Test of Honour battle report!! Today we are playing the Ambush scenario, as a chest of gold coins is transported under heavy guard.
Where will the ambushers strike?
▲ The attackers have chosen their ambush site carefully. As the guards march wearily past the ruined hut and towards the welcome sight of a tea shop and tea house on the outskirts of the town, they know they're almost at their destination.
Let's hope they haven't let their guard down too much!
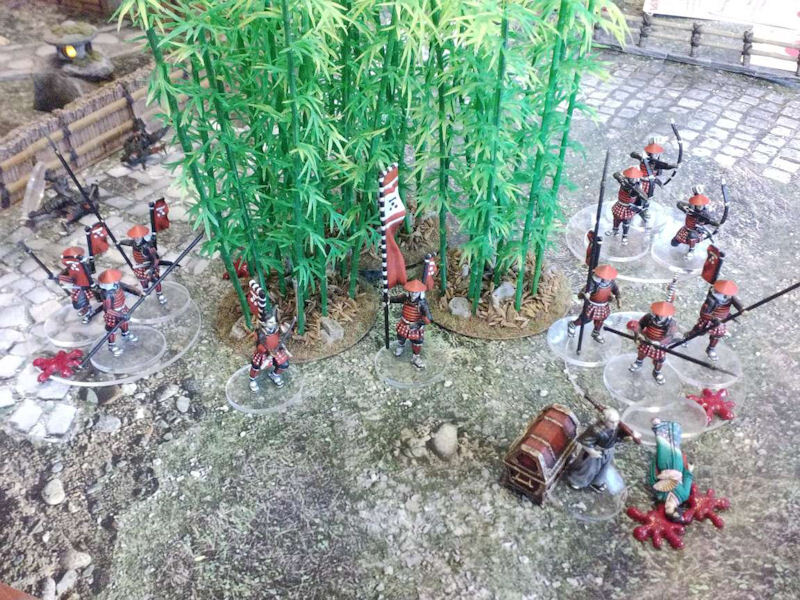
▲ This is the defending force, transporting the chest across back to town. A samurai hero and his devoted lieutenant (on the left) are in charge of dealing with any trouble they might encounter on the road, backed up by two groups of spearmen, archers, a banner bearer and a very noisy sergeant!
Care of the chest has been entrusted to old Master Jiro, who is the only unarmoured model in the force.
▲ The ambushers are led by the bearded ronin Tora, and his lieutenants are cunningly disguised as a geisha and an old beggar. Several ninja will join the ambush, where their throwing knives should help to sow confusion.
The ashigaru deserter (on the right) has also joined the ambushers in the hope of a good payday, but unbeknownst to him, Tora is actually using him as bait for re-directing enemy charges. The castle guards hate the deserter so much that they may HAVE to charge him!
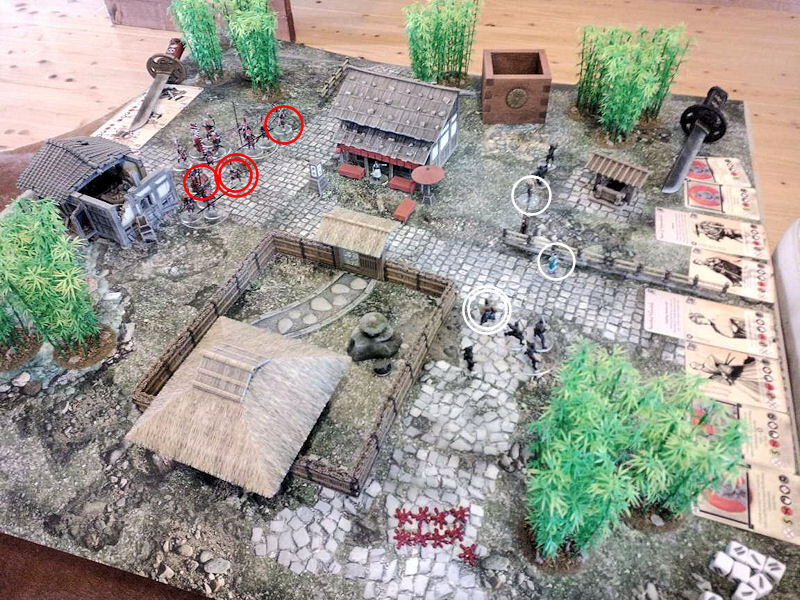
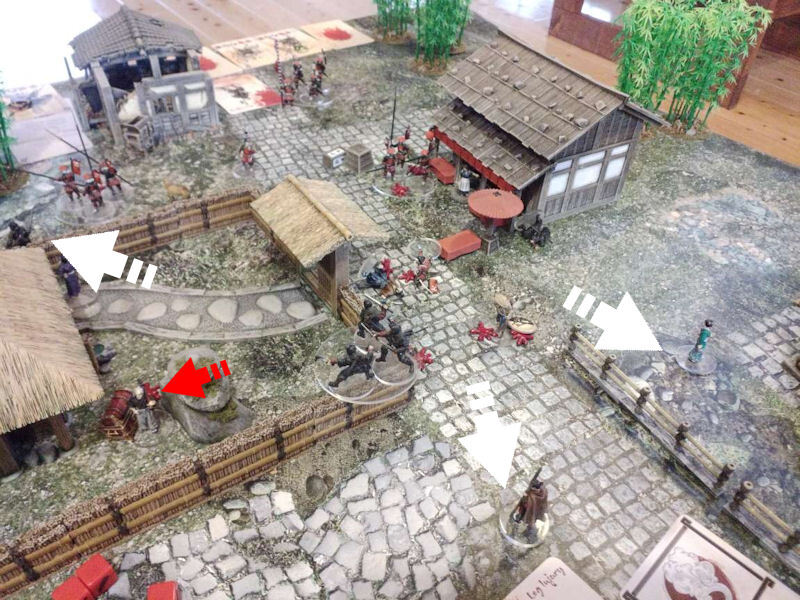
▲ The guards (in RED) start the game on the left of the board, and have to escape with the chest off the opposite table edge. The hero is double-circled in red, and his lieutenants are circled next to him.
The ambushers (in WHITE) have to grab the chest from old Master Jiro and escape off the left-hand side to win.
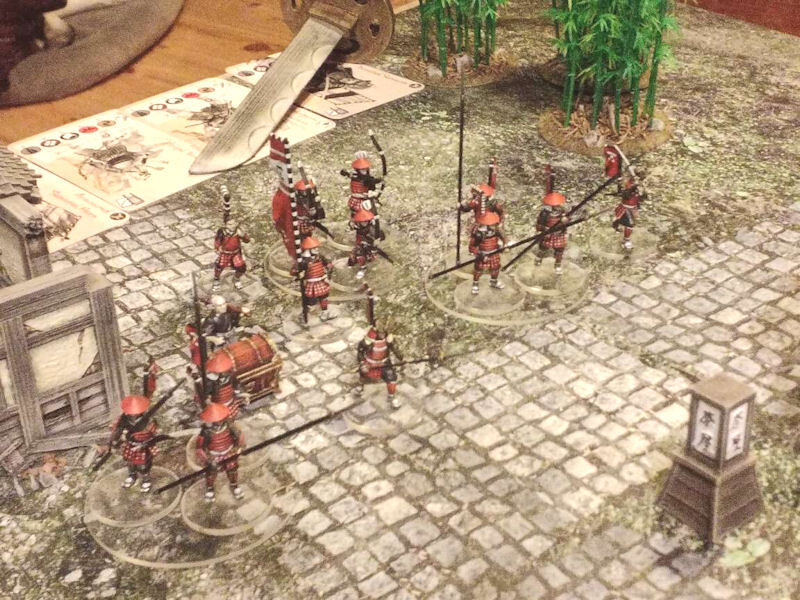
▲ Master Jiro has been entrusted with the chest, and is limited to only 4" per action, so there wasn't much maneuverability there. The captain ordered his forces to spread out, leaving no gaps in their battleline.
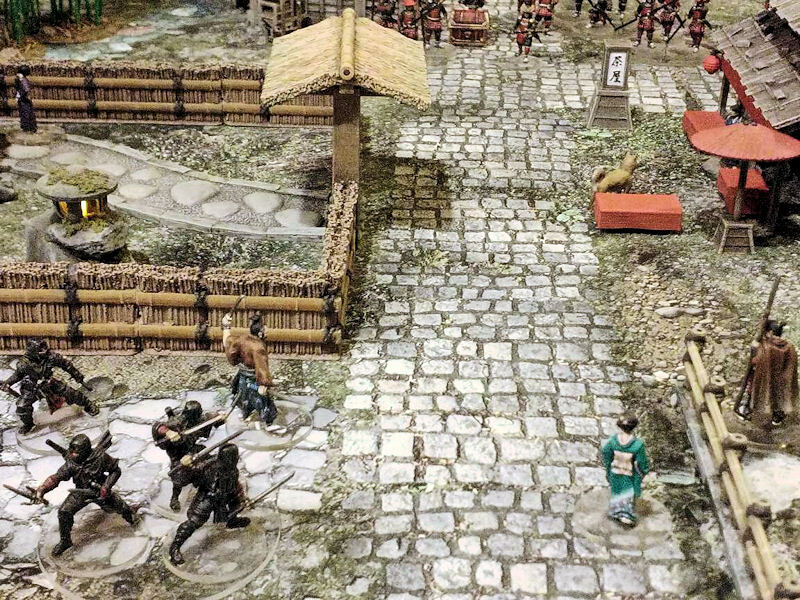
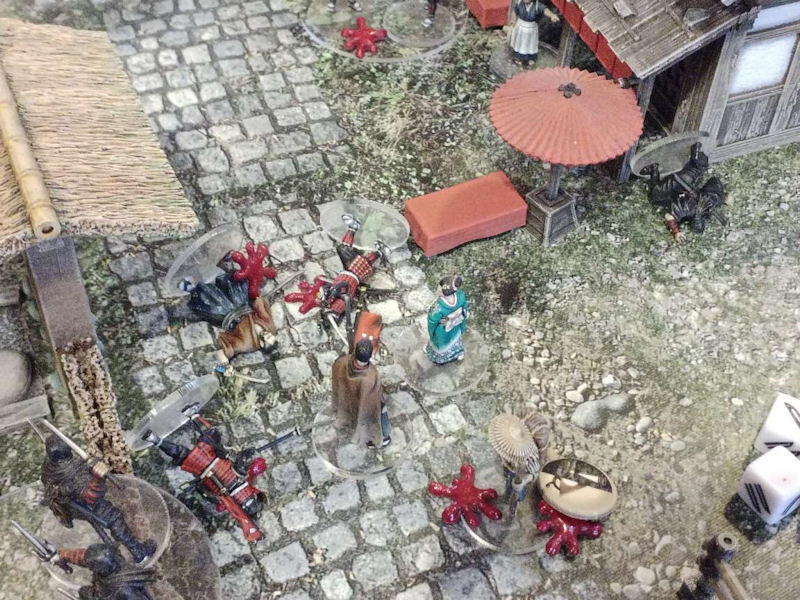
▲ Tora the ronin smiled wickedly as his ambushers crept from their hiding places behind the fences and buildings, ready to attack.
▲ The old 'beggar' strolled forward whistling a jaunty tune, trusting to his years of experience in wearing his disguise. To his right, one of the ninja assassins crept to the side of the tea shop and leapt up on to the low roof. His tabi boots slipped on the rain-slicked wood, and he tumbled down again cursing!
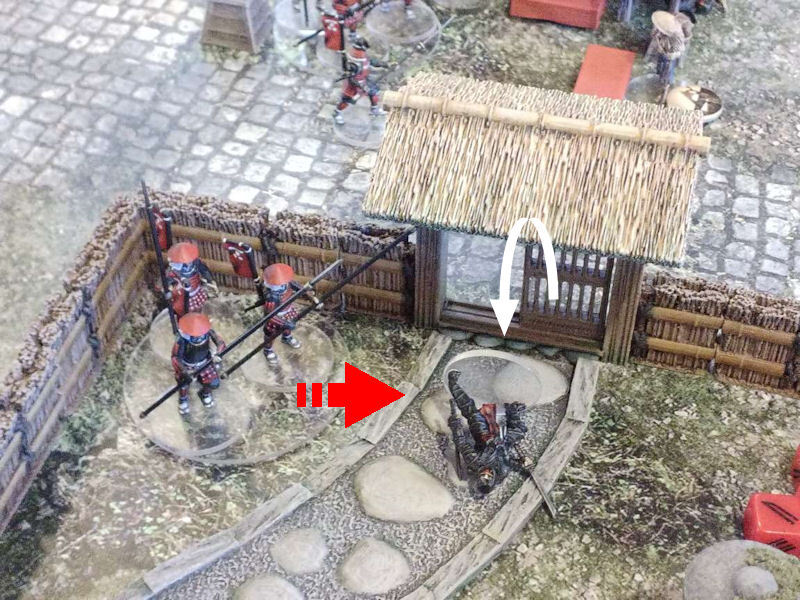
▲ A second ninja darted across the teahouse garden and attempted to climb up onto the gate's roof, but he also slipped on the wet thatch!
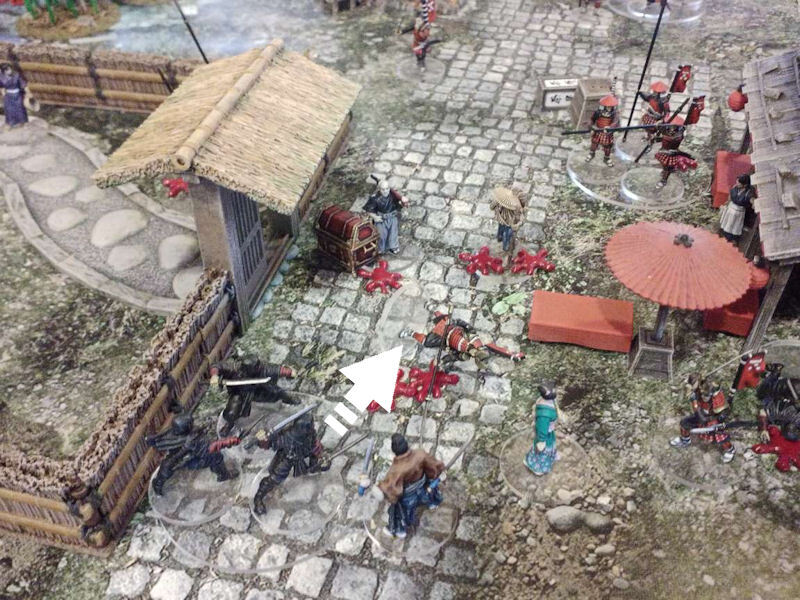
With a roar, the enemy spearmen charged across the fence into the garden, stabbing down at the struggling ninja, but failed to pin him down.

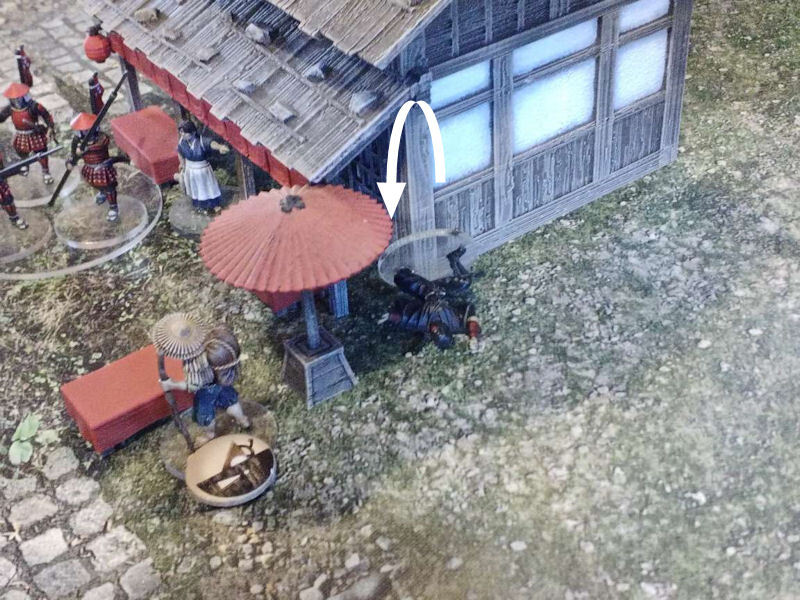
▲ The samurai lieutenant of the defending force rushed around the back of the tea shop, and howled as he launched himself at the first would-be assassin, still lying on the ground with the wind knocked out of him.
A wild swing took the ninja's head clean off, and two of his nearby accomplices bolted away in panic!

▲ The geisha Tomoko, seeing the enemy lieutenant had over-extended himself, charged forward with an evil cackle but slipped on the spreading pool of blood, and slid to a halt.

▲ Glancing behind him to check that the chest was well protected by Jiro and the nearby spearmen, the samurai captain leapt forwards onto one of the benches and swung his naginata down at the old beggar. He managed to blood-drop him, before stepping back to take up a blocking position next to old Master Jiro once more.
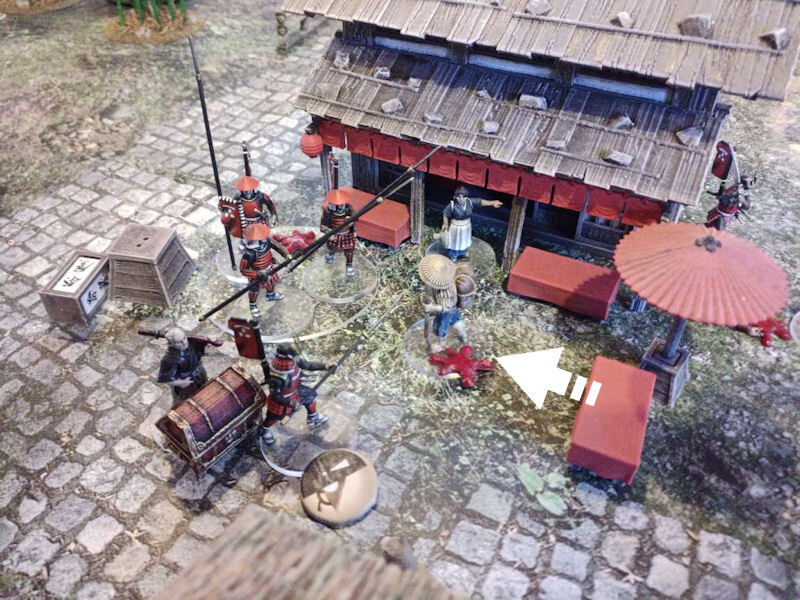
▲ The ruse was over, so the old beggar charged forwards into the group of spearmen, blood-dropping them as they stumbled backward into the teahouse's paper lantern.
The owner of the teashop, Izumi, screamed her displeasure at the old man, as benches went flying and blood splattered the floor!

▲ The old beggar tried another charge, this time on old Master Jiro himself! The two experienced fighters were evenly matched, and the old men danced back with only minor scratches.
▲ Seeing that the old beggar was out of actions for this turn, the samurai captain decided to go on the offensive and charged straight at the ronin Tora!
The two leaders lunged and parried, but were unable to land any blows.
▲ Tora the ronin decided to play one of his skill cards, and ordered Tomoko the geisha to charge into the samurai captain as a free action. While she didn't cause any damage with her attack, it gave Tora the distraction he needed and he swung both his swords at his enemy, knocking the samurai to his knees and dealing a heavy injury to his leg!
▲ A group of 3 assassins saw their moment and somersaulted forwards across the garden fence, a blur of shortswords descending on the samurai captain at their feet. Outmatched and outnumbered, the captain finally slumped to the cobbles as his blood splashed out!
▲ The guard forces lost heart at the death of their captain and even Master Jiro turned to flee, dropping the heavy chest in the street.
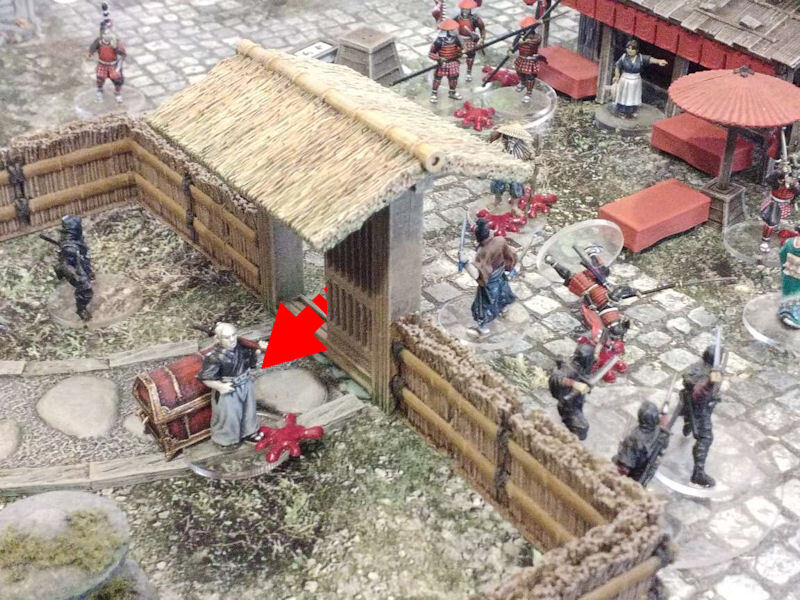
▲ The ambushers shouted at each other to grab the chest from the middle of the street, but luck was not with them... instead it was old Master Jiro who pulled out two action tokens before any of the enemy could react, and quickly rushed back into the fray, grabbed the chest up again and dashed into the teahouse garden!
With age and wisdom comes a certain amount of luck too, it seems!
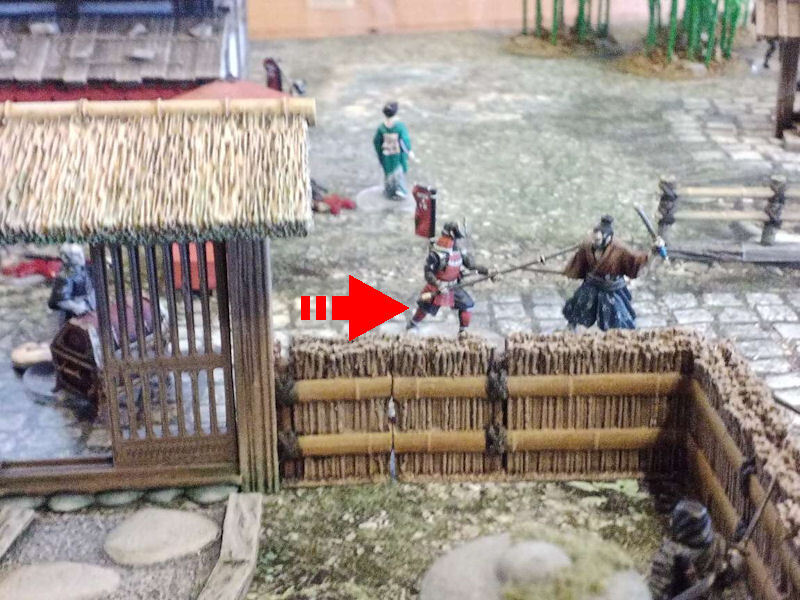
▲ The devoted samurai lieutenant, having seen his captain cut down in the previous turn, screamed a challenge at the top of his lungs and charged into combat with the ronin Tora.
He knew he might be sacrificing himself just to distract the enemy from pursuing the treasure chest, but his dedication was rewarded when he managed to knock Tora to the floor and deal him a nasty wound.
The nearby ninja group leapt over the fence once more, into combat with old Master Jiro, but failed to stop him as he edged further away!
▲ The geisha Tomoko pounced on the defenceless samurai lieutenant, and stabbed him in the back several times, pulling him down!
▲ But Tomoko's ruthlessness was her undoing, as her foul curses at the dead samurai's corpse caused some of her allies to run away in disgust! Realising what she'd just done, the shame was too much even for herself, and Tomoko also fled away from the blood-slicked cobbles!
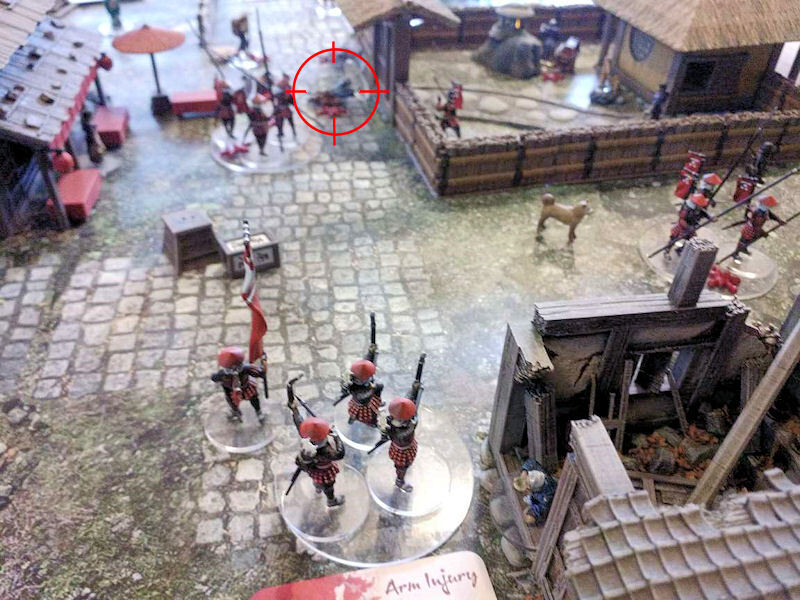
▲ It was at this moment, with the street rapidly emptying of enemy troops, that the archer squad finally had a chance to activate. They'd spent the whole game standing at their start position next to their clan banner bearer, but finally spied a chance to act. With calm precision, they took aim at the ronin Tora, who was still struggling to get to his feet outside the teahouse gate, and let fly their arrows.
Tora was unprotected and vulnerable, and had no defence against the shafts as they pinned him to the floor!
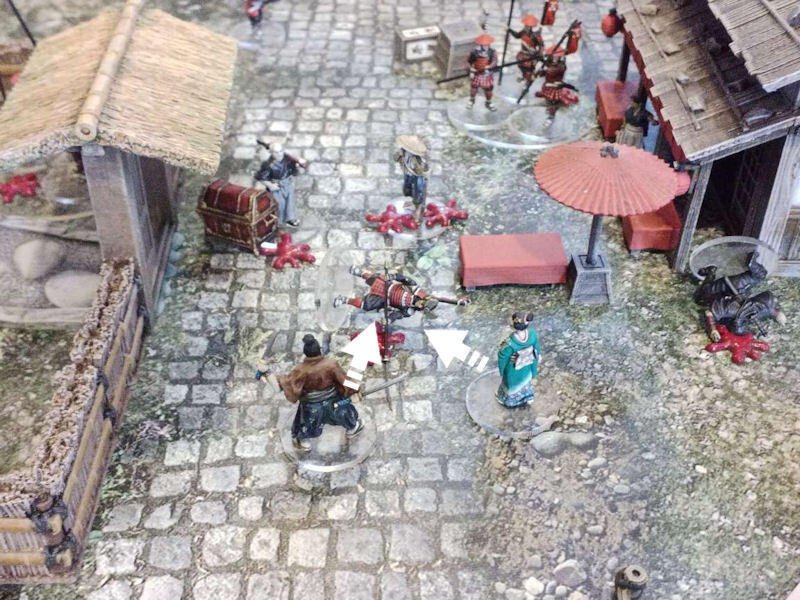
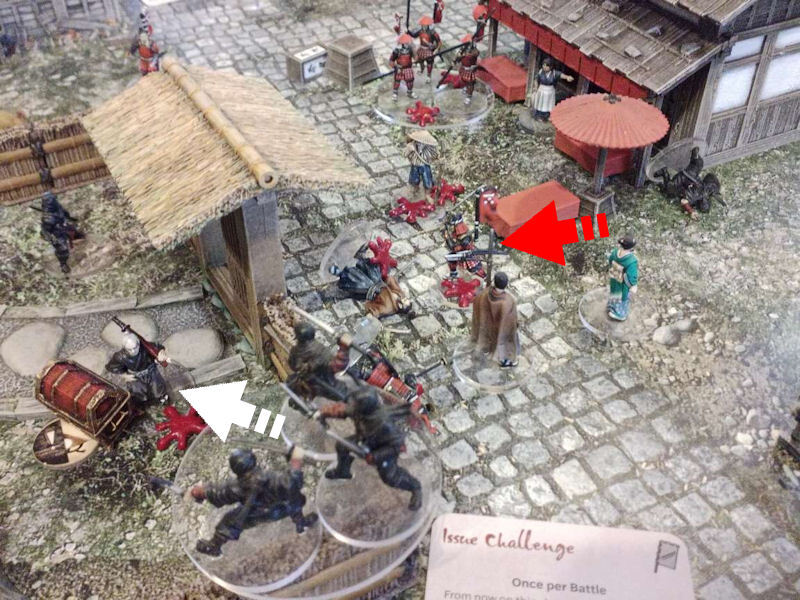
▲ With both leaders slain and the chest once more in possession of old Master Jiro, the chest was slowly dragged across the teahouse fence and away towards the corner of the board.
Realising their error, the ambushers rushed to follow Jiro, but his own support troops were quickly catching up.
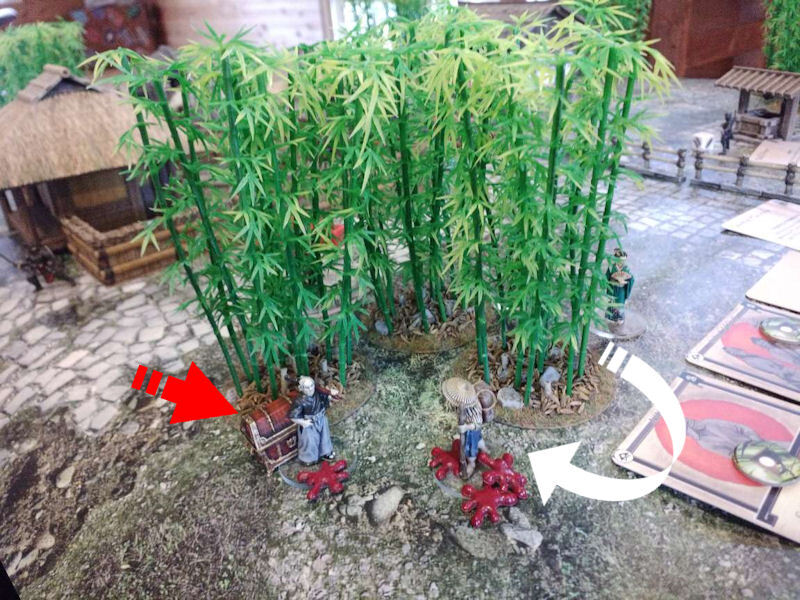
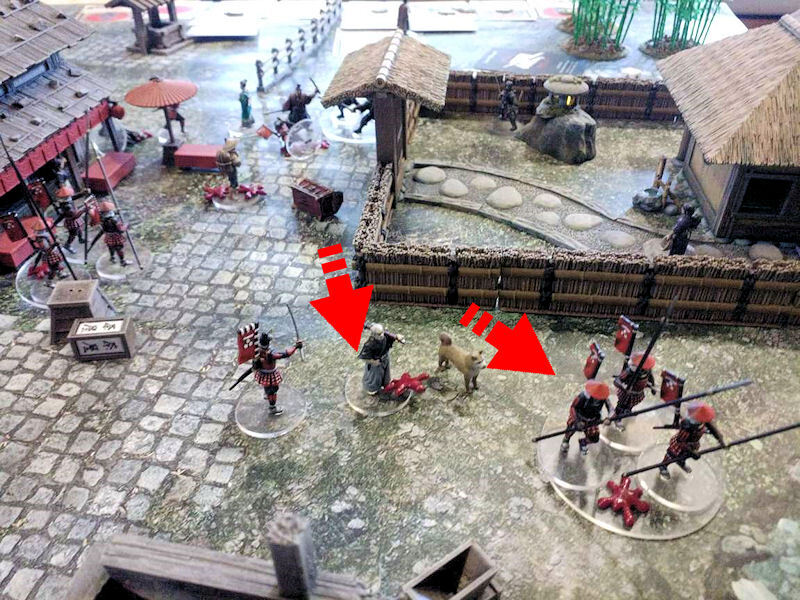
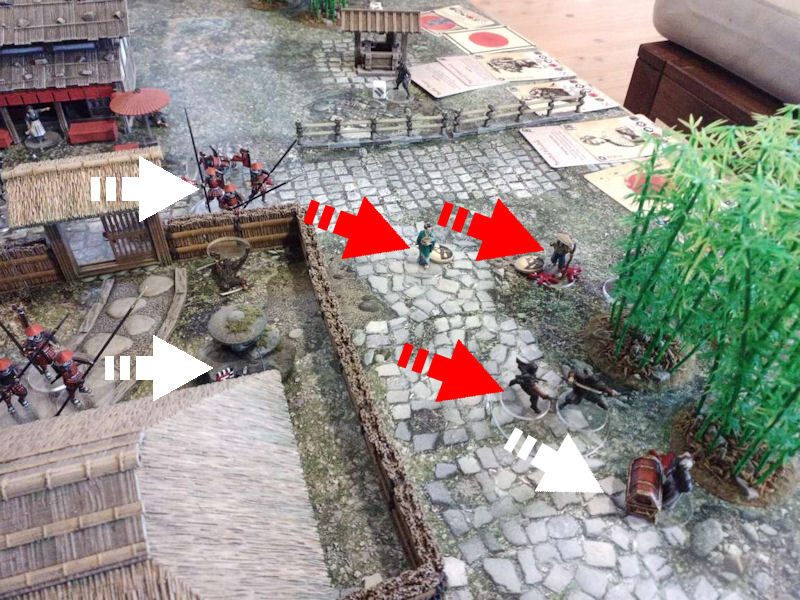
▲ As old Master Jiro again tried to escape past the bamboo woods in the corner, the old beggar managed to rush around the far side and block his way, with Tomoko quickly following.
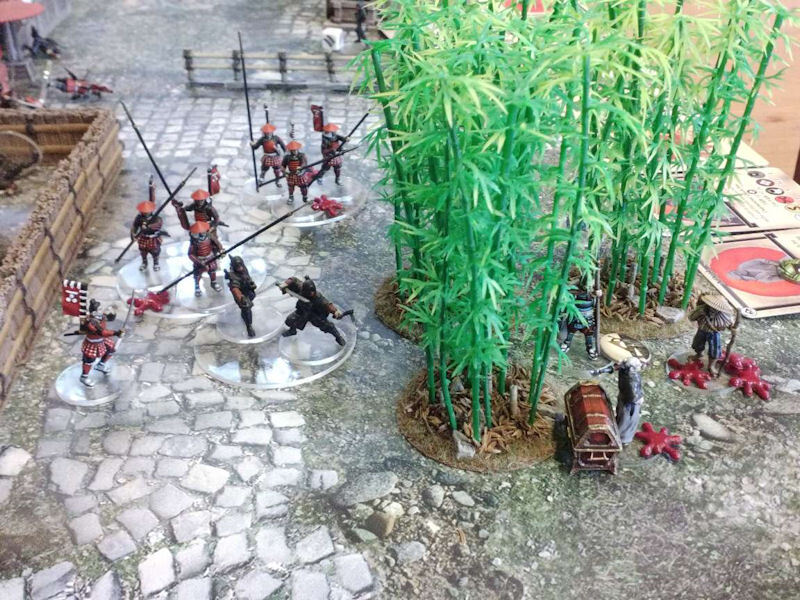
▲ As the ninja group tried to trap old Master Jiro from behind, they were in turn attacked by a spearmen group while their sergeant bellowed orders.

▲ Meanwhile the guard archers had been slowly marching up the main street, and took another opportunity to show off their skills, by killing another ninja in the best display of shooting I've ever seen! 8 swords on 4 dice, and the ninja slumped dead across the fence - wow!!
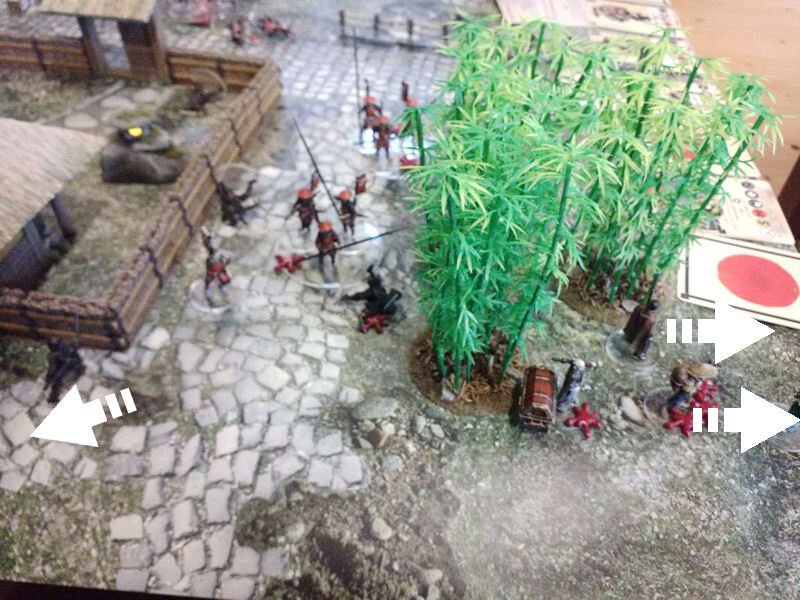
▲ The ambushers had again closed in around old Master Jiro, and it looked like there would be no escape this time.... until the guard sergeant spotted a single chance for success, and ordered his spearmen to charge the last remaining ninja from the group of three.
As they rammed their spears home in his chest, the nearby ambushers had a sudden wave of panic. Since they were all so close to the corner of the board, a ninja, the deserter, AND the old beggar all ran off the board, never to return!
Now the only thing standing between old Master Jiro and victory was the geisha Tomoko....
▲ With bated breath, the next token was drawn by the the guard force - a samurai token!
Master Jiro leapt to the attack, using his well-honed fencing skills to slip past Tomoko's defence, and flicking her knife away out of reach. As his supporting troops gathered around in grim silence, Jiro slashed once across her throat with a grim snarl, and her lifeblood oozed out into the dirt.
The battle was won.
A victory for the defenders. Although it looked quite likely to be a win for the ambushers when Jiro fled earlier in the game, dropping the chest in the process, his insane luck in being able to retrieve the treasure ultimately gave him the victory. At the end of the game, only Tomoko survived until the final turn, while the slow but resolute defenders had finally caught up. A wise old samurai, indeed!
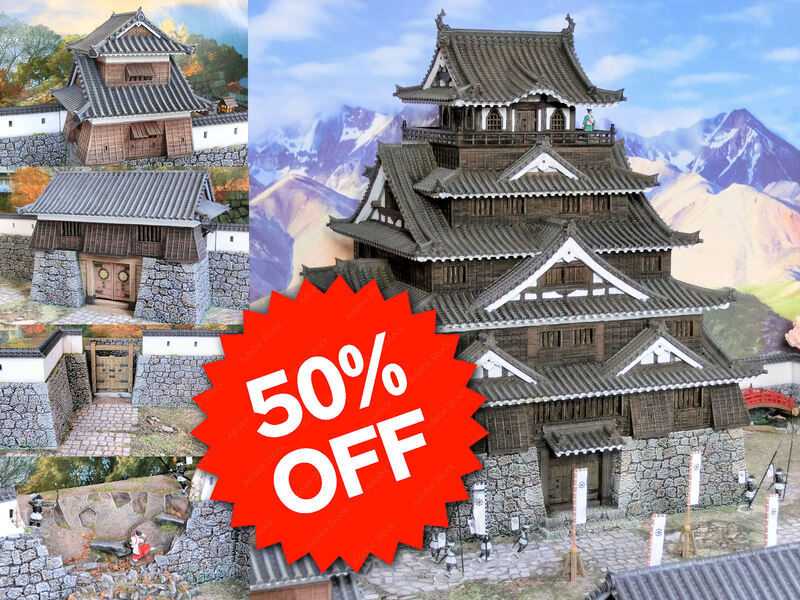
Special Time Sale Offer - 50% OFF ALL THE CASTLE ITEMS!
This is a combination set of ALL the castle items currently in our terrain collection, at 50% OFF:
Samurai Castle Walls Set (fully modular set including gates)
Samurai Nobori Flags (to decorate your castle grounds)
If you've ever dreamed of creating your own Japanese castle board, this is the perfect set for a fully expandable, multilevel layout.
▲
Happy Halloween again, everybody! This is the second little Halloween prop I've knocked up for a party decoration, and I'm posting it up on Thingiverse for free for everybody.
I saw this DIY-ed on YouTube, and I thought it might be good to make one for 3D printers so everyone can make it with minimum effort!
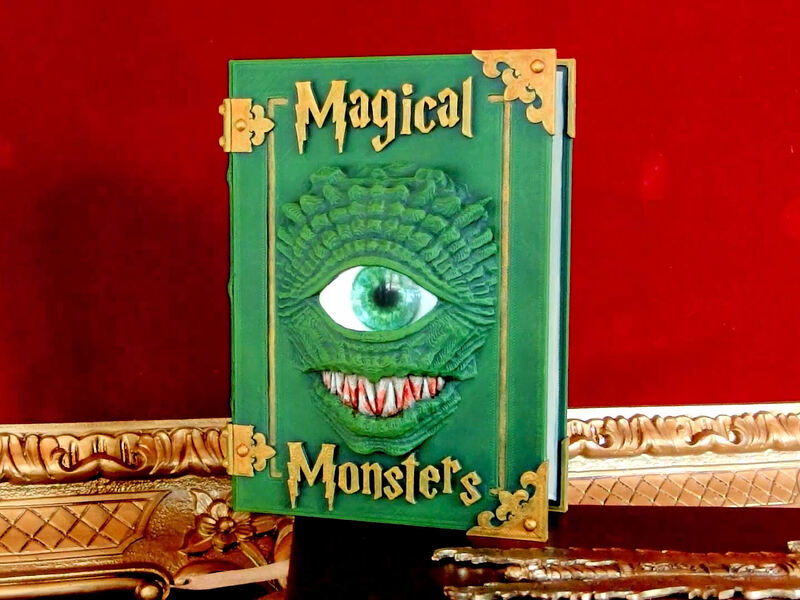
▲ Suitably spooky, eh?
Well, that eyeball moves!! See the video below...
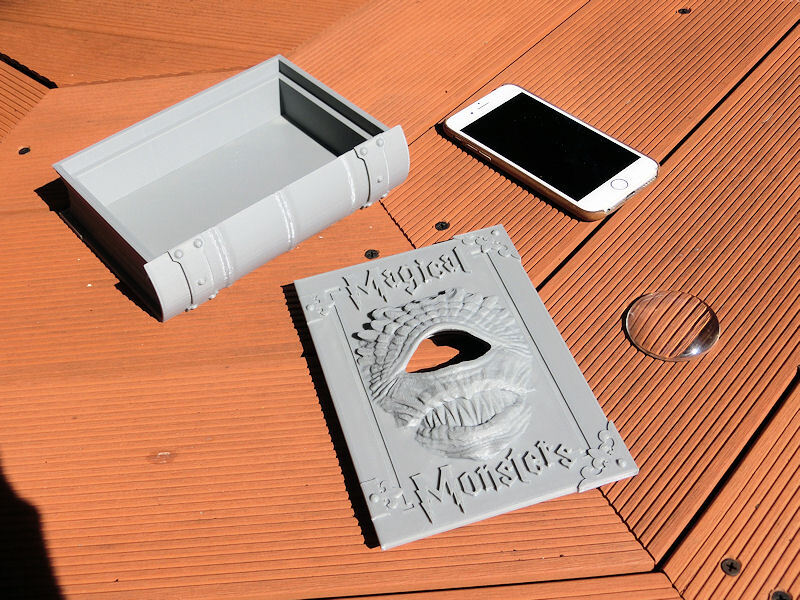
▲ You will need the printed pieces shown in this photo, which are available for free on Thingiverse:
![]() Monster Eyeball Book on Thingiverse
Monster Eyeball Book on Thingiverse
The book has a 160mm space available inside, which should fit most smartphones.
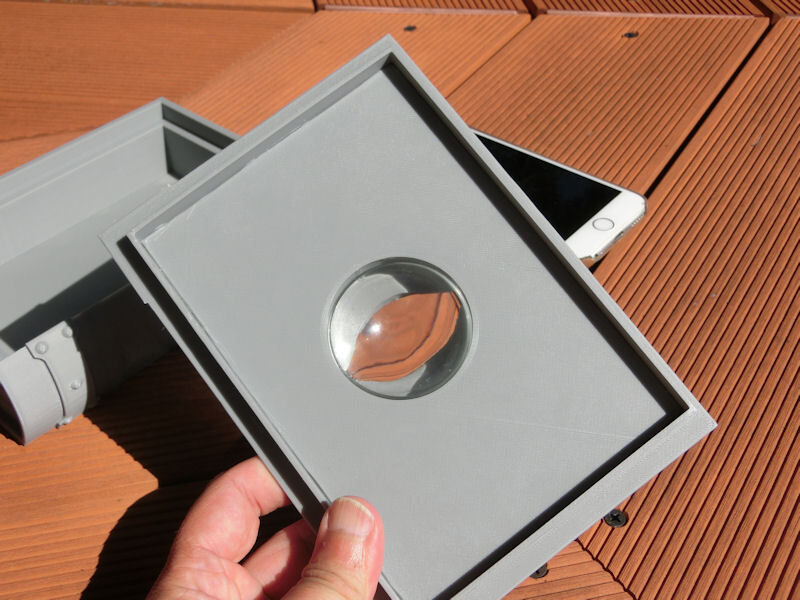
▲ If you add a glass cabochon (curved lense) with a diameter of 50mm it magnifies the eyeball shape and effect, but it's not essential. I got mine on AliExpress for $2.

▲ The hole for the cabochon in the book cover is 50mm in diameter, so please adjust the scale of all 3 pieces to fit the size of hole you need if you buy a bigger one.
Download a suitable eyeball video from YouTube, play it on loop on your smartphone, and you're done! Here's the link to the video file I used:
https://www.3dalienworlds.com/pages/EyeballLoopGreenLandscape.mp4 (8MB)
https://www.3dalienworlds.com/pages/EyeballLoopGreenPortrait.mp4 (8MB)
Ready for the video? Here we go....
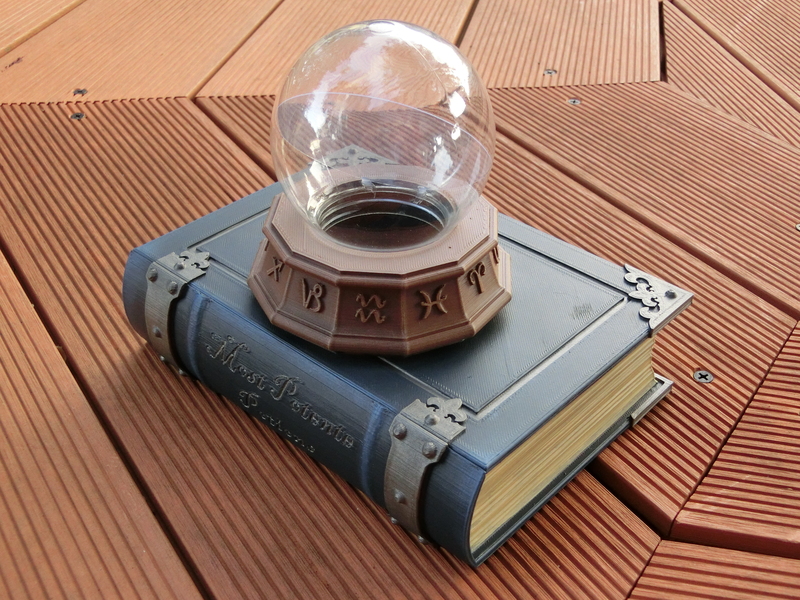
Happy Halloween, everybody! This is a fun little Halloween prop I designed and printed, to decorate for an upcoming party. You might have seen it before described as a "Pepper's Ghost" effect, and most people DIY it from an old book etc, and I thought it might be good to make one for 3D printers.
So here's mine...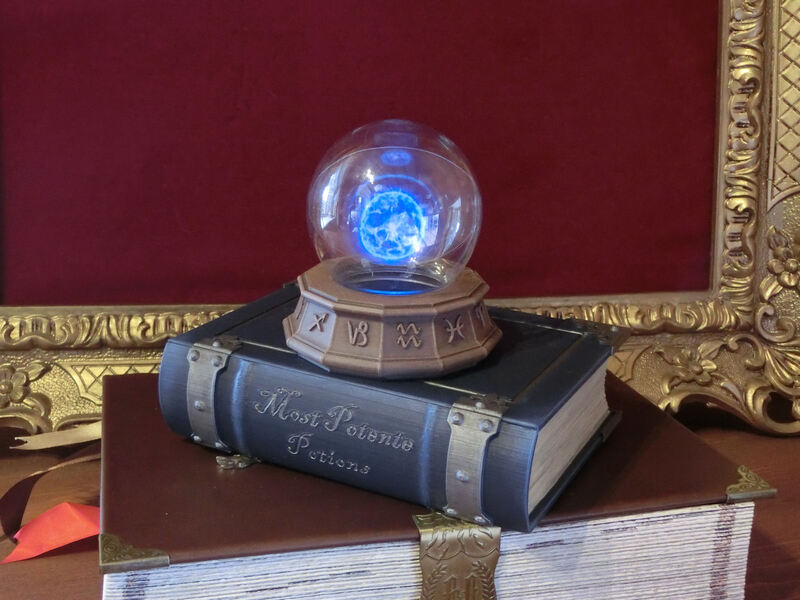
▲ This looks really cool in a dark room - see video below!
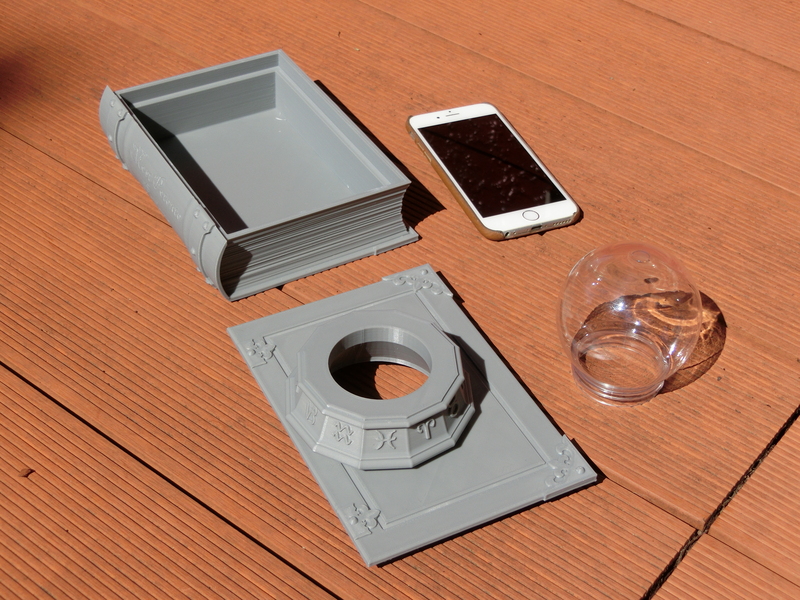
▲ You will need the printed pieces shown in this photo, which are available for free on Thingiverse:
The book has a 160mm space available inside, which should fit most smartphones.
You will also need a crystal ball piece - I bought a plastic snow dome kit from Amazon for about $2 (Artec Snow Globe Kit 55370), which has a diameter of 78mm.
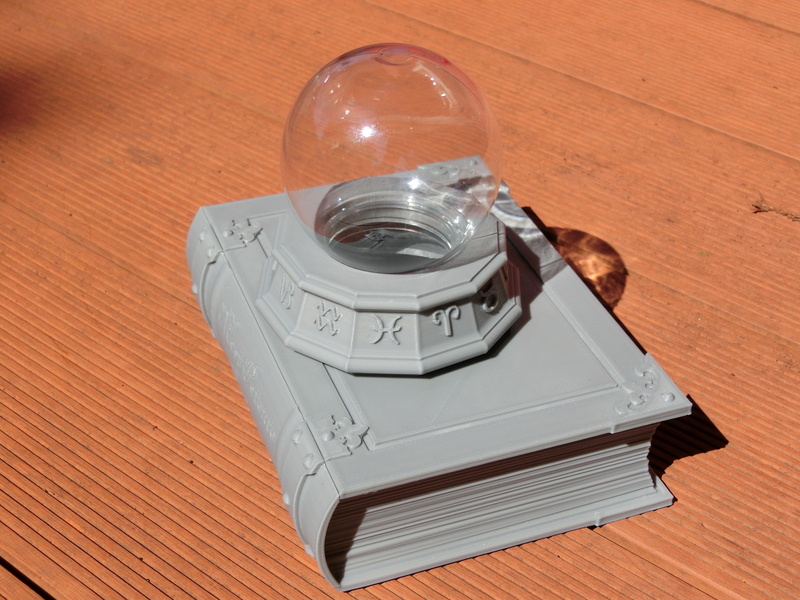
▲ The hole in the book cover is 53mm in diameter, which is what I needed for my snow globe dome, so please adjust the scale of all 3 pieces to fit the size of hole you need.
▲ The only other item you will need is a thin piece of clear plastic, cut into a circle and placed inside the crystal ball. I glued it at a 45 degree angle with a couple of dots of hot glue gun.
Download a suitable special effect video from YouTube, play it on loop on your smartphone, and you're done! Here's the MP4 link to the video file I used:
https://www.3dalienworlds.com/pages/EnergyBallLoop.mp4 (18MB)
Here's a video of the Crystal Ball in action....


0 Comments :
Write a comment :