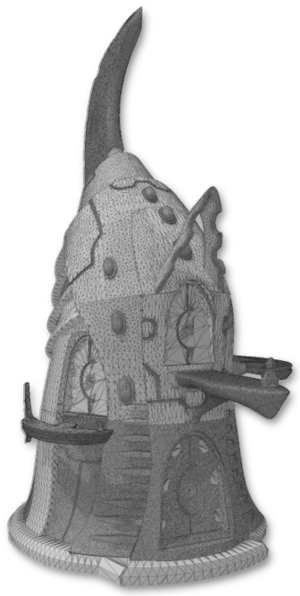
3d-printable terrain for all your samurai wargaming needs


Happy new year to you all! We're entering into our 3rd year of making these 3D-printed models (as of this April), and this year's going to be a good one!
(... funnily enough, I'm still waiting on the Kickstarter-backed 3D printer that started off this new hobby after 3 years (!), but that's another story!)
With the huge castle project taking up at least half of 2020 last year, we can finally move on to new projects and new ranges this year!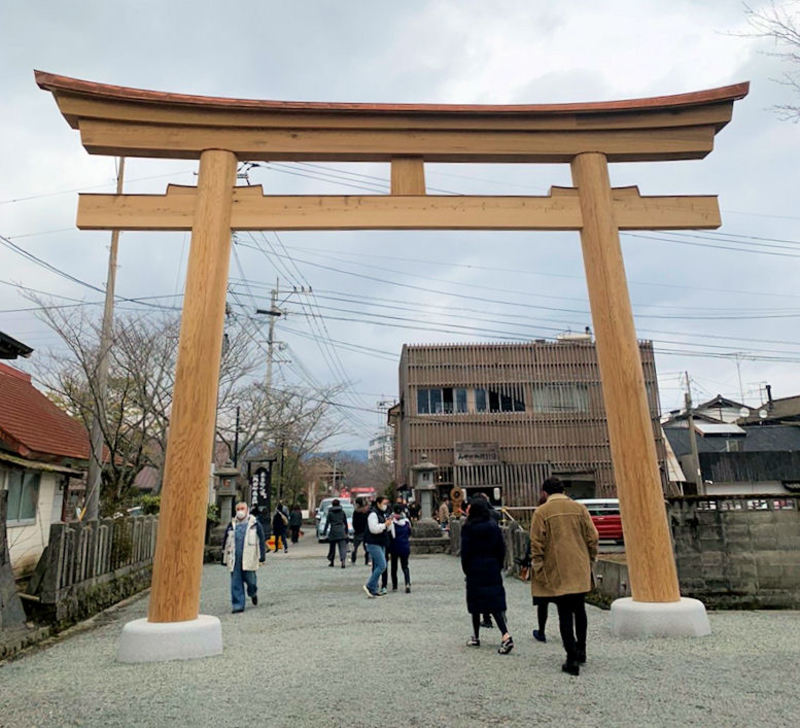
This pic is a brand new torii gate I came across last week, when I visited my local shrine during the new year break. You usually see them either in unpainted stone, or red-painted wood, and this was the first natural wood torii gate I've ever seen. It even has a gorgeous shining copper roof! Lovely! I thought it might give some of you inspiration for painting?
So, what would YOU like to see this year? More samurai? More sci-fi Taui? More monolithic Necrontyr? How about a vehicle or two? Let us know in the comments....
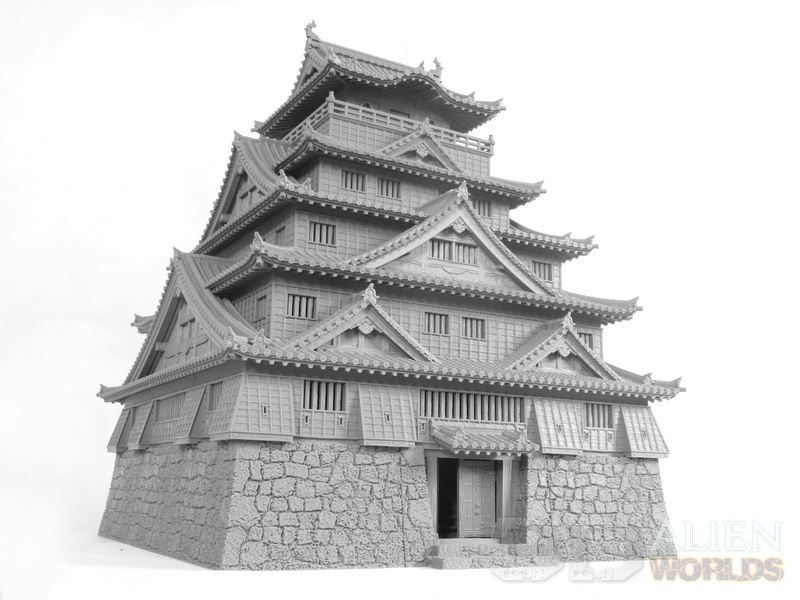
Construction of this massive model has been a long time coming, but we're happy to announce that the new Samurai Castle is finally available for download from today!!
Time for some pics......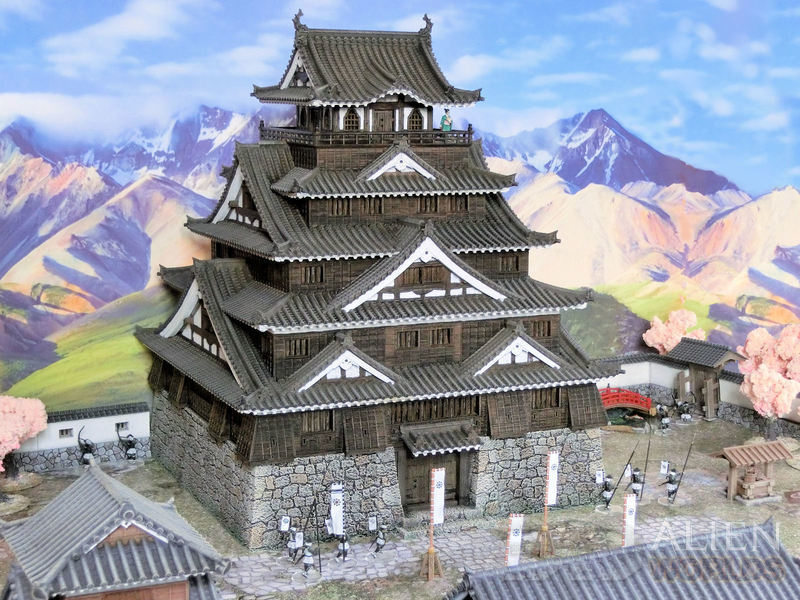
£ Battle stations, everybody!! The castle is under attack!
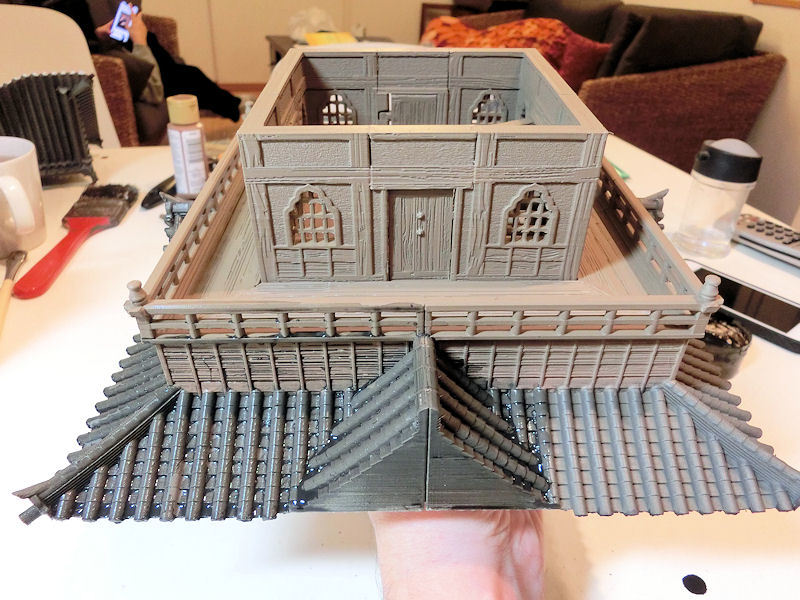
You'd have to be pretty brave to attack this enormous fortress, which combines perfectly with the existing sets - the corner tower, the gatetower, and the castle walls set. You could cover an entire table with fortifications and have this giant castle as a stunning centrepiece!
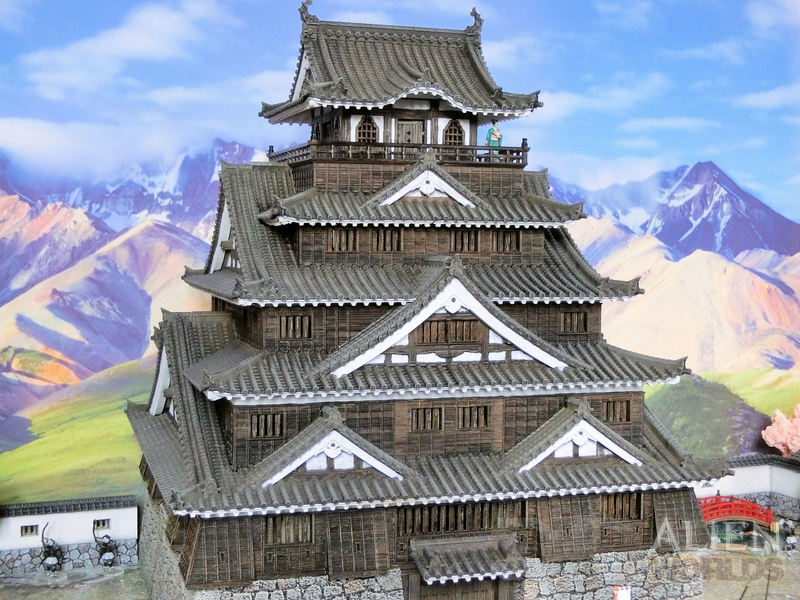
£ Covered in detailed wood panelling, the castle also features these ornate roof shapes - which slot together level by level.
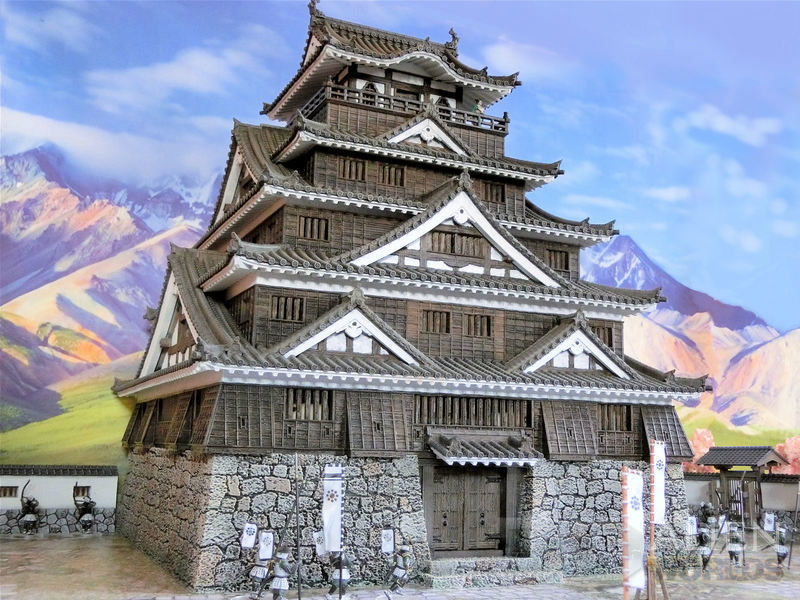
£ Quite an imposing view for an attacker - the ultimate statement of feudal Japanese power!
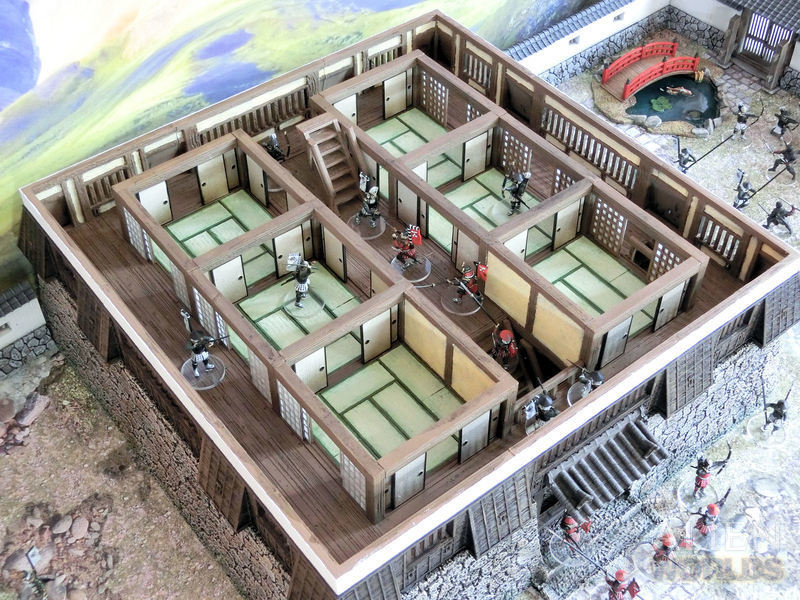
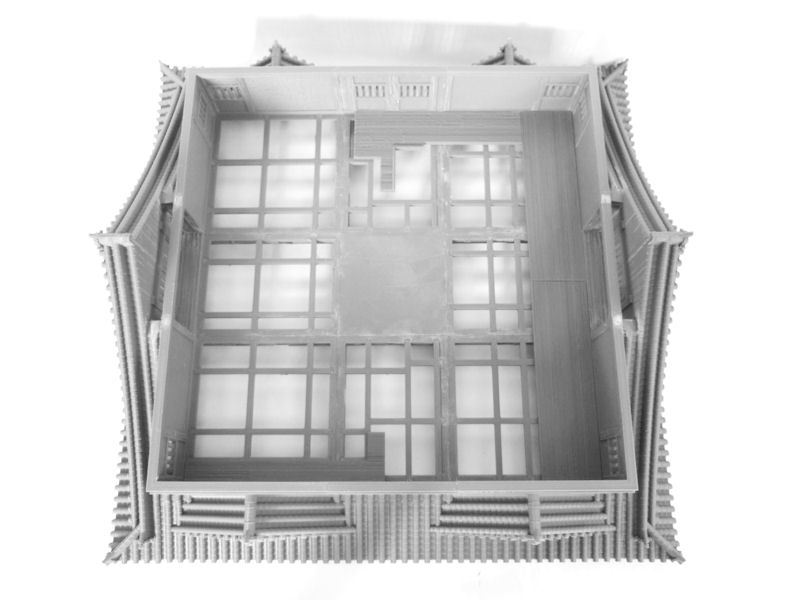
£ But it's not just the castle's exterior which is fully detailed - the interior of each level also features authentic layouts which you can game across.
In this photo you can see that the Mori clan's red-armoured troops have gained access to the enemy's castle, and are fighting their way up inside the 1st level!
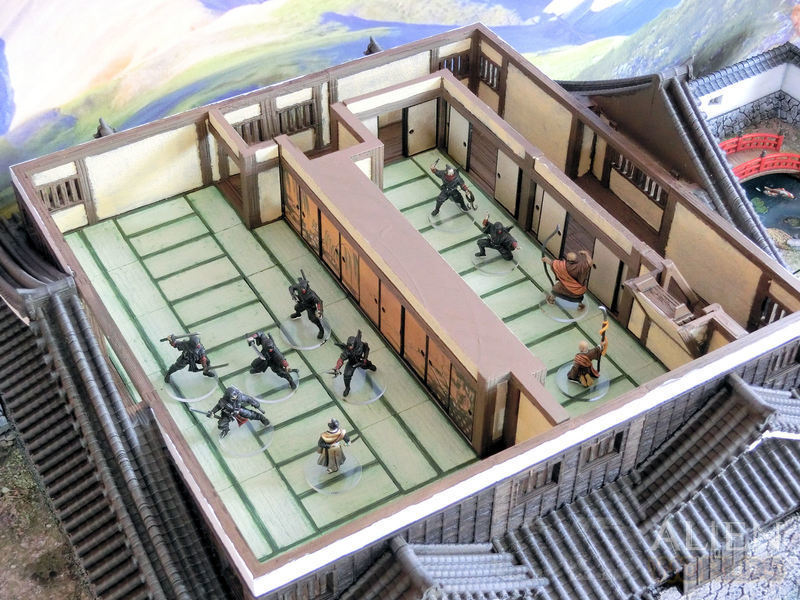
£ Ninja assassins infiltrate the 2nd level's throneroom, in an attempt to capture the Lord of the castle.....

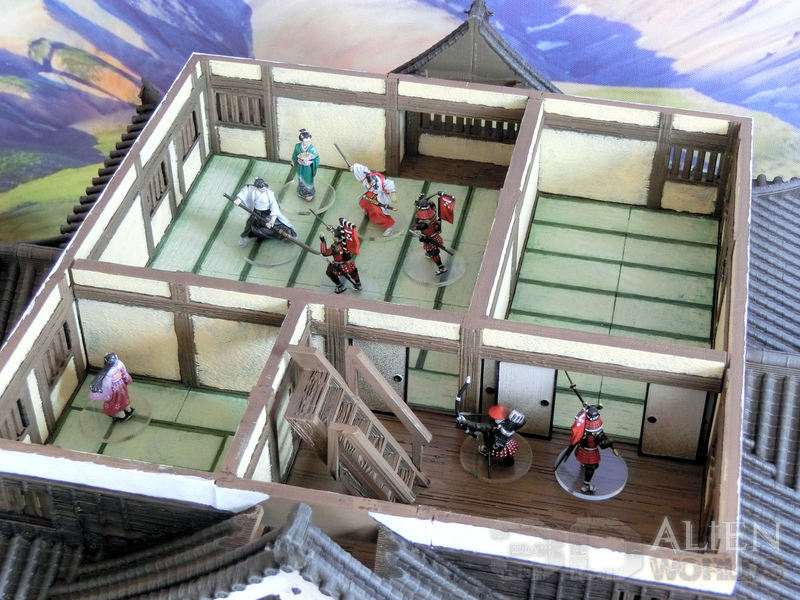
£ ... but Lord Hosokawa is ready for them, and slips away through a secret door panel. His castle guards wait on the other side with loaded guns!
£ More enemy warriors force their way up to the rooms of the 3rd level, where the personal maiden-guards of the princess prepare to fight to the death!
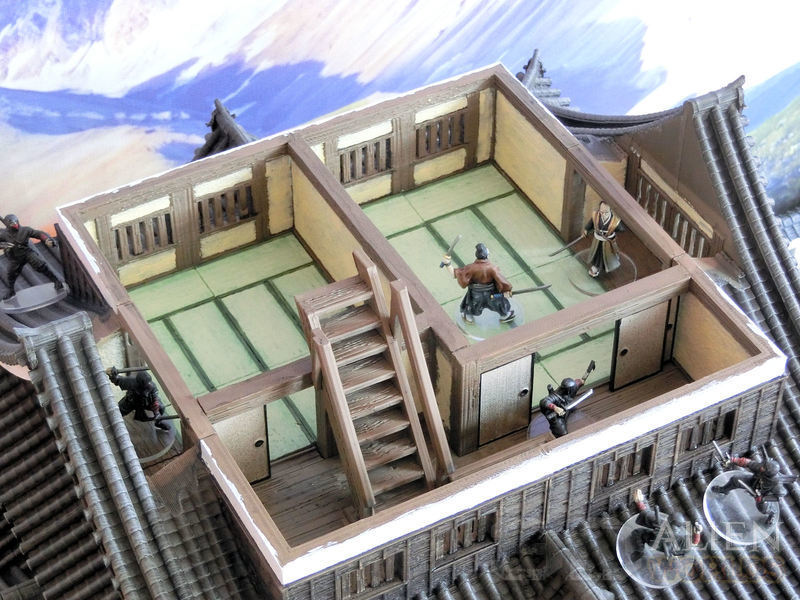
£ Ninja assassins finally corner the Lord of the castle on the 4th level living quarters, and their employer steps forward to claim his revenge.
"There's no escape this time... brother!"
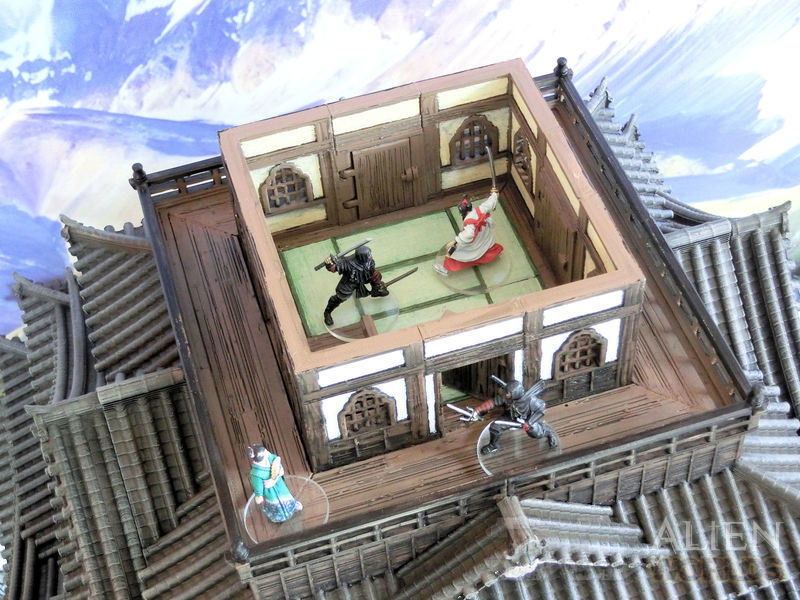
£ The last of the guards valiantly tries to protect her mistress from the ninja assassins on the top 5th level, but the Princess is not without her own deadly skills....
The new Samurai Castle is available for download from today!!
It took only 3 days to paint the castle, inside and out, but those were looooong days!
Cheap spray cans can be used to do the bulk of the work, and then I used cheap acrylics to drybrush and add details, and then finally some home-made washes to finish up. Here are the major stages...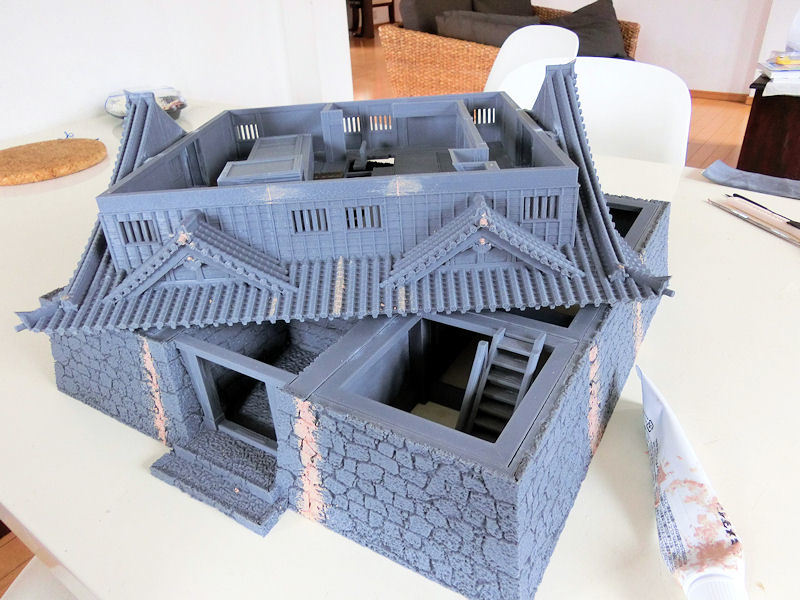
£ Before painting the model, it's probably a good idea to check it for gaps between sections and fill those in if necessary. Thankfully, gaps on the walls and roof sections are mostly hidden, so the only big gaps were in the base. I used wood putty filler smeared on thickly, and smoothed over with a (very dirty) finger!
£ First stage of the painting process was to spray the underside of each level with matt white. Honestly, this will save you SO much time! I did two coats of spray to make it a clean white cover.
Once that was dry, I used masking tape to close the holes for the stairs, and then flipped them over and sprayed each layer with a light brown matt. This is good for the exterior wood, and also works well for the interior beams.
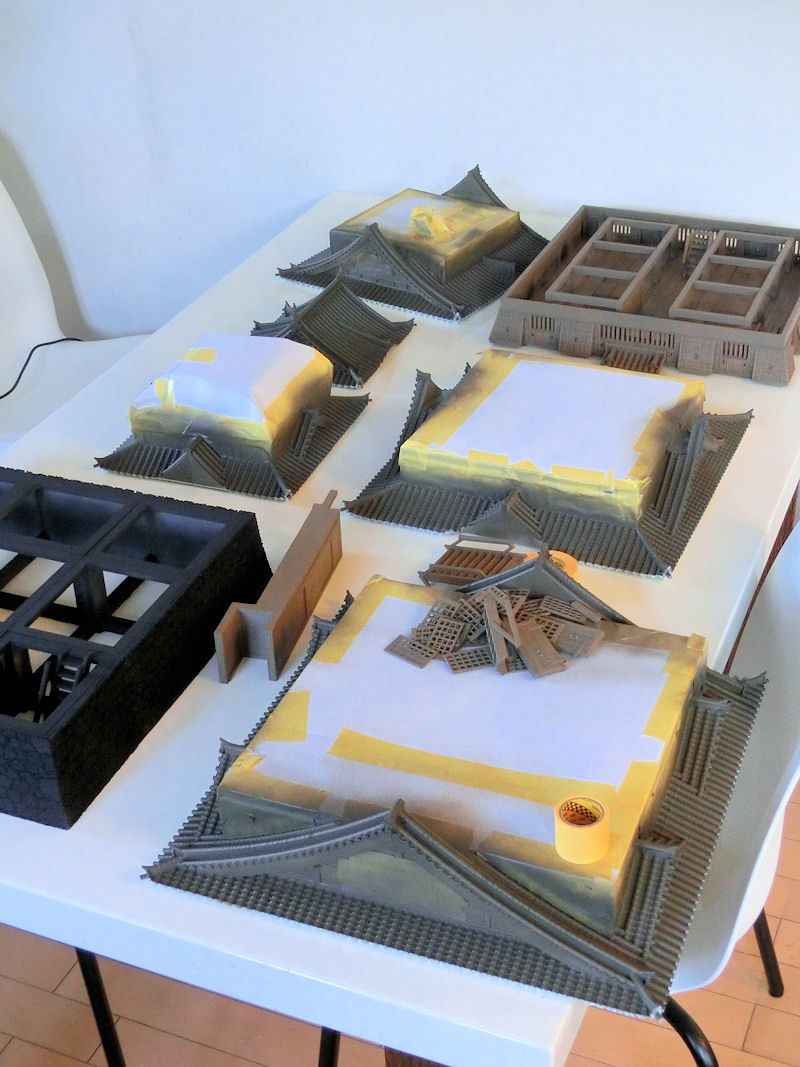
£ So now the bottom of each section was white, and the top of each section was brown. Only one more major colour remained - grey for the roof tiles. After taping over the interior of each section (with sheets of paper) and roughly masking the exterior wood, I sprayed each section with a matt charcoal grey.
Japanese castles, by the way, can also be seen with green roof tiles (see Osaka castle) and red roof tiles (see Shuri castle in Okinawa), but the majority seem to be grey/black. So have a look around before choosing your colours!
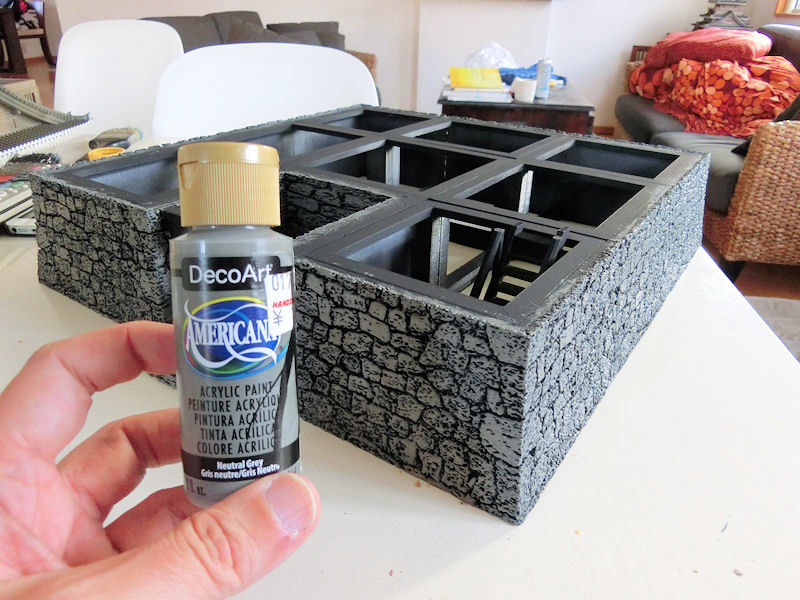
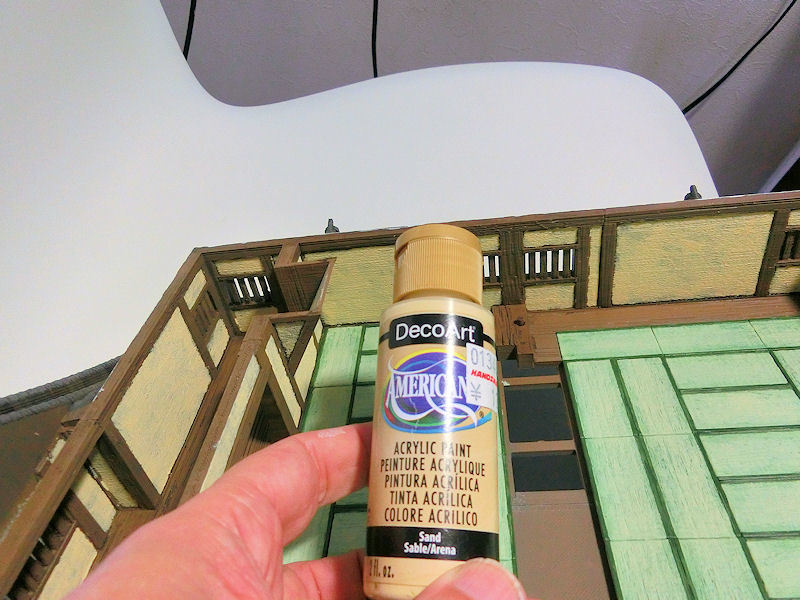
£ The base section was sprayed in matt black, and roughly painted over with a mid-grey (Neutral Grey by Americana Deco-Art).
The base was completed with a black wash, then a light beige drybrush followed by a light grey drybrush, and then finally some rocks were washed with browns and reds to make it more interesting, and then green wash at the bottom of each wall.
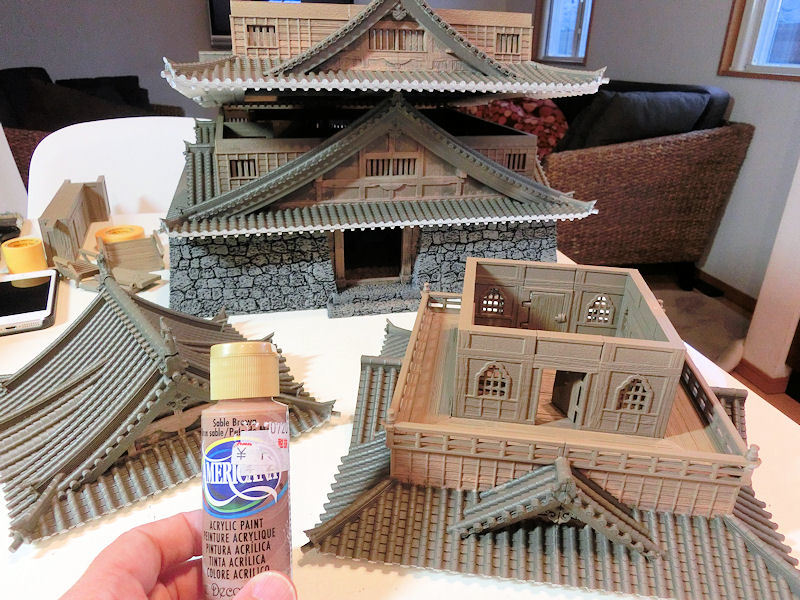
£ Since the spray cans (and my masking tape) were done pretty roughly, I needed to tidy up a few places. I used this Sable Brown as a pretty close match to my spray colour, to neaten up the edges of the wood next to the rooftiles, and paint in the wood beams at the gable ends and the gateway.
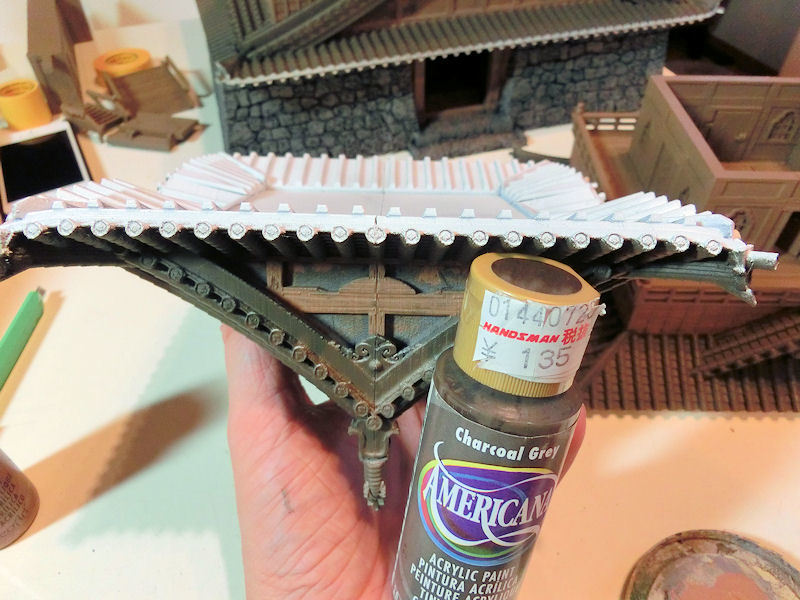
£ In this photo you can see that the edges of this roof section (shown upside down) have white circles at the ends of each row of tiles, but these obviously need to be grey. Again, I found a very close match to my spray colour, and painted those in with a 1cm wide brush in Charcoal Grey.
With that, the basic colours of my castle were done!
On to the washes......
£ This castle is BIG. Using expensive paints and washes can get expensive! So I really, really recommend mixing your own washes for this model, to save yourself some money. This is actually pretty easy, and you'll only need a bottle of acrylic ink (black, brown etc), a matte medium (only a few drops), a drop of dish washing liquid to help it flow, and some water.
There's a guide here to making your own washes, on our club site:
https://www.kitaqgamers.com/page.php?ID=201&La=E
Anyway, I made myself a pot of black wash, and painted over the roof tile sections with a large brush. On the photo you can see that I also tried it on the wood section (on the left), but decided to revisit that later with a stronger wash to produce a darker wood.
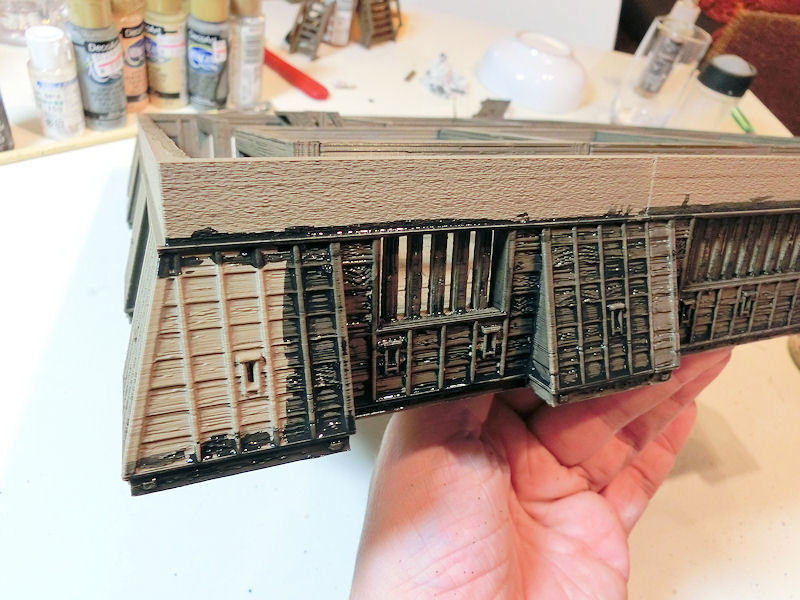
£ Japanese castles panelled in wood tend to be very dark (but obviously it's YOUR castle, so you can choose!), and I tried to duplicate this by mixing much more black ink into the wash. This produced the very dark wash as shown above - which worked very well to show the woodgrain.
After that was dry, I painted the top of each exterior wall white (2 coats), and also filled in the gable end walls in white between the wood beams.... but I forgot to take a photo! It was quite tedious, to be honest, especially knowing you have to do it twice!
A final touch was to lightly drybrush the roof sections in a mid-grey, with a 2" brush! This picks out the ridges and bumps on the roof tiles beautifully. The exterior was now finished!
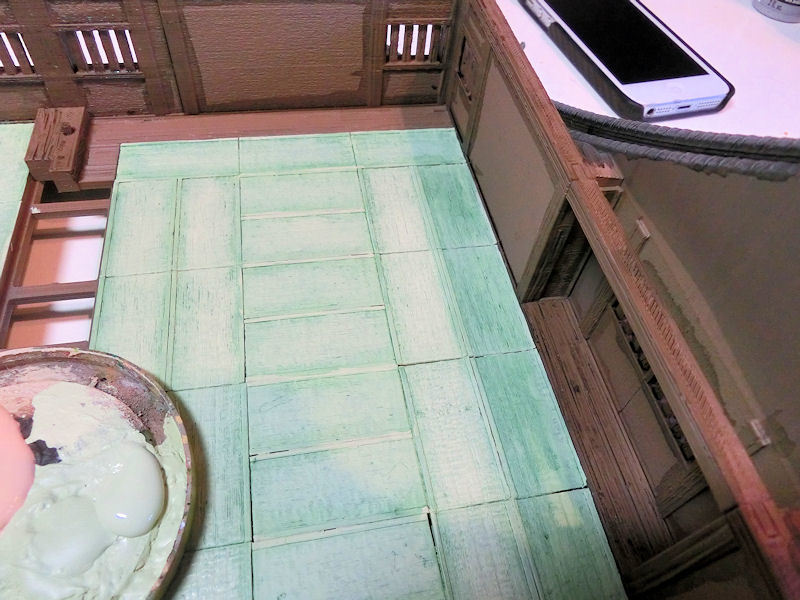
£ Most Japanese tatami mats tend to be light straw-coloured when they are new, and darker yellows when they are older mats. However, castles would usually have super fresh tatami mats, and you can choose to paint these this light mint-green colour. I thought that would be a nice contrast with the interior walls, which I planned to do in a pale sand colour.
I used Soft Sage by Americana to paint all the mats in the castle, but found that they need a little darkening to bring out the texture of the mats. For that, I diluted a green wash (by Games Workshop) with plenty of water, and brushed that quickly over all the mats. This made the texture a little splotchy (you can see this in the row of mats on the right), so I went back over the centre of each mat with a little Soft Sage again, leaving the darker green washed areas to the sides.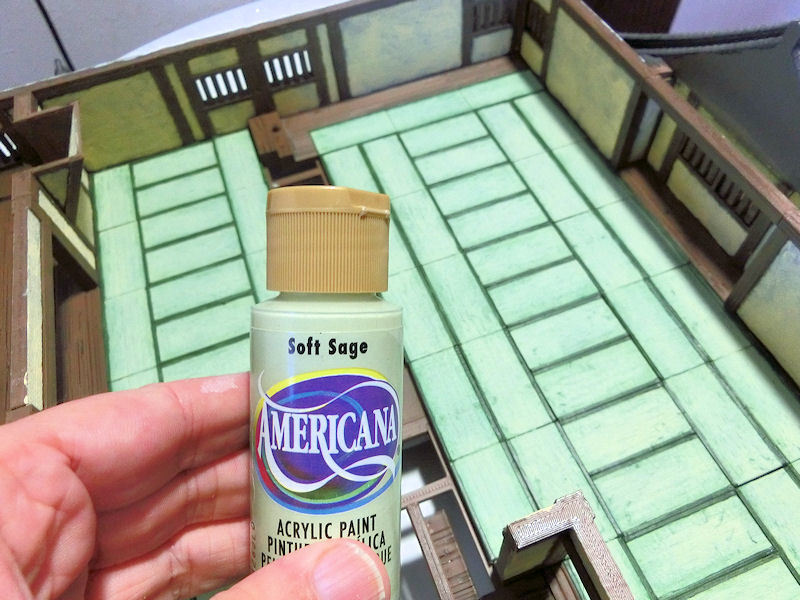
£ The last step for the tatami mats is to paint the fabric strips on each side. I will admit this was painfully tedious! I chose green, but other common colours would be blue, navy blue, grey or black. If you want to go nuts with gold flecks in the fabric, be my guest!
I hand painted these, and it took ages! Looking back, I realise that using a paint pen would have saved lots of time. Oh well!
£ For the interior walls, I used this sand colour applied with a 1cm brush (with a very straight edge!). One day I might go back and give these wall panels a sepia wash for some depth, but I ran out of time a little!

£ This castle needs loads of sliding doors, and I needed to speed through this step. So I spray undercoated both sides in a cream colour, and then lined up all the doors in rows.... and zoomed along each row quickly with a gold spray can! This gave the effect of gold flecks, which is a common design on Japanese doors.
Again, do some image searches for sliding doors. Some have thick stripes across the middle, some are more plain, and some are extremely ornate. I chose "quick and easy"!!
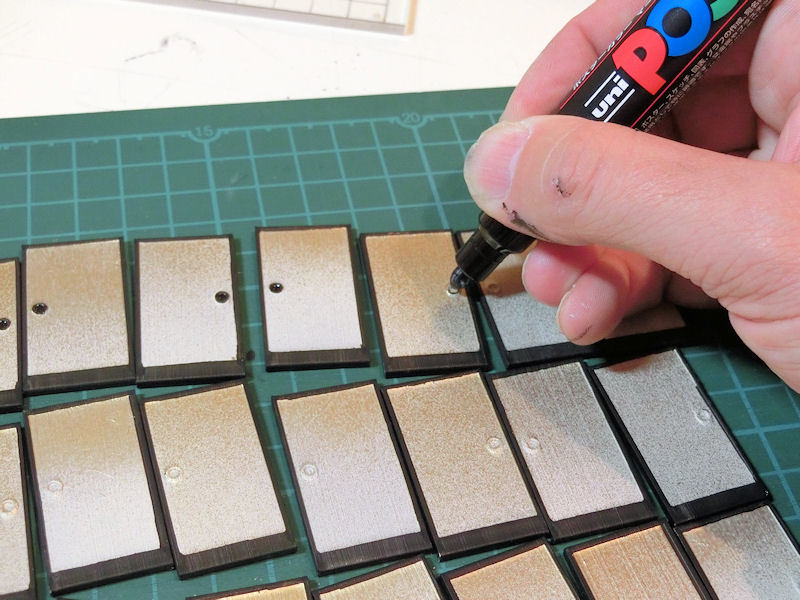
£ Trying to hand paint the edges of those doors would be very time consuming, and I don't have the patience or the skill to keep my hand steady! So I cheated and used a paint pen. Well, two, in fact.
I used a paint pen with a thicker flat 5mm tip to do the edges of each door, and then a thinner round tip to colour the door 'handles'. You can obviously choose whatever colour you need (or wood), but I chose black - probably the most common colour for sliding doors.
£ The last step to complete the castle was to add some "bling" to the throne room. I had painted all the other doors in the castle with my quick and easy two-tone spray method, so for the 9 doors in the throne room I wanted to add a very ornamental design.
You could try hand-painting this with lots of gold if you like, but I didn't have the luxury of time - so I cheated and photoshopped this design together to print out. Then I simply cut each panel to size, pushed my finger over the door handle to get an imprint, cut out the circle over each door handle, and glued it into place.
Just in case you'd like to use it, you can download this design here:
So that's it! The castle is finished! This weekend we'll be seeing those finished photos, and you can see for yourself how the whole thing looks.....
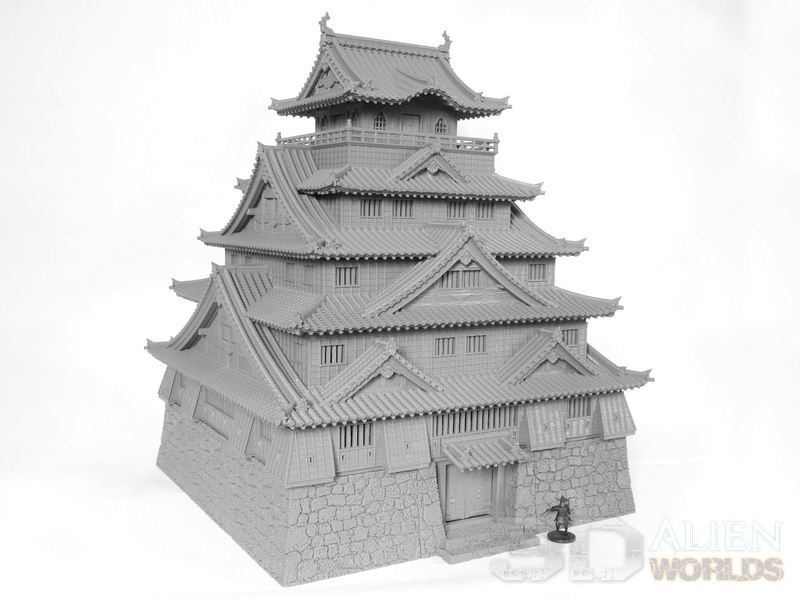
It's finally finished!!!! Our biggest project yet, this MASSIVE Japanese samurai castle soars 5 levels up into the sky, and sits atop a mighty stone platform!

£ Here's the completed castle in all its glory! What a building! What a print!

£ Without its stone base section, this castle is still guaranteed to dominate any table you place it on!

£ If you want to use the castle without its large 36cm base, then you can print this ground-level door section (with opening doors, of course) for access to the interior.....
£ ... and here's how that ground-level entrance looks.

£ Personally, I'm aiming for maximum "WOW" value, so I chose to use the big stone base to raise my castle even higher. To do that, you should print this underground entrance section, which comes with opening doors, a locking bar, and wide stairs up to the next level.
And yes, stairs in Japanese castles really are that steep!

£ .... and here's the version with the underground entrance. Nobody's going to mess with this castle!
£ Want to see what it looks like from an attacker's eye-level? Here you go....
Nope. Not going to attack that, I think!

£ Another view of the whole castle, with its intricate roof shapes. What you can't really see in this photo is the detail that has gone into every single part of this model.....

£ .... so here's a zoomed-in version of the entrance and first level. The exterior has wood grain modeled on almost every surface, and other walls have an authentic sandy texture sculpted on. Each roof tile has been carefully modeled to show up every detail of this magnificent building!

£ I'm rather looking forward to painting these roof sections.... at least from the top! I'd better stock up on spray paint!

£ If your tastes are more military, then you can leave off the ornamental roof section above the underground entrance...

£ .... but I couldn't resist adding a little more bling, so I chose to add the optional roof on there!
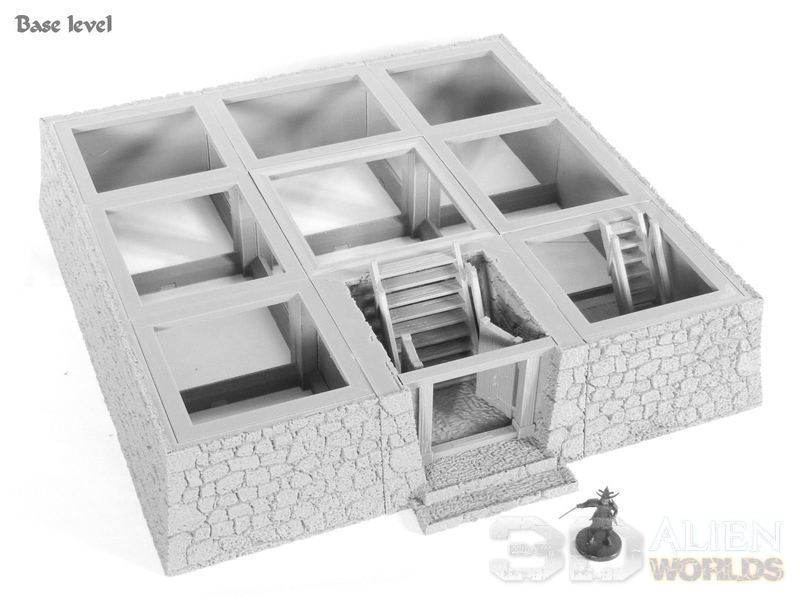
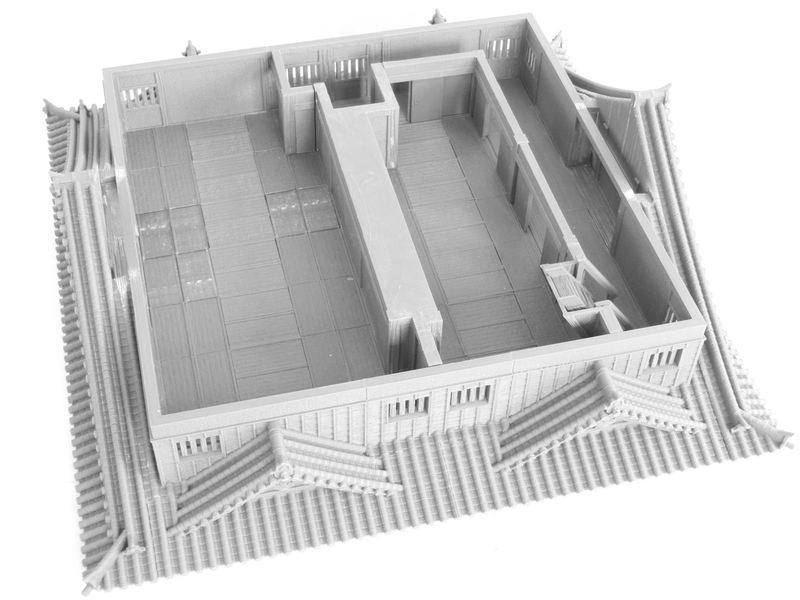
£ Now it's time for the full set of level photos. Here's the base level, with its main entrance leading up to the 1st level. Note the second smaller staircase on the right - this leads down to a basement level, so if you really want to go nuts you could add dungeons, kitchens and storerooms down there!

£ The 1st level has a slightly military feel to it, with 6 small rooms and a surrounding corridor. There are small holes for archers, and you could also add window shutters if you want make it a real fortress. All those doors actually slide, by the way!
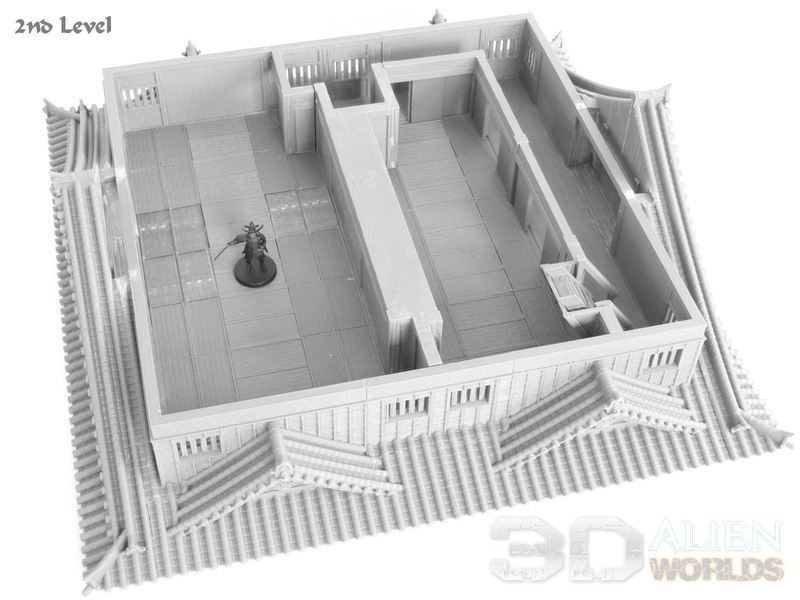
£ The 2nd level contains the grand "throne room" - the largest room in the castle. A slightly narrower room and corridor make up the other half of this level, and there is a secret door connecting the two rooms. After all, every lord needs an escape route, right?
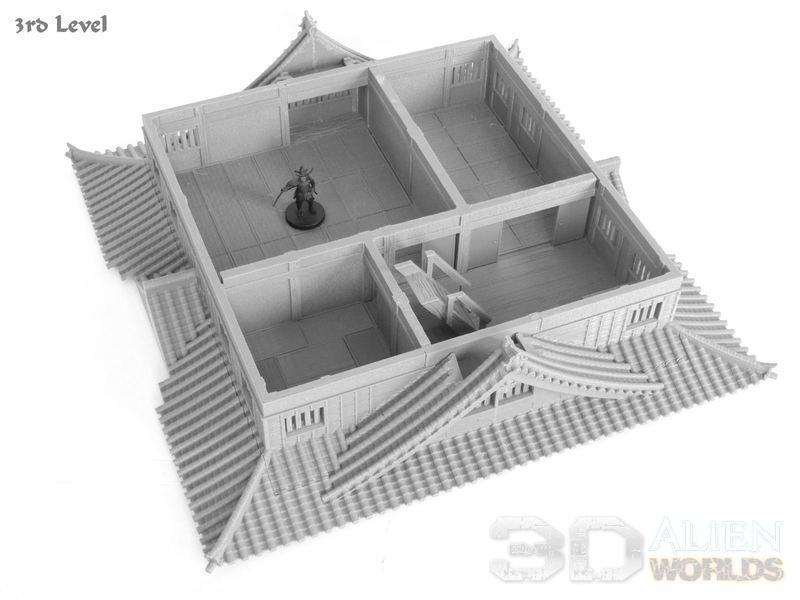
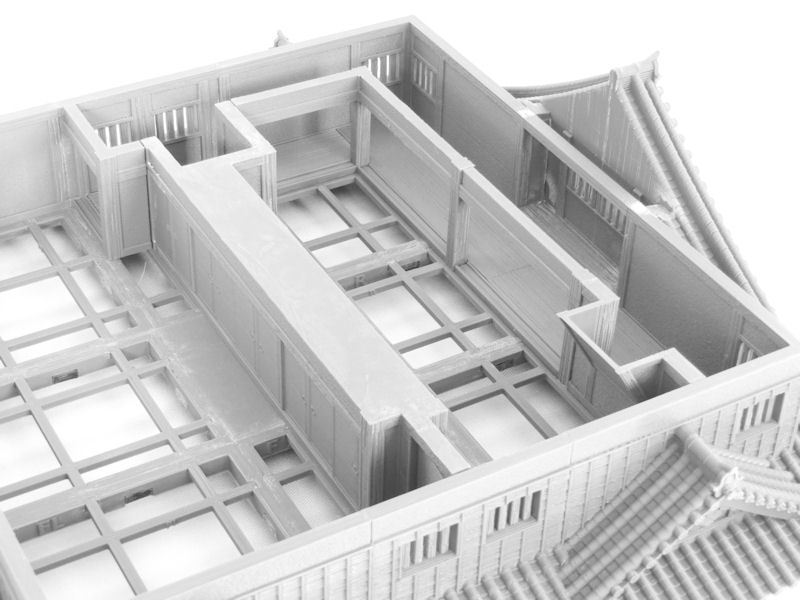
£ The 3rd level has 3 decent-sized rooms, and these could be used for important meetings or councils of war.
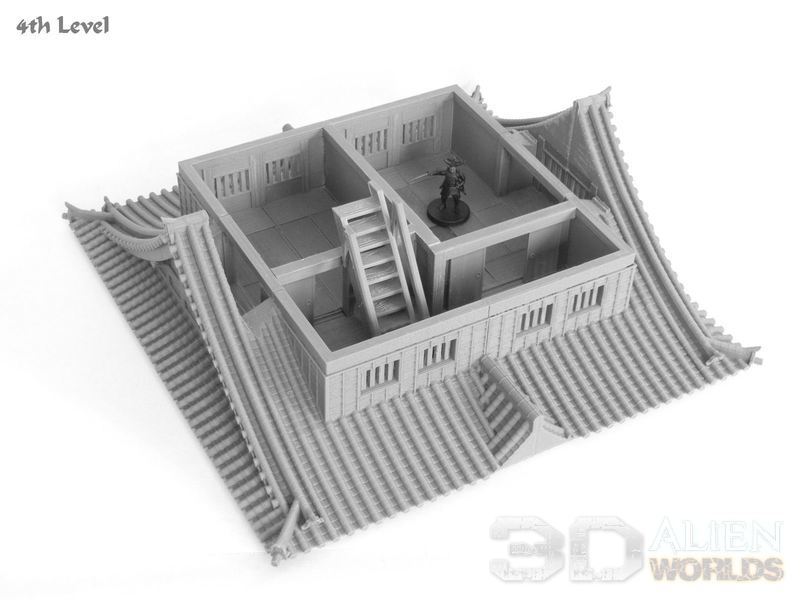
£ The 4th level only has two rooms, most likely sleeping quarters for the lord of the castle and immediate family.
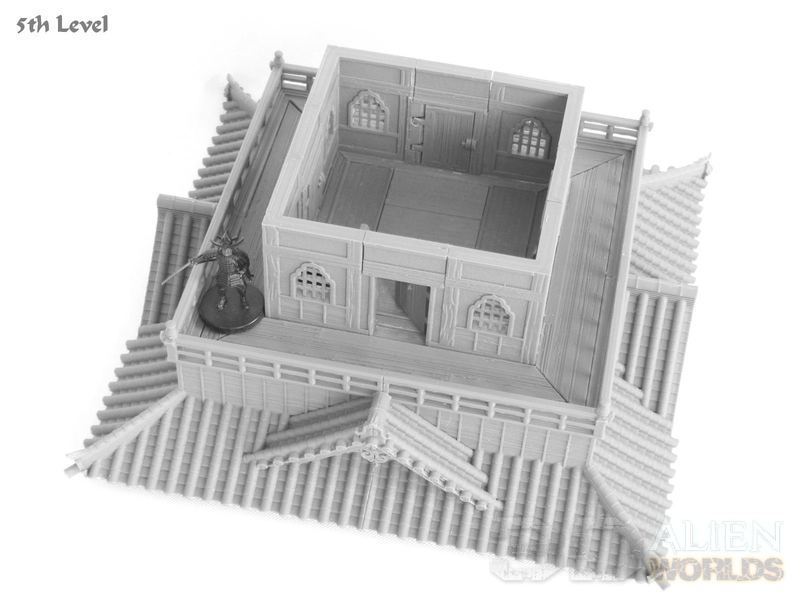
£ Finally, we have this elegant 5th level room, with doors on all sides and a surrounding balcony from where you could sneer down on your enemies!

£ The top roof section has a stunning roof shape, only found on the most important buildings of the land. Those ornamental dragonfish statues complete the look - although they could actually be added on roof sections on every level if you really want to make a statement to your rivals!

£ So how big is it? Well, here's the castle corner tower (minus its base) as a size comparison.

£ HOW BIG?! Well, pretty darn HUUUUUGE! It will also give your arms a good workout just lifting the whole thing!
Apologies for the stupid grin on my face - perhaps I'm just happy not to be modeling roof tiles for a while?
This model will be hitting the paint desk tonight, and will be released next week! Watch this space...
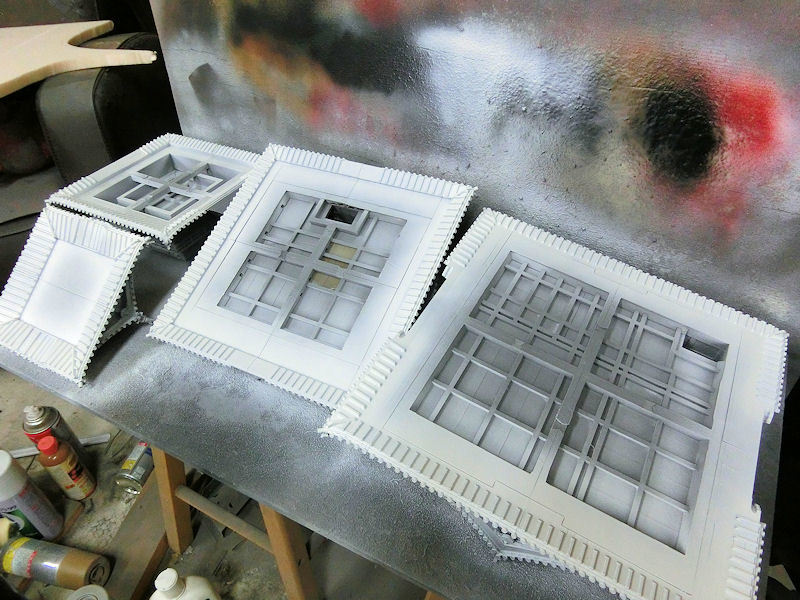
Photos of the fully assembled samurai castle are coming tomorrow, so here's a final guide to putting together the 2nd level of this huge model - the Throne Room level!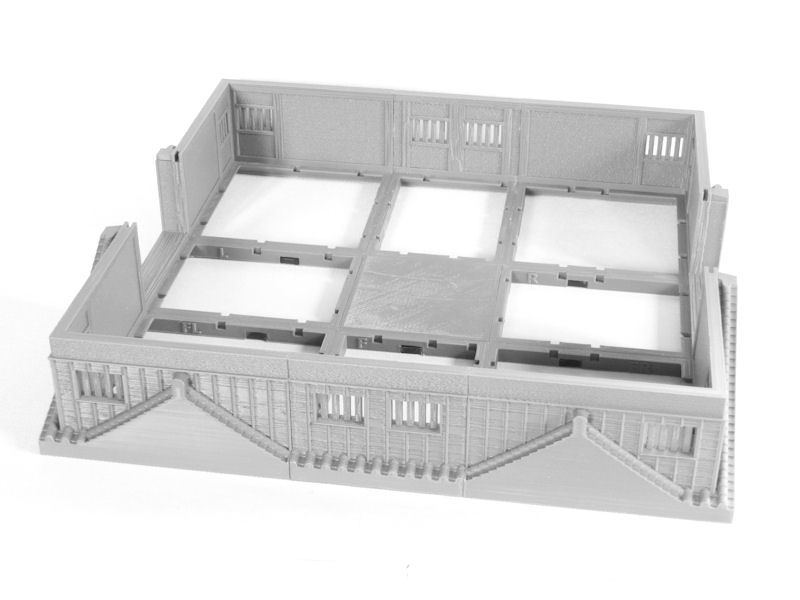
£ This level prints in 9 pieces, which all have slightly different support placements. To help with this, each section is labelled; "FR" for "Front Right" and so on.
As for other levels, the little joining clips should be used between sections to give them more strength.
£ The support beams are similarly labelled to match the corresponding parts, so they're easy to glue into the correct place.
A couple of head-height beams glue into place above the alcoves at the sides.
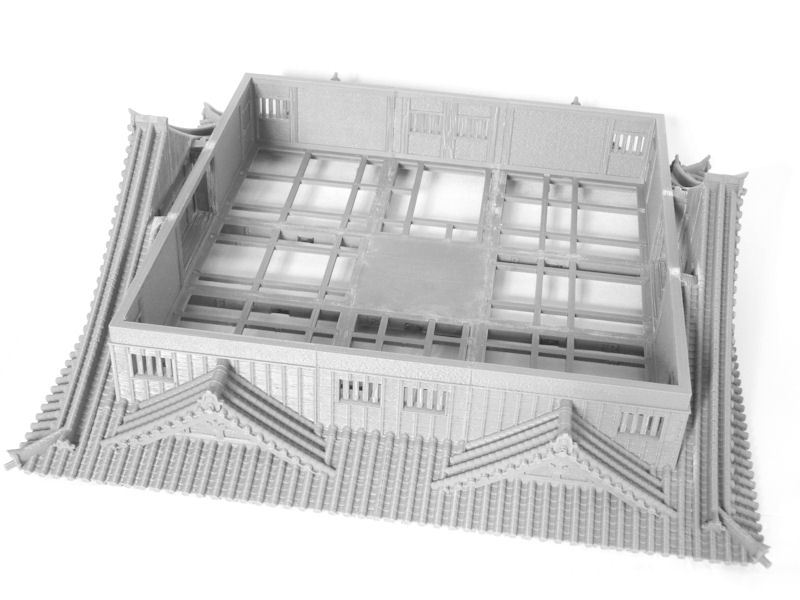
£ The surrounding roof sections are printed in 8 parts, and can be glued in place as shown.
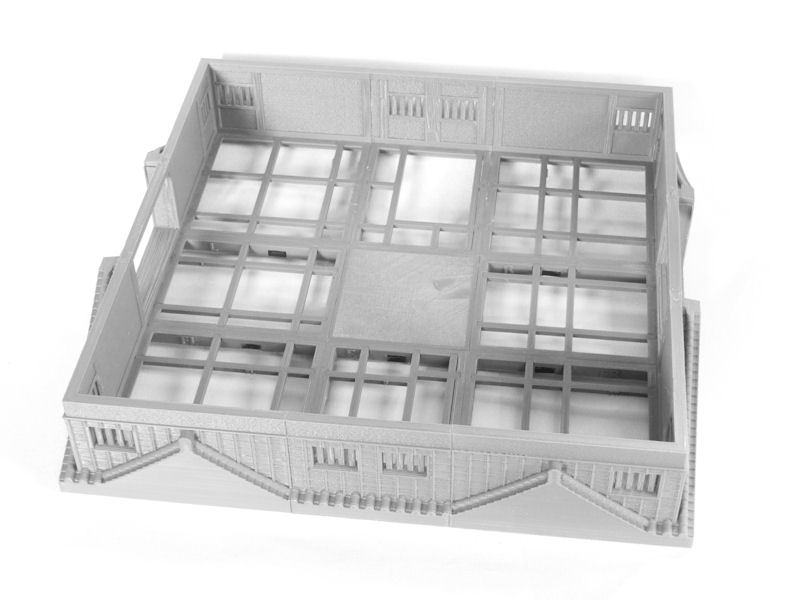
£ Now we move to the interior of this level. We start by printing the four floor sections, which glue in as shown.
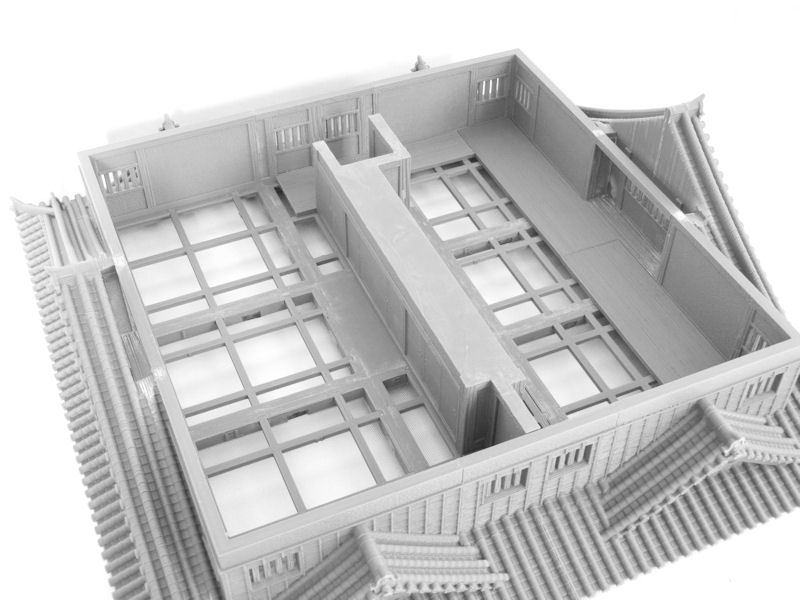
£ The central wall section can be printed in two pieces, or as one larger piece if your printer is big enough.
I'm planning on painting some fancy ornamental designs on the screen doors in the throne room, so I was careful NOT to glue this central wall to the floor. At one end of the wall there is a secret door section, and you obviously don't want to glue that in either - or it won't spin.
£ The rest of walls can be glued in as normal, as shown in the photo above, and then the bottom rails for each of the doorways can be slotted in to place.
£ The final steps for this level are printing the sliding doors and the huge number of tatami mats. The mats are a pretty tight fit, so I'd advise leaving the last row unprinted until you know whether you need to print those one millimetre shorter, for example.
And that's it! We're done!
The last level of the castle is now finished, so some very large photos of the entire castle will be unveiled tomorrow - watch this space!!


13 Comments :
Troy Lanning
2021-01-08 (Fri) 12:57PM
More Taui please. I have plans for these and yours have been some of the best to build I have worked with.
2021-01-08 (Fri) 14:03PM
Thanks, Troy! Taui are definitely high on the list!
Thomas
2021-01-08 (Fri) 23:01PM
Hi David, I love your Samurai models. I mostly play Sohei monks. That's why I would love to see more scenery for a temple (shrines, bells, pagodas) :)
2021-01-09 (Sat) 10:37AM
Thanks, Thomas! I've got those very same sohei monks sitting on my paint desk..... it's just possible they may be next on my painting list... hint, hint
Vaughan
2021-01-10 (Sun) 5:00AM
Any additions to the Samurai line would be great - shops (including swordsmith/blacksmith and sake brewery), temple, shrines!!!!!!
Andreas
2021-01-13 (Wed) 22:24PM
Necrons! More Necrons please ;-)
Vincent
2021-01-13 (Wed) 23:32PM
Tau & Necron! Though I love seeing all of the Samuri work you have created :)
Wes
2021-01-15 (Fri) 2:28AM
I'm definitely excited to see more Taui this year!
Eric
2021-01-21 (Thu) 1:05AM
Samurai Shops and Townhouses would be first on my list. (and maybe some fishing docks / fish market)
Working on replacing the boards for the game "Rise of the Kage" with 3D terrain... docks of Ryu is a merchant district in the game, so that would be great.
Thanks,
2021-01-21 (Thu) 9:14AM
Thanks, everybody, for the great comments! The next few releases will be for the Taui range (2 of them next month, hopefully), and then some ruined pieces for the samurai collection.
Then it'll be on to one or two necrontyr pieces and some bigger new samurai sets - townhouses, shops and temples..... though not necessarily in that order!
Austin
2021-02-09 (Tue) 10:20AM
Yes more samurai stuff, shops, homes markets, a bath house would be amazing.
Cliff
2021-02-11 (Thu) 12:30PM
Samurai range... stables, shops, townhomes, temple, pagodas, beds, furniture, temporary cloth pavilions used by lords while traveling, and manor homes...
2021-02-12 (Fri) 10:34AM
Thanks, Cliff and Austin! Yes, all of those projects are on the list!
Write a comment :