Join our Mailing List:

3DAlienWorlds BLOG

Samurai Pavises are available NOW!

2021-01-13 by David

The first new release of 2021 for you today - some wooden Samurai Pavises!


  Samurai Pavises  


Wooden pavises, or tate, were used by feudal-era infantry as protective shields from enemy arrows. They were large enough for one or two soldiers to take shelter behind, and were used by archers and ashigaru alike. The stand at the rear could be planted in the ground to create a stable barrier, or it could be carried in one hand.


£ This set contains 12 versions with clan markings, 1 blank version, and 1 version with double horizontal stripes at the top. All have detailed woodgrain textures on both sides, which is more pronounced at the top and bottom.


£ Wooden pavises were also hung over castle walls, to provide extra cover for troops within.


Although I suspect pavises would be placed slightly lower on the walls than in this photo (perhaps only half protruding above the top of the wall?), but they are easy enough to temporarily balance on the walls for a quick game!


£ These are the 12 clan symbols marked on the pavises. 5 of them (the more intricate ones) are projecting from the wood, and the rest are carved into the wood.


£ The sculpted wood patterns make these very quick to paint. I used a light brown spray undercoat, with a brown wash on top of that to produce the photo above. A drybrush with lightbrown and then a very light drybrush with sand-coloured paint gave them a great weathered finish. The nailheads are picked out in dark grey.


The carved clan symbols are particularly easy to paint - I just used a black wash nudged into the carved shapes, and the wash flows into the right bits.


£ In this old illustration, you can see that you could also paint the pavises in a much lighter colour (or clan colours etc), to show freshly cut wood or painted designs.


The wooden Samurai Pavises are available for download from today!


  Samurai Pavises  


Tags: samurai  release  painting 


Printing the samurai pavises

2021-01-11 by David

Something new to show you today - wooden pavises for our samurai range!
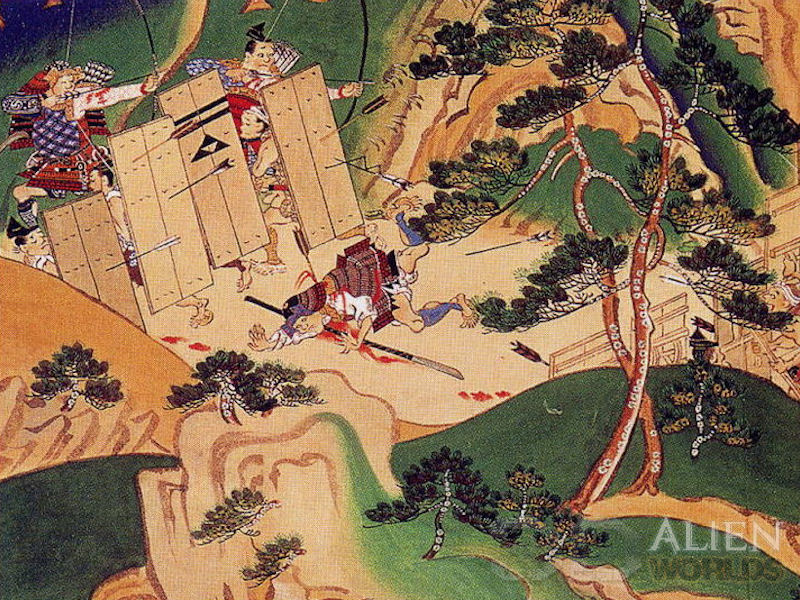


£ Wooden pavises, or tate, were used by feudal-era infantry as protective shields from enemy arrows. They were large enough for one or two soldiers to take shelter behind, and were used by archers and ashigaru alike. The stand at the rear could be planted in the ground to create a stable barrier, or it could be carried in one hand.
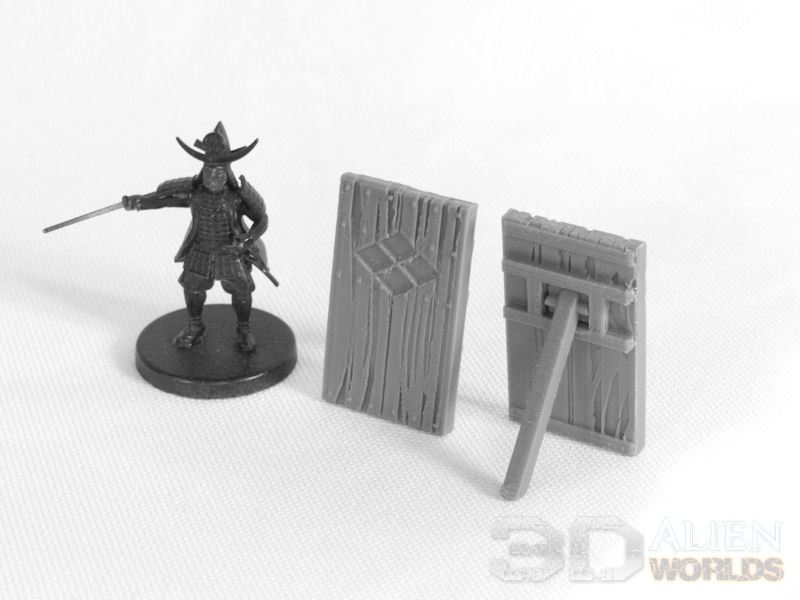


£ These pavises measure 21mm wide by 34mm tall, and are printed in two parts. They feature detailed woodgrain textures and stud fixings on the front. The woodgrain has been modelled to be slightly more pronounced at the top and bottom.
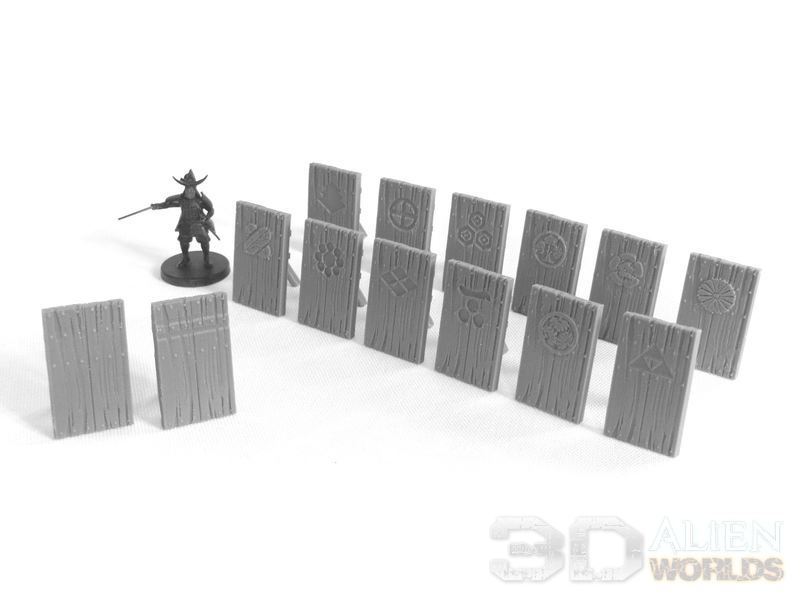


£ The set contains the 12 clan crest versions (on the right), a blank version and another version with two thin horizontal stripes (on the left).
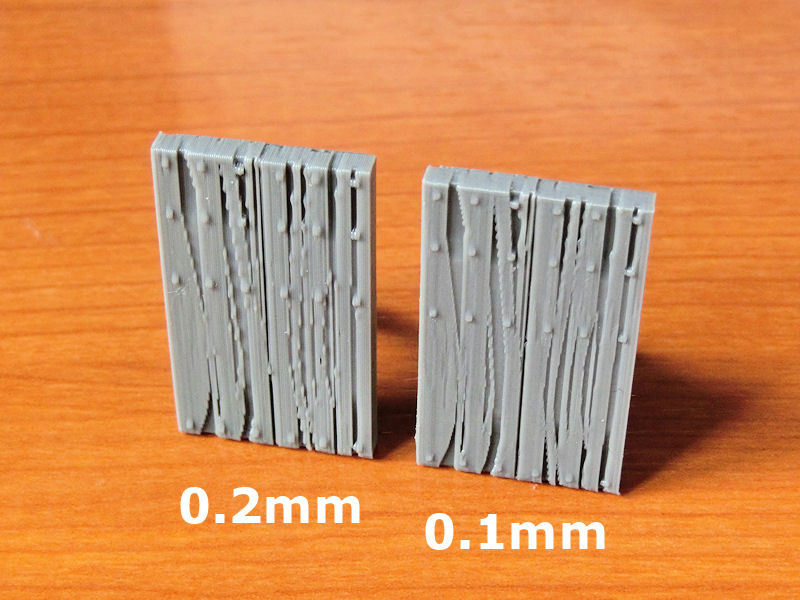


£ If you're in a hurry to print dozens of them, a 0.2mm layer resolution will produce a good result. But for models this small, I prefer to print at 0.1mm layer resolution.


£ The files can be printed on their sides, like this, with no supports. I recommend printing with a brim to stop them toppling over on the printbed.
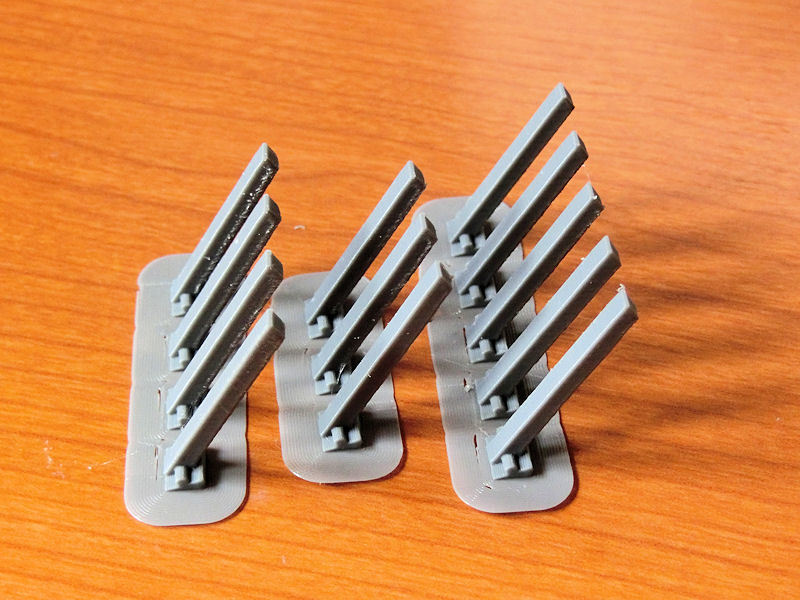


£ The pavise legs are separate pieces, and can also be printed without supports. Again, I recommend printing with a brim, as in the photo above.


£ 5 of the 12 clan symbols are very, very intricate, and proved difficult to cut into the pavise. As you can see from the photo above, the engraved versions (on the left) didn't print very cleanly on my FDM printer, so for those 5 clans I decided to emboss the symbols instead (shown on the right).


These should be very quick paintjobs, so the pavise set will be officially released in a few days! Watch this space....


Tags: samurai  printing 


Happy New Year!

2021-01-07 by David

Happy new year to you all! We're entering into our 3rd year of making these 3D-printed models (as of this April), and this year's going to be a good one!


(... funnily enough, I'm still waiting on the Kickstarter-backed 3D printer that started off this new hobby after 3 years (!), but that's another story!)


With the huge castle project taking up at least half of 2020 last year, we can finally move on to new projects and new ranges this year!


This pic is a brand new torii gate I came across last week, when I visited my local shrine during the new year break. You usually see them either in unpainted stone, or red-painted wood, and this was the first natural wood torii gate I've ever seen. It even has a gorgeous shining copper roof! Lovely! I thought it might give some of you inspiration for painting?


So, what would YOU like to see this year? More samurai? More sci-fi Taui? More monolithic Necrontyr? How about a vehicle or two? Let us know in the comments....


Tags:  


Samurai Castle is available NOW!

2020-12-13 by David

Construction of this massive model has been a long time coming, but we're happy to announce that the new Samurai Castle is finally available for download from today!!


  Samurai Castle  


Time for some pics......


£ Battle stations, everybody!! The castle is under attack!


You'd have to be pretty brave to attack this enormous fortress, which combines perfectly with the existing sets - the corner tower, the gatetower, and the castle walls set. You could cover an entire table with fortifications and have this giant castle as a stunning centrepiece!


£ Covered in detailed wood panelling, the castle also features these ornate roof shapes - which slot together level by level.


£ Quite an imposing view for an attacker - the ultimate statement of feudal Japanese power!


£ But it's not just the castle's exterior which is fully detailed - the interior of each level also features authentic layouts which you can game across.


In this photo you can see that the Mori clan's red-armoured troops have gained access to the enemy's castle, and are fighting their way up inside the 1st level!


£ Ninja assassins infiltrate the 2nd level's throneroom, in an attempt to capture the Lord of the castle.....


£ ... but Lord Hosokawa is ready for them, and slips away through a secret door panel. His castle guards wait on the other side with loaded guns!


£ More enemy warriors force their way up to the rooms of the 3rd level, where the personal maiden-guards of the princess prepare to fight to the death!


£ Ninja assassins finally corner the Lord of the castle on the 4th level living quarters, and their employer steps forward to claim his revenge.


"There's no escape this time...  brother!"


£ The last of the guards valiantly tries to protect her mistress from the ninja assassins on the top 5th level, but the Princess is not without her own deadly skills....


The new Samurai Castle is available for download from today!!


  Samurai Castle  


Tags: samurai  release 


Painting the samurai castle

2020-12-11 by David

It took only 3 days to paint the castle, inside and out, but those were looooong days!


Cheap spray cans can be used to do the bulk of the work, and then I used cheap acrylics to drybrush and add details, and then finally some home-made washes to finish up. Here are the major stages...


£ Before painting the model, it's probably a good idea to check it for gaps between sections and fill those in if necessary. Thankfully, gaps on the walls and roof sections are mostly hidden, so the only big gaps were in the base. I used wood putty filler smeared on thickly, and smoothed over with a (very dirty) finger!


£ First stage of the painting process was to spray the underside of each level with matt white. Honestly, this will save you SO much time! I did two coats of spray to make it a clean white cover.


Once that was dry, I used masking tape to close the holes for the stairs, and then flipped them over and sprayed each layer with a light brown matt. This is good for the exterior wood, and also works well for the interior beams. 


£ So now the bottom of each section was white, and the top of each section was brown. Only one more major colour remained - grey for the roof tiles. After taping over the interior of each section (with sheets of paper) and roughly masking the exterior wood, I sprayed each section with a matt charcoal grey.


Japanese castles, by the way, can also be seen with green roof tiles (see Osaka castle) and red roof tiles (see Shuri castle in Okinawa), but the majority seem to be grey/black. So have a look around before choosing your colours!


£ The base section was sprayed in matt black, and roughly painted over with a mid-grey (Neutral Grey by Americana Deco-Art).


The base was completed with a black wash, then a light beige drybrush followed by a light grey drybrush, and then finally some rocks were washed with browns and reds to make it more interesting, and then green wash at the bottom of each wall.


£ Since the spray cans (and my masking tape) were done pretty roughly, I needed to tidy up a few places. I used this Sable Brown as a pretty close match to my spray colour, to neaten up the edges of the wood next to the rooftiles, and paint in the wood beams at the gable ends and the gateway.


£ In this photo you can see that the edges of this roof section (shown upside down) have white circles at the ends of each row of tiles, but these obviously need to be grey. Again, I found a very close match to my spray colour, and painted those in with a 1cm wide brush in Charcoal Grey.


With that, the basic colours of my castle were done!


On to the washes......


£ This castle is BIG. Using expensive paints and washes can get expensive! So I really, really recommend mixing your own washes for this model, to save yourself some money. This is actually pretty easy, and you'll only need a bottle of acrylic ink (black, brown etc), a matte medium (only a few drops), a drop of dish washing liquid to help it flow, and some water.


There's a guide here to making your own washes, on our club site:

https://www.kitaqgamers.com/page.php?ID=201&La=E


Anyway, I made myself a pot of black wash, and painted over the roof tile sections with a large brush. On the photo you can see that I also tried it on the wood section (on the left), but decided to revisit that later with a stronger wash to produce a darker wood.


£ Japanese castles panelled in wood tend to be very dark (but obviously it's YOUR castle, so you can choose!), and I tried to duplicate this by mixing much more black ink into the wash. This produced the very dark wash as shown above - which worked very well to show the woodgrain.


After that was dry, I painted the top of each exterior wall white (2 coats), and also filled in the gable end walls in white between the wood beams.... but I forgot to take a photo! It was quite tedious, to be honest, especially knowing you have to do it twice!


A final touch was to lightly drybrush the roof sections in a mid-grey, with a 2" brush! This picks out the ridges and bumps on the roof tiles beautifully. The exterior was now finished!


£ Most Japanese tatami mats tend to be light straw-coloured when they are new, and darker yellows when they are older mats. However, castles would usually have super fresh tatami mats, and you can choose to paint these this light mint-green colour. I thought that would be a nice contrast with the interior walls, which I planned to do in a pale sand colour.


I used Soft Sage by Americana to paint all the mats in the castle, but found that they need a little darkening to bring out the texture of the mats. For that, I diluted a green wash (by Games Workshop) with plenty of water, and brushed that quickly over all the mats. This made the texture a little splotchy (you can see this in the row of mats on the right), so I went back over the centre of each mat with a little Soft Sage again, leaving the darker green washed areas to the sides.


£ The last step for the tatami mats is to paint the fabric strips on each side. I will admit this was painfully tedious! I chose green, but other common colours would be blue, navy blue, grey or black. If you want to go nuts with gold flecks in the fabric, be my guest!


I hand painted these, and it took ages! Looking back, I realise that using a paint pen would have saved lots of time. Oh well!


£ For the interior walls, I used this sand colour applied with a 1cm brush (with a very straight edge!). One day I might go back and give these wall panels a sepia wash for some depth, but I ran out of time a little!


£ This castle needs loads of sliding doors, and I needed to speed through this step. So I spray undercoated both sides in a cream colour, and then lined up all the doors in rows.... and zoomed along each row quickly with a gold spray can! This gave the effect of gold flecks, which is a common design on Japanese doors.


Again, do some image searches for sliding doors. Some have thick stripes across the middle, some are more plain, and some are extremely ornate. I chose "quick and easy"!!


£ Trying to hand paint the edges of those doors would be very time consuming, and I don't have the patience or the skill to keep my hand steady! So I cheated and used a paint pen. Well, two, in fact.


I used a paint pen with a thicker flat 5mm tip to do the edges of each door, and then a thinner round tip to colour the door 'handles'. You can obviously choose whatever colour you need (or wood), but I chose black - probably the most common colour for sliding doors.


£ The last step to complete the castle was to add some "bling" to the throne room. I had painted all the other doors in the castle with my quick and easy two-tone spray method, so for the 9 doors in the throne room I wanted to add a very ornamental design.


You could try hand-painting this with lots of gold if you like, but I didn't have the luxury of time - so I cheated and photoshopped this design together to print out. Then I simply cut each panel to size, pushed my finger over the door handle to get an imprint, cut out the circle over each door handle, and glued it into place.


Just in case you'd like to use it, you can download this design here:


Throneroom doors PDF >


So that's it! The castle is finished! This weekend we'll be seeing those finished photos, and you can see for yourself how the whole thing looks.....


Tags: samurai  painting 


MORE >>


Join our Mailing List: