3d-printable terrain for all your samurai wargaming needs


| << Wiring the stone lantern for LEDs 2020-04-25 | Painting the samurai teahouse set >> 2020-04-29 |
We have some great new printed items to show you today - the samurai Teahouse Set!!

£ Here's the entirety of the teahouse set. The main components are the lovely teahouse, of course, plus a detailed rock garden and surrounding bamboo and stick fence. Lovely set, right?
So on with the printing and assembly instructions.....

£ You start assembly with the floor of the teahouse, which is printed as several tatami mats. These are designed to be printed side-on, so that the print lines combine to form a perfect tatami texture. A central half-tatami includes a small pit for the tiny kettle.

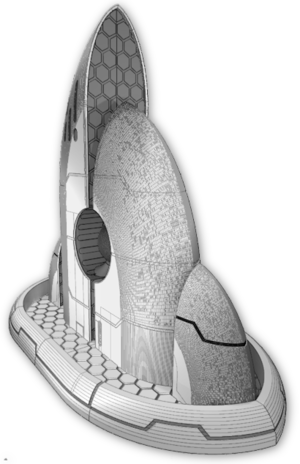
£ Next item to be printed is the teahouse itself, which is a large one-piece print. Every surface is fully textured, and only one part requires a print support. To save time, we built this print support (for the small doorway) in to the model itself, so you will need to carefully remove this piece as shown in the photo above.

£ Apologies for the rough quality of the pic above - it was hard to get a good angle for this comparison photo.
The wall section on the left was printed at 0.2mm layers, while the section on the right was printed at 0.1mm layers. We'd recommend printing at 0.1mm layers if you have the time, but the difference to the end result is not very much. Perhaps a little clarity on the scroll's kanji characters and a smoother wall?

£ Once the extra balcony and tokonoma alcove floors have been printed, you can glue them in place. I'm choosing to leave the tatami floor section unglued for now, so it can be painted separately.

£ You'll notice that the wall featuring the circular window also contains a thin slot - this is designed for paper to be inserted later on.

£ The roof is printed in two halves, and has a few simple built-in supports that will need to be removed, as shown.

£ The roof overhangs the walls by quite a bit, as you'll find on real teahouses. The shape is also subtly curved, with a wood and bamboo cap.

£ The roof also provides cover for the rear balcony, which can be left open as in the photo above....
£ .... or you can insert screen doors. I chose to print these versions of the screen doors, and plan to glue thin paper to them later on.
Fences:
£ The fences are one-piece prints, but due to their construction they will take a while to print. You might find small webs of filament, even with retraction turned on! You can remove these by passing a flame very quickly underneath the webs. Don't melt the fence, though!

£ The other thing I find effective in preparing the fences for paint was to scrub them with a thin wire brush. This helps to remove any extra bumps or strings.

£ The fence gateway is printed in 4 pieces. The two thatch roof halves can be printed without any print supports, and there are 3 versions of the sliding gate doors.

£ All of the fence pieces include holes at either end for small 5mm magnets. It's a bit of effort to make sure all the magnet polarities match up, but I strongly recommend adding these as they clip together and hold the pieces securely during games.

£ The fences all have wooden posts at regular intervals, which are tied to the horizontal bamboo pieces with rough twine. The sticks are then placed between the bamboo pieces to create a simple rustic fence.

£ The set includes a winding path too, leading from the gateway to the small doorway of the teahouse. The surface is textured, and you could paint this as simple brown dirt, gravel and stones, or even springy moss between the stepping stones.

£ What small Japanese garden would be complete without a few carefully arranged rocks? This collection of rocks is a large one-piece print, and gives good sized cover for ninja assassins or besieged guests. I'm planning to add moss to mine!

£ A small stone bench for waiting guests is usually situated near the teahouse, in addition to this small water feature. You might be familiar with this piece, known as a deer-scarer in English.
Please note that the diagonal bar circled in red in the picture above is a print support necessary for printing as one piece, and should be carefully removed with cutters.

£ I was oddly pleased that this model printed first attempt! It's very small and delicate, but adds so much to the garden atmosphere!

£ One last item included in the teahouse set is this stone lantern. Yesterday's blog contained simple instructions on how to wire the lantern for the LED light....
£ ... which looks like this! Cute little lighting option, don't you think?
£ This set contains quite a bit of uniquely Japanese terrain, and together makes a great diorama!

£ All the pieces are on the paint desk now, for a full release this coming week!
| << Wiring the stone lantern for LEDs 2020-04-25 | Painting the samurai teahouse set >> 2020-04-29 |